
Unlock the Secrets to Crafting an Irresistible Airbnb-like Platform Prototype
A step-by-step guide to visualizing your app idea with compelling mockups and functional no-code prototypes, turning vision into reality.
Creating a compelling mock-up or prototype for a platform and app as multifaceted as Airbnb can seem daunting. However, with the right approach and tools—many of which require no coding expertise—you can effectively visualize, test, and present your innovative idea. This guide will walk you through the process, from initial planning to showcasing a polished representation of your platform.
Key Insights for Your Prototyping Journey
- Clarity is King: Before diving into design, meticulously define your platform's core features (like listings, search, booking) and map out the essential user journeys for both guests and hosts.
- Leverage Powerful Design Tools: Utilize industry-standard software like Figma for creating detailed visual mockups and interactive click-through prototypes that bring your UI/UX concepts to life.
- Embrace the No-Code Revolution: Explore versatile no-code platforms such as Bubble to build surprisingly functional prototypes, complete with databases and workflows, without writing a single line of code.
Understanding the Building Blocks: Mockups vs. Prototypes
Before we delve into the "how," it's crucial to understand the distinction between a mockup and a prototype, as they serve different purposes in the development lifecycle.
What is a Mockup?
A mockup is a static, high-fidelity visual representation of your app's design. It focuses on the look and feel, showcasing the color schemes, typography, imagery, and overall aesthetic. Think of it as a detailed visual blueprint. Mockups are excellent for:
- Communicating the visual design.
- Getting feedback on aesthetics and layout.
- Serving as a guide for developers.
What is a Prototype?
A prototype takes a mockup a step further by adding interactivity. It simulates the user experience, allowing users to click through screens, interact with elements, and get a feel for the app's flow and basic functionality. Prototypes can range from simple click-through models (created in tools like Figma) to more functional versions built on no-code platforms. Prototypes are invaluable for:
- Testing user flows and navigation.
- Gathering feedback on usability.
- Demonstrating core functionality to stakeholders or potential investors.
- Identifying UX issues early in the process.
For an Airbnb-like platform, a prototype might allow users to simulate searching for a property, viewing listing details, and initiating a booking request.
Core Features to Showcase in Your Airbnb-like Platform Prototype
To create a compelling representation, your prototype should highlight the essential functionalities that define an Airbnb-like experience. Focus on demonstrating:
- User Registration and Profiles: Separate flows for guests and hosts, including profile creation and management.
- Property Listings: Detailed views of properties with high-quality images, descriptions, amenities, pricing, and host information.
- Search and Filtering: Intuitive search by location, dates, number of guests, and advanced filters for amenities, property type, price range, etc.
- Booking System: A clear process for checking availability, requesting a booking, and understanding the payment steps (even if non-functional in a basic prototype).
- Messaging System: A way to simulate communication between guests and hosts.
- Reviews and Ratings: Displaying how user feedback would be integrated.
- Map Integration: Showing how properties would be displayed geographically.
- Host Dashboard: Basic features for hosts to manage their listings and bookings.
You don't need to build out every single feature in exhaustive detail, especially for an initial prototype. Prioritize the core user journeys that best communicate your platform's value.
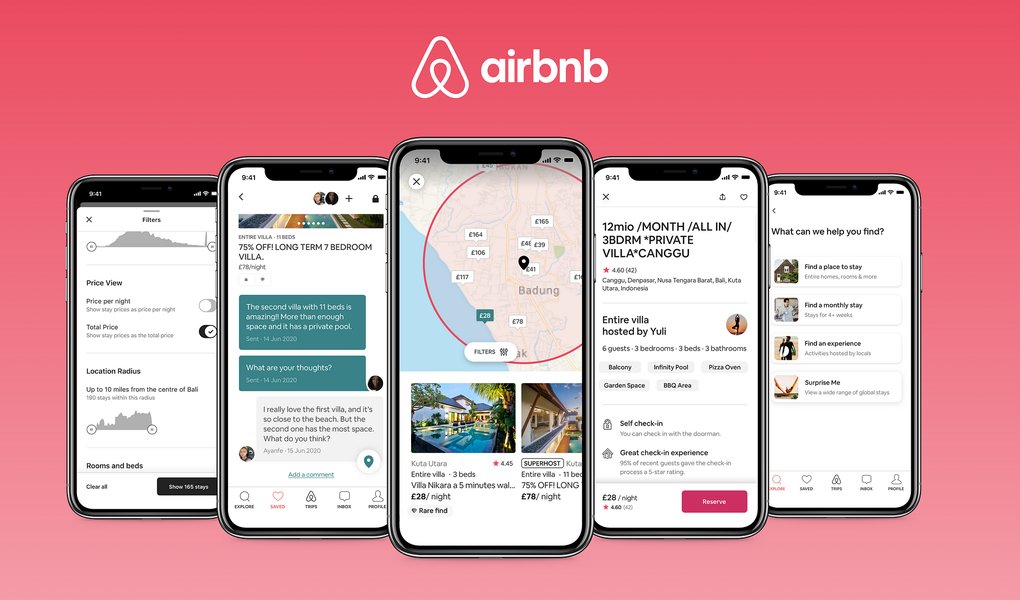
High-fidelity UI design showcasing visual elements and layout, crucial for a compelling prototype.
Your Step-by-Step Guide to Building a Compelling Prototype
Let's break down the process into manageable phases, incorporating best practices and tool recommendations.
Phase 1: Planning and Defining Scope
Solidify Your Vision
Before you touch any design tool, get crystal clear on what you want to build. This involves:
- Identifying Your Target Audience: Who are your ideal guests and hosts? What are their needs and pain points?
- Mapping User Flows: Sketch out the step-by-step journeys users will take. For example:
- Guest Journey: Landing page -> Search -> View Listing -> Book -> Confirmation.
- Host Journey: Sign Up -> Create Listing -> Manage Bookings -> Receive Payment.
- Prioritizing Core Features: Decide which features are essential for your prototype to effectively demonstrate your concept. Don't try to build everything at once.
Phase 2: Choosing Your Toolkit
The market is rich with tools to help you design and prototype. Your choice will depend on your technical skills, desired fidelity, and specific goals.
Design and Wireframing Tools:
- Figma: A collaborative, browser-based interface design tool. Excellent for wireframing, high-fidelity mockups, and creating interactive prototypes. It has a vast library of community resources and UI kits.
- Sketch: (MacOS only) A popular vector graphics editor for UI/UX design, similar to Figma in many respects.
- Balsamiq: Focuses on low-fidelity wireframes, helping you quickly sketch out layouts and user flows with a hand-drawn feel.
Interactive Prototyping Tools:
- Figma (again!): Its built-in prototyping features allow you to link screens, add transitions, and create clickable demos.
- Marvel: A user-friendly platform for turning sketches, mockups, and designs into interactive prototypes. Good for collaboration.
- InVision: Another popular choice for creating interactive prototypes and facilitating design collaboration and feedback.
- Justinmind: Offers more advanced interactions and conditions, suitable for complex prototypes that require dynamic content or data simulation.
No-Code Platforms for Functional Prototypes:
These platforms allow you to build web and mobile applications with databases and workflows, without writing code.
- Bubble: Highly recommended for building complex web applications like marketplaces (e.g., Airbnb clones). It offers visual programming for front-end design, database management, and workflow logic.
- Adalo: Focuses on building native mobile apps and web apps visually. Simpler to learn than Bubble for certain use cases.
- toddle: A newer entrant focused on web app development, offering a component-based approach and flexibility.
Mockup Generators (for Presentation):
Once you have your designs, these tools help you present them in realistic contexts (e.g., on a phone screen, laptop, or tablet).
- Placeit: Offers a vast library of mockup templates for various devices and scenarios.
- Mockuuups Studio: A desktop app that lets you quickly generate device mockups by dragging and dropping your designs.
- Canva: Includes an AI mockup generator and various templates for showcasing your app visuals.
- Previewed.app: Specializes in creating 3D app mockups and animations.
Phase 3: The Creation Process
Step 1: Wireframing (Low-Fidelity)
Start by creating low-fidelity wireframes. These are basic structural blueprints of your app screens, focusing on layout, content hierarchy, and user flow, without worrying about colors or detailed graphics. Tools like Balsamiq or even pen and paper are great for this stage. Figma can also be used for quick digital wireframes.
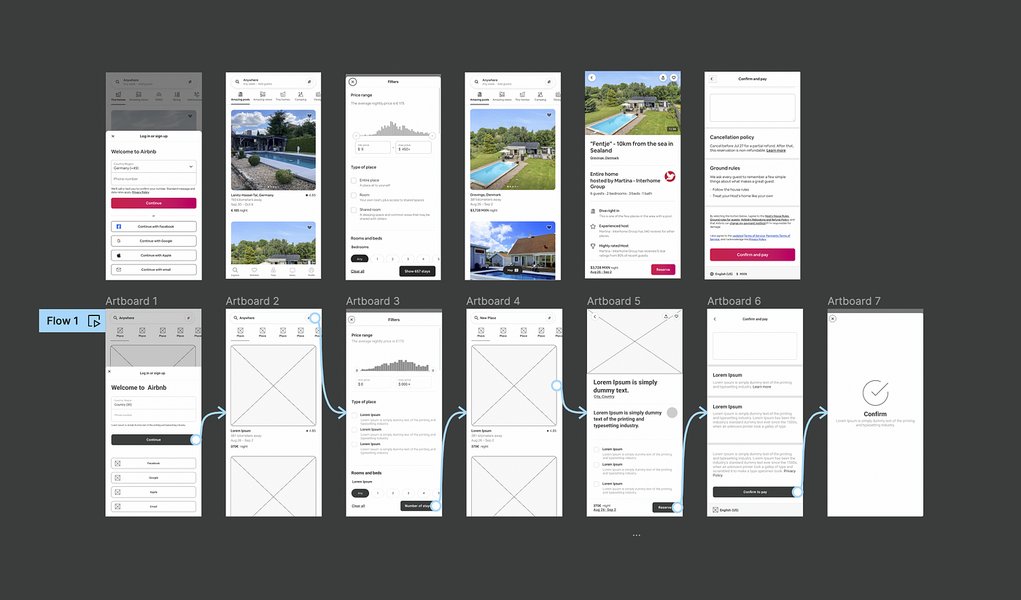
Example of low-fidelity wireframes, crucial for mapping out app structure and flow early on.
Step 2: High-Fidelity Design (Mockups)
Once your wireframes are approved, move on to creating high-fidelity mockups. This is where you apply your branding, color palette, typography, imagery, and detailed UI elements. Figma is an excellent choice here. Aim for pixel-perfect representations of what the final app will look like. Consider using existing Airbnb UI kits or templates as inspiration or a starting point to save time.
Step 3: Interactive Prototyping (Click-Through)
Bring your static mockups to life by adding interactivity. Link screens together to simulate navigation. Define hotspots for buttons and interactive elements. Add basic transitions to mimic app behavior. Figma, Marvel, or InVision are great for this. The goal is to create a clickable prototype that users can navigate to test the flow and user experience.
Step 4: Building a Functional No-Code Prototype (Optional, but Powerful)
If you want to demonstrate more than just visual flow, and actually showcase some working functionality (like users creating accounts, listings appearing from a database, or simulated bookings), a no-code platform like Bubble is invaluable. This involves:
- Designing your UI using the platform's visual editor.
- Setting up a database to store information (e.g., users, listings, bookings).
- Creating workflows to define what happens when a user interacts with an element (e.g., "when 'Book Now' button is clicked, create a new booking entry").
While this has a steeper learning curve than simple click-through prototypes, it provides a much more realistic and compelling demonstration of your platform's capabilities.
Phase 4: Making it Compelling and Presenting
Visual Realism and Consistency
Use high-quality images (even stock photos for a prototype) and maintain a consistent design language throughout your app. A visually polished prototype is more engaging.
Smooth and Intuitive Interactivity
Ensure that navigation is clear and interactions feel natural. Test your prototype thoroughly yourself before showing it to others.
Contextual Presentation with Device Mockups
Use tools like Placeit or Mockuuups Studio to showcase your app screens within realistic device frames (smartphones, tablets, laptops). This helps stakeholders visualize the app in a real-world context.
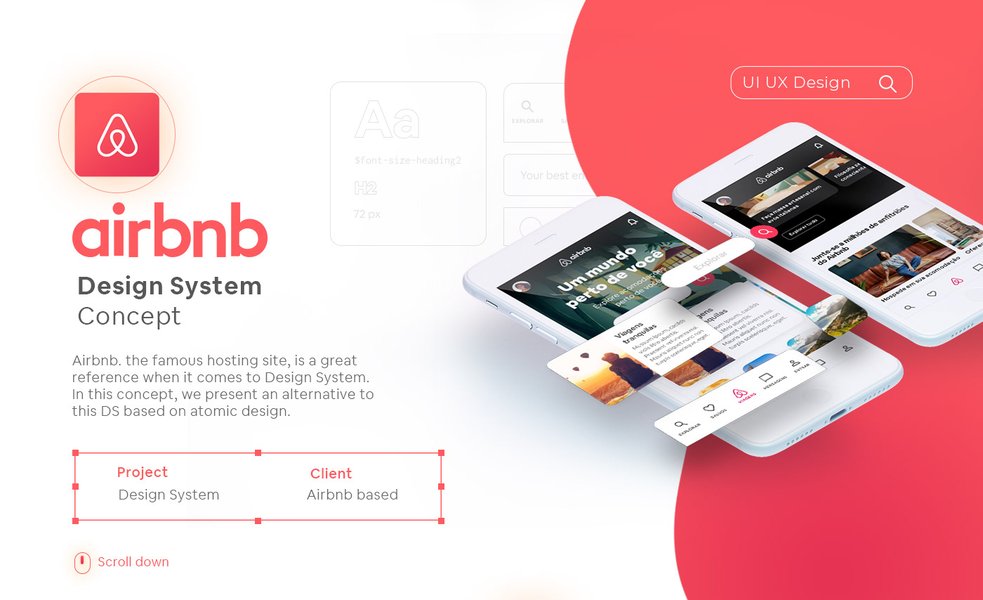
Presenting an app design within a realistic device mockup enhances visual appeal and contextual understanding.
Focus on Key User Journeys
When presenting, guide your audience through the most critical user flows to highlight the value proposition of your platform.
Gather Feedback and Iterate
The primary purpose of a prototype is to learn. Share it with potential users, stakeholders, or mentors to gather feedback. Be prepared to iterate on your design based on this input.
Visualizing Your Prototyping Approach
Different prototyping methods offer varying balances of speed, cost, realism, and required skill. The radar chart below compares common approaches for building an Airbnb-like platform prototype. Consider these factors when deciding which path is best for your current needs and resources. Each approach has its strengths, from quickly visualizing ideas with static mockups to building highly interactive, data-driven experiences with no-code platforms or even a coded Minimum Viable Product (MVP).
This chart helps illustrate that while a Coded MVP offers the highest realism and scalability, no-code functional prototypes provide an excellent balance for achieving high realism and quality feedback with moderate speed, cost, and technical skill requirements, making them ideal for many entrepreneurs and startups.
Structuring Your Prototype Development: A Mindmap
To better visualize the entire process, here’s a mindmap outlining the key stages and components involved in building your Airbnb-like platform prototype. This can serve as a roadmap as you navigate from idea to a presentable concept.
(Listings, Search, Booking, Profiles)"] UserFlows["Map User Flows
(Guest & Host Journeys)"] TargetAudience["Define Target Audience
& Needs"] Phase2["Phase 2: Choose Tools"] DesignTools["Design & Wireframing
(Figma, Sketch, Balsamiq)"] InteractiveProtoTools["Interactive Prototyping
(Figma, Marvel, InVision)"] NoCodePlatforms["No-Code Functional Platforms
(Bubble, Adalo, toddle)"] MockupGenerators["Mockup Generators
(Placeit, Canva, Mockuuups Studio)"] Phase3["Phase 3: Create"] Step3a["Wireframing
(Low-Fidelity Sketches)"] Step3b["High-Fidelity Design
(Visual UI Mockups)"] Step3c["Interactive Prototype
(Clickable Flows & Transitions)"] Step3d["(Optional) Functional No-Code Build
(Workflows, Database Logic)"] Phase4["Phase 4: Present & Iterate"] VisualAppeal["Compelling Visuals
(Realism, Consistency)"] DeviceShowcase["Use Device Mockups"] UserFeedback["Gather User Testing & Feedback"] IterateDesign["Iterate on Design & Functionality"]
This mindmap shows how each phase builds upon the last, ensuring a structured approach to developing a prototype that effectively communicates your vision.
Focus on No-Code: Building Functionality Without Code
No-code platforms have revolutionized how quickly and affordably functional applications can be prototyped, and even launched. For an Airbnb-like platform, tools like Bubble are particularly powerful.
Benefits of Using No-Code for Your Prototype:
- Speed: Develop functional prototypes much faster than traditional coding.
- Cost-Effectiveness: Significantly lower development costs.
- Accessibility: Enables non-technical founders to build and test their ideas.
- Rapid Iteration: Make changes and updates quickly based on feedback.
- Validation: Test core assumptions about your business model with a working prototype.
How Bubble Can Help Build an Airbnb Clone:
Bubble provides a visual development environment where you can:
- Design the User Interface: Drag and drop elements to create your app's pages.
- Manage Data: Set up your own database for users, listings, bookings, reviews, etc.
- Define Logic with Workflows: Create rules for what happens when users interact with your app (e.g., "when a user clicks 'Search', display listings that match criteria").
- Integrate with External Services: Connect to APIs for payments (Stripe), maps (Google Maps), and more through plugins.
While there's a learning curve, the ability to create a truly functional prototype of a complex platform like Airbnb without writing code is a game-changer for many entrepreneurs.
This video tutorial demonstrates how to build an Airbnb clone using the no-code platform Bubble, showcasing the power of visual development for creating complex marketplace apps.
Watching tutorials like the one above can provide practical, step-by-step insights into how no-code tools can be leveraged to bring your Airbnb-like platform idea to life, allowing you to build features like dynamic search, user profiles, and listing management with visual programming.
Comparing Popular Prototyping Tools
Choosing the right tool depends on your specific needs, from simple visual mockups to fully functional no-code applications. Here's a comparison of some popular options:
| Tool | Type | Key Features | Best For | Learning Curve |
|---|---|---|---|---|
| Figma | Design & Interactive Prototype | Collaborative vector editing, UI kits, component libraries, built-in interactive prototyping, large community, cross-platform. | UI/UX design, high-fidelity mockups, interactive click-through prototypes, team-based projects. | Moderate |
| Bubble | No-Code Platform | Visual programming, database management, complex workflows, responsive design, plugin ecosystem, API integration. | Building functional web applications, MVPs, marketplaces like Airbnb, data-driven platforms. | Steep (for complex applications) |
| Marvel / Moqups | Interactive Prototype | User-friendly interface, wireframing tools, basic to moderate interactivity, collaboration features, rapid prototyping. | Quickly creating and sharing interactive prototypes, validating user flows, team feedback sessions. | Easy to Moderate |
| Placeit / Canva | Mockup Generator | Extensive template libraries, device mockups (phones, laptops, etc.), AI-powered generation, ease of use, social media integration. | Presenting designs in realistic contexts, creating marketing visuals, showcasing app UIs on various devices. | Easy |
| Visily | AI-assisted UI Mockup Tool | AI-powered screen generation from text or sketches, pre-built UI kits, drag-and-drop interface, collaborative features. | Rapidly creating UI mockups with AI assistance, converting wireframes to high-fidelity designs, quick ideation. | Easy to Moderate |
This table provides a snapshot to help you select tools that align with your project's phase and your team's skillset. Often, a combination of tools is used: Figma for design and click-through prototypes, then Bubble for a more functional no-code version, and Placeit/Canva for presentation visuals.
Frequently Asked Questions (FAQ)
Recommended Next Steps & Deeper Dives
Once you've grasped the fundamentals of creating a prototype, consider exploring these related areas to further enhance your skills and project:
- Explore advanced prototyping techniques for complex user interactions in Figma or Bubble.
- Learn how to design and conduct effective user testing sessions for your app prototype.
- Discover strategies for successfully pitching your app idea to investors using a compelling prototype.
- Investigate the possibilities and limitations of scaling a no-code application beyond the initial prototype stage.
References
This guide synthesized information from various expert sources. For further reading and tool exploration, consider these resources:

Last updated May 12, 2025