
Indepth Explanation about Arduino
Uncover the Essentials of Arduino Setup, Programming, and Best Practices
Key Highlights
- Comprehensive Overview: Explore Arduino’s hardware, software, and its gradual approach from basic to advanced projects.
- Essential Setup & Programming: Detailed guidance on installing the IDE, writing your first sketch, and practical coding conventions.
- Best Practices: Learn efficient code organization, memory management, debugging strategies, and power optimization techniques.
Introduction to Arduino
Arduino is an open-source electronics platform designed to enable the rapid development of interactive electronic objects. It combines user-friendly hardware with an easy-to-use software environment. This makes it accessible to hobbyists, educators, students, and professionals alike who wish to engage in creative projects or prototype innovative solutions.
At its fundamental level, Arduino consists of a microcontroller board equipped with input/output (I/O) pins that allow it to interact with various components such as sensors, actuators, and displays. Complementing the hardware is the Arduino Integrated Development Environment (IDE), which simplifies writing, compiling, and uploading code to the microcontroller.
Setting Up Your Arduino
Hardware Setup
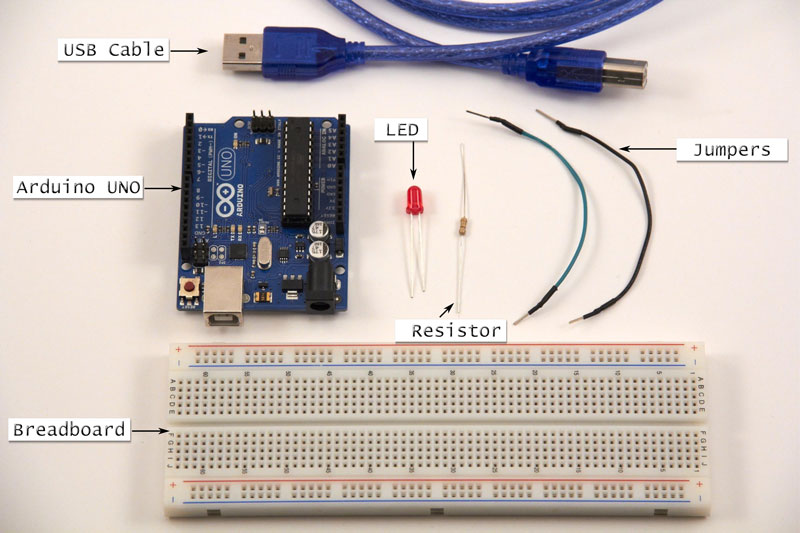
The first step in your Arduino journey is to choose an appropriate Arduino board based on your project requirement. While many models exist, the Arduino Uno is highly recommended for beginners. It offers a balanced mix of functionality and simplicity with features like digital and analog I/O pins, USB connectivity, and sufficient power management circuits.
Components Breakdown
Key hardware components include:
- Microcontroller: The brain of your board, executing code and controlling connected devices.
- Digital Pins: Used for binary outputs (HIGH/LOW) and reading digital inputs.
- Analog Pins: Enable the reading of sensor data with a resolution that typically ranges up to 1023.
- USB Port: Facilitates communication between your board and computer, simplifies power supply and program uploading.
Software Installation
Installing the Arduino IDE is equally crucial. The IDE is available for multiple operating systems, including Windows, Mac, and Linux. To get started:
- Download the IDE from the official Arduino website.
- Follow the installation instructions specific to your operating system.
- Connect your board to your computer using a USB cable. The necessary drivers are usually installed automatically, though manual installation might sometimes be required.
- Select the correct board model and the corresponding communication port from the “Tools” menu in the IDE.
Programming Fundamentals
Arduino programming is built on a simplified version of C/C++ programming. The code written for Arduino is referred to as a “sketch”. Every Arduino sketch is structured around two essential functions:
Core Functions
setup()
The setup() function is executed once when the board powers up or resets. Its main purpose is to initialize variables, configure pin modes (e.g., input or output), and set up communication protocols such as serial communication.
loop()
After setup(), the loop() function takes control, running continuously and managing the program’s main operations. Anything you want your Arduino to do repeatedly should be included within this function.
Writing Your First Sketch
A common introductory example is the “Blink” sketch, which turns an LED on and off at one-second intervals. Here is a simplified version of the code:
// Define the LED pin
const int LED_PIN = 13;

void setup() {
    // Initialize the digital pin as an output
    pinMode(LED_PIN, OUTPUT);
}

void loop() {
    // Turn on the LED
    digitalWrite(LED_PIN, HIGH);
    // Wait 1 second
    delay(1000);
    // Turn off the LED
    digitalWrite(LED_PIN, LOW);
    // Wait 1 second
    delay(1000);
}
This example demonstrates the core concepts of both pin configuration and fundamental delay-based timing. Experimenting with such sketches helps build confidence in using the platform.
Advanced Arduino Practices
Code Organization and Maintenance
As your projects grow in complexity, maintaining an organized and modular codebase becomes essential. Here are guidelines to follow:
- Function Breakdown: Decompose your code into smaller, reusable functions instead of one large monolithic loop. This not only simplifies debugging but also promotes code reuse.
- Meaningful Names: Adopt expressive and descriptive names for variables and functions. This practice manages complexity and improves code readability.
- Commenting and Documentation: Incorporate comments to describe the function of key code sections. This documentation is invaluable for debugging and future development, especially when returning to older projects.
Memory Management and Efficiency
Arduino boards typically have limited RAM and processing power. Efficient memory management is critical when working within these constraints:
- Static Memory Allocation: Favor static or fixed memory allocation over dynamic allocation since dynamic memory can lead to fragmentation.
- Data Types: Choose data types that match your requirements. For instance, if a variable does not require a large range, using an int might be more efficient than a long.
- Avoiding Unnecessary Computation: Optimize your loops and algorithms to minimize unnecessary cycles. Leveraging interrupts instead of busy waiting can conserve processing time and power.
Debugging Techniques
Debugging is an integral part of programming. When developing with Arduino, these strategies can be highly effective:
-
Serial Communication: The Serial Monitor, initiated by
Serial.begin()in the setup(), is an invaluable tool. UseSerial.print()to output variable values and program states for real-time debugging. - Incremental Testing: Build and test your project in small segments. This approach limits the scope of potential issues and simplifies troubleshooting.
- Error Checking: Implement error-checking routines and condition tests to handle unexpected sensor values or process flow abnormities gracefully.
Circuit Building and Component Integration
Arduino doesn’t operate in isolation; it works together with various electronic components. Successful projects require solid understanding of circuit building:
- Breadboards: These prototyping boards allow you to build and test circuits quickly without soldering. They are ideal for temporary circuit setups.
- Jumper Wires: Used for making connections between the Arduino board and peripheral components. Ensure that your wiring is neat to avoid accidental short circuits.
- Component Protection: Use proper resistors and components such as LEDs, sensors, and motors to safeguard your circuit and prolong the lifespan of your board.
Power Management
For projects involving battery power or remote applications, managing energy consumption is critical:
- Power Sources: Understand the differences between powering your Arduino via USB and using an external power supply. Each method has its benefits and limits.
- Sleep Modes: Implement sleep or low-power modes to significantly reduce energy consumption when the microcontroller is inactive.
- Efficient Components: Use sensors and peripherals designed for low power consumption to maximize battery life.
Practical Examples and Advanced Uses
Real-world Application Projects
Arduino’s versatility lends itself to a wide range of applications—from simple DIY projects like automated plant watering systems to complex integrations such as home automation and robotics. Below is a table summarizing common projects and related core components:
| Project Type | Key Components | Example Applications |
|---|---|---|
| Basic LED Control | LED, Resistors | Blinking lights, status indicators |
| Sensor Integration | Temperature, Humidity Sensors | Weather stations, environmental monitors |
| Motor Control | Servo, DC Motors, Motor Drivers | Robotics, remote-controlled vehicles |
| Wireless Communication | Wi-Fi, Bluetooth Modules | Smart home systems, IoT devices |
This table provides a snapshot of the diversity of projects you can implement with Arduino. With a strong foundation in both hardware and software practices, you can mix and match various components to suit your particular project needs.
Utilizing Libraries and Third-party Tools
Arduino’s ecosystem is enriched by an extensive library of third-party components that streamline the development of complex functionalities. For example, the Servo library simplifies constructing projects that require motor control. As you progress, consider integrating:
- Communication Protocol Libraries: Simplify interactions with sensors and modules using libraries that manage protocols like I2C, SPI, and UART.
- Custom Libraries: For elaborate projects, developing custom libraries can help organize and reuse code efficiently.
- Development Environments: Especially for large projects, explore advanced development tools such as PlatformIO or Visual Studio Code with Arduino extensions. These tools provide extra features like code auto-completion, advanced debugging options, and better version control integration.
Tips for Continued Learning and Development
Community Engagement
One of the most powerful resources for learning Arduino is its vibrant community. Online forums, discussion groups, and project showcases are filled with enthusiasts eager to share their experiences and solutions. Engaging with these communities can provide insights into troubleshooting, creative project ideas, and effective debugging techniques.
Incremental Project Building
Begin with small projects to grasp basic functionalities before scaling up to more complicated designs. Incremental learning not only improves technical skills but also builds confidence. Start with simple sketches and gradually introduce additional components or more complex logic as your comfort level increases.
Maintaining a project log or journal where you document your challenges, solutions, and ideas can be a valuable resource over time. This log serves both as a personal reference and as an inspiration for future projects.
Continual Refinement and Testing
As you develop your Arduino projects further, continuous testing and refinement are essential. Adopt an incremental testing strategy where each new module or functionality is thoroughly tested before integrating it into your main codebase. This approach not only helps prevent elusive bugs but also ensures that each component functions as expected.
Additionally, make regular use of version control systems such as Git to track changes. This practice can be invaluable when you need to revert to previous stable versions in case a new change introduces unforeseen issues.
References
- Arduino Tutorial - Arduino Official
- Getting Started Guide - Arduino Documentation
- Arduino Tutorial - TutorialsPoint
- Arduino Getting Started - ArduinoGetStarted
- Beginner's Guide to Arduino - Instructables
- Arduino Project Hub - Arduino
- Arduino Ultimate Guide - Circuit Basics
- Arduino Board Guide - Arduino Official
- Arduino for Beginners - ArduinoGetStarted
- DIY Arduino Projects - Instructables
Recommended
Last updated March 1, 2025