
Unlocking the 2015 Mitsubishi ASX Door Panel Removal
Detailed step-by-step guide with visuals, diagrams, and pro tips
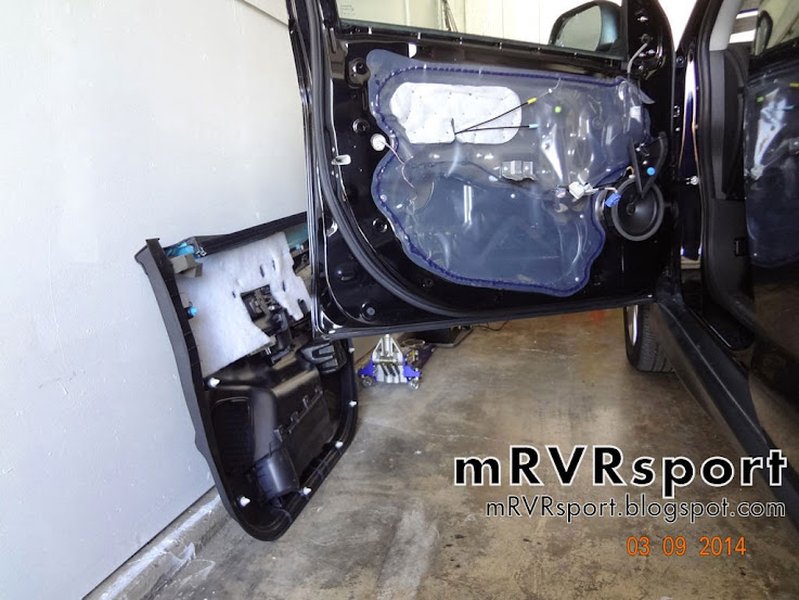
Key Takeaways
- Tool Preparation & Safety: Ensure your workspace is safe and that you have the required tools before beginning.
- Screw & Clip Removal: Identify all screws, plastic caps, and clips that secure the door panel.
- Detached Panel & Reconnection: Follow the correct procedure to detach the panel and safely disconnect any wiring.
Step-by-Step Removal Process
1. Preparation and Safety
Before you begin the door panel removal process on your 2015 Mitsubishi ASX, ensure that you have a clean, flat workspace and that your vehicle is safely parked with the engine off. For added safety, disconnect the car battery to avoid accidental electrical shorts, especially if you plan to work near any wiring connected to power windows or door locks.
Tools You Will Need:
- Phillips screwdriver
- Flathead screwdriver or pry tool (a trim removal tool is ideal)
- Cover popper tool
- Door panel remover tool
- Soft surface or mat for laying out removed components
Ensure all tools are at hand. These tools help provide a clean and damage-free removal of screws, caps, and clips.
2. Opening the Door and Accessing the Panel
Open the front door of your Mitsubishi ASX to expose the full extent of the door panel. With the door open, inspect the panel for visible screws and plastic caps. They are usually located behind the door handle and along the armrest. This initial inspection will help you determine all the removal points.
3. Removing Screws, Caps, and Covers
The door panel is fastened by various screws hidden behind plastic caps. To expose these screws:
- Locate the plastic cover around the door handle and the grip area. Use a flathead screwdriver or a cover popper tool to gently pry them off.
- Remove screws using a Phillips screwdriver. Note that screws might vary in length and be located near the bottom of the door handle and inside the armrest.
- In some cases, you may also need to remove any visible retaining screws on the lower edge of the door panel.
It is helpful to keep a small container or magnetic tray to store screws and clips as you remove them so that you can easily reinstall the panel later.
4. Detaching the Door Panel
With all screws and plastic caps removed, the panel is now secured primarily by plastic retainers. Follow these tips:
- Use a door panel remover tool: Starting at the bottom, begin the process of prying the panel away from the door frame. Work slowly around the perimeter, releasing each clip.
- If your door panel includes a tweeter pod or other attachments, try beginning from that area as it is often held by a single retainer. This can sometimes ease the overall removal.
- Lift the panel gently and tilt it forward to disengage it from the door.
Be gentle in order to avoid breaking the plastic clips or damaging the panel itself.
5. Disconnecting Electrical Connections
The door panel may have electrical wiring attached to components such as speakers, door locks, or window controls. Before completely removing the panel, disconnect these components:
- Locate the electrical connectors at the back of the panel.
- Gently release the connectors by pressing any locking tabs and pulling them apart.
- Take note or photograph the connections if you are unsure about reassembling them later.
Disconnect all cables systematically and set them aside, ensuring no strain is applied on the wiring.
6. Removing and Laying Out the Panel
With all fasteners, clips, and connectors removed, lift the door panel upward and away from the door. It may require a slight wiggle along the edges to completely free the panel from the clips.
Once removed, place the panel on a soft surface where it will not get scratched. Proper organization at this step minimizes the risk of misplacing parts.
Visual Elements and Data Overview
Radar Chart: Step Complexity Analysis
The radar chart below reflects an overall analysis of the complexity and importance of each removal step. The overall goal of the chart is to visualize the precision required during each part of the door panel removal.
Mindmap Overview: Key Components of the Process
The mindmap below provides an overview of the key steps and considerations when removing the door panel from a 2015 Mitsubishi ASX. It is designed to visualize the process in an easily digestible format.
Detailed Removal Process Table
The table below summarizes each step with tools required and detailed notes. Review the table to ensure you do not miss any critical tasks during removal.
| Step | Action | Tools | Notes |
|---|---|---|---|
| 1. Preparation | Park vehicle; disconnect battery; set up workspace | N/A | Ensure safety first. |
| 2. Open Door | Open relevant front door | N/A | Gain full access to the panel. |
| 3. Remove Screws & Caps | Gently pry off plastic covers; use Phillips screwdriver to remove screws | Phillips screwdriver, flathead, cover popper tool | Store all components securely. |
| 4. Detach Panel | Using panel removal tool, free plastic clips and lift the panel upward | Door panel remover tool | Release clips around edges carefully. |
| 5. Disconnect Electricals | Disconnect wiring connectors from speakers, locks, etc. | N/A | Document wiring positions if needed. |
| 6. Lay Out Panel | Set aside panel on a soft surface for further work | N/A | Avoid scratches and damage. |
Below is an Embedded Video Resource
For additional visual guidance, watch the following video which provides a detailed demonstration of the door panel removal process for the 2015 Mitsubishi ASX:
FAQ (Click to Expand)
Why disconnect the battery before starting?
What are the common fastener locations?
What precautions should be taken when using metal tools?
How do I keep track of removed screws and clips?
References
- Mitsubishi ASX Door Panel Tutorial - Scegliauto
- Front Door Panel Removal Step-by-Step - Scegliauto
- Detailed Door Panel Removal Guide - Evolution M Forum
- Door Panel Removal Video Tutorial - YouTube
- ASX/RVR Door Panel Removal Visual Guide - YouTube
Recommended Queries for Further Insights
Last updated April 1, 2025