
Seamless Outdoor Natural Gas Connections: Your Comprehensive Guide
Transform your backyard into a culinary haven with a professionally installed natural gas line for your grill or fire pit.
Key Insights into Outdoor Natural Gas Line Installation
- Safety First: Installing natural gas lines involves inherent risks. It is strongly recommended to consult or hire a qualified professional to ensure safety and compliance with local codes.
- Proper Materials and Planning: Utilize black iron pipe or appropriately rated flexible gas lines, ensure correct sizing for BTU demands, and meticulously plan the route to prevent damage and corrosion.
- Exterior Protection and Maintenance: Exposed outdoor gas lines, particularly black iron pipe, must be painted with rust-resistant enamel to prevent corrosion and regularly inspected for wear.
Adding a natural gas line to the exterior of your home offers unparalleled convenience for outdoor appliances like barbecue grills, fire pits, and outdoor kitchens. This eliminates the need for propane tank refills, providing an uninterrupted fuel supply and enhancing your outdoor living experience. While it offers numerous benefits, the installation of a natural gas line is a complex process that demands careful planning, adherence to safety protocols, and often, professional expertise. This guide will walk you through the essential steps and considerations for safely and effectively attaching a natural gas line to the outside of your house.
Initial Planning and Safety Precautions
Laying the Groundwork for a Secure Gas Line
Before any physical work begins, thorough planning and strict adherence to safety measures are paramount. Natural gas is a combustible fuel, and improper installation can lead to severe hazards, including leaks, explosions, and carbon monoxide poisoning.
Assess Your Home's Gas Capacity and Requirements
The first critical step is to determine if your existing natural gas system can support the additional demand of a new outdoor appliance. This involves locating your gas meter, typically found on the exterior of your house, and assessing its capacity. You'll need to know the BTU (British Thermal Unit) rating of the new appliance(s) you plan to connect. Longer gas line runs may require larger diameter pipes (e.g., 3/4-inch instead of 1/2-inch) to ensure adequate gas flow and pressure to all appliances.
It's highly advisable to create a detailed diagram of your proposed gas line route. This diagram should include:
- The location of your gas meter and main shut-off valve.
- The path the new line will take, both inside and outside the house.
- The estimated length and width of each pipe section.
- The BTU rating of each appliance to be connected.
- Whether your home uses natural gas or propane.
Professional Consultation and Permits
While some homeowners with extensive DIY experience might consider tackling aspects of gas line installation, it is generally recommended to consult or hire a licensed plumber or gas fitter. Professionals possess the expertise to accurately assess your home's gas capacity, understand local codes, and ensure the installation is safe and compliant. Many localities require permits for gas line work, and attempting a DIY installation without one can lead to fines, difficulties with insurance, and safety risks. A trustworthy installer will typically include permit fees and inspections in their quote.
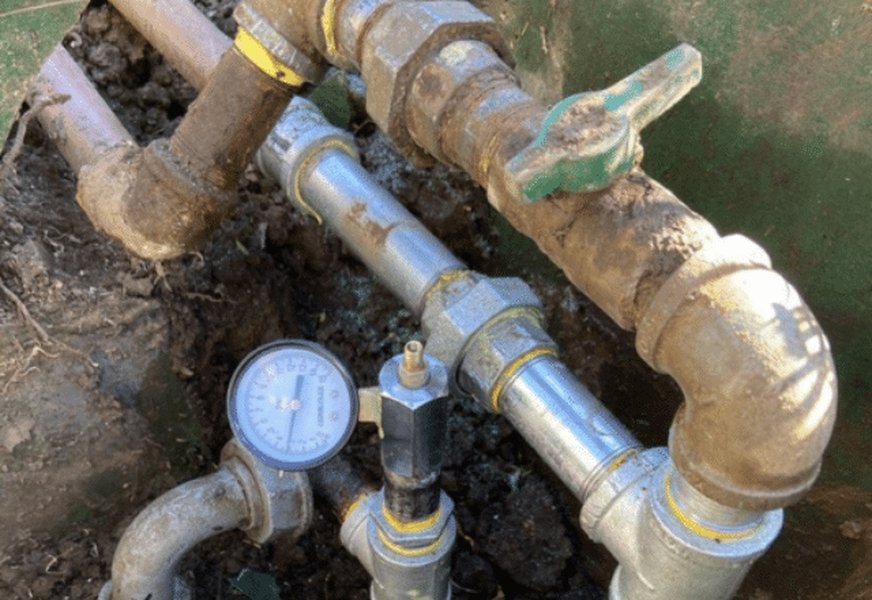
Properly installed gas line with secure connections.
Turning Off the Gas Supply
Before any work on the gas lines commences, the gas supply to your house must be completely shut off. The main shut-off valve is usually located near the gas meter on the exterior of your home. Turn the valve a quarter turn to make it perpendicular to the gas line, indicating it's off. Double-check that the gas meter is not moving to confirm the supply is indeed off.
Choosing the Right Materials and Routing the Line
Selecting Durable Pipes and Strategic Pathways
The choice of materials and the routing of the gas line are crucial for both safety and longevity, especially for outdoor installations exposed to the elements.
Pipe Types and Fittings
For outdoor natural gas lines, black iron pipe is the most common and recommended material. It is durable and designed for gas applications. However, black iron pipe used outdoors must be painted with rust-resistant enamel to prevent corrosion due to weather exposure. Other options include flexible corrugated stainless steel tubing (CSST) which may be used, though its suitability for exposed outdoor use can vary by local code and type (some black CSST has an integral bonding layer for lightning protection). Galvanized pipe is generally not recommended for gas lines.
When making connections, use straight pipe nipples instead of flare fittings, as flare fittings can be less secure for gas lines. Pipe joint compound, specifically designed for gas, should be used on all threaded connections to ensure a leak-proof seal. Avoid using thread seal tape on steel gas piping, as cutting oils on the threads can prevent proper sealing.
Routing and Support for Exterior Lines
When running a gas line on the exterior of your house, consider the following:
- Protection from Damage: The line should be routed in a location where it is protected from accidental damage. If running underground, pipes should be buried at least 18 inches below the surface and marked for future excavation awareness.
- Securing the Pipe: Gas pipes need to be adequately secured to the structure. A common practice is to secure the pipe every 6 feet using two-hole straps attached to a structural element like a 2x4.
- Penetrating Exterior Walls: When the gas line passes through an exterior wall, ensure the hole is large enough to accommodate the pipe and is properly sealed to prevent gas leaks and water intrusion. A drip leg should be installed near the appliance connection to catch sediments from the gas, ensuring a purer gas supply.
- Painting Exposed Pipes: All exposed black iron pipe should be painted with a rust-resistant spray paint or other protective coating to prevent corrosion. Painting it the same color as the wall can help it blend in visually.
Installation Process and Testing
Step-by-Step Connection and Verification
Once the planning is complete and materials are gathered, the physical installation can begin. Precision and adherence to safety guidelines are crucial at every step.
Cutting and Threading Pipes
Black iron pipe needs to be cut to precise lengths and threaded at the ends for connections. Hardware stores often provide this service, but if doing it yourself, use a metal-cutting blade with a rotary pipe cutter or snap cutter. Ensure clean threads for secure connections.
Making Connections
Assemble the pipe sections according to your diagram, applying gas-rated pipe joint compound to all male pipe threads. Use two wrenches when tightening connections: one to hold the existing pipe steady and the other to turn the new fitting, preventing stress on other connections.

Underground gas line preparation for an outdoor BBQ.
For outdoor appliances like grills, you will typically need a quick-connect fitting at the end of the line. This allows for easy connection and disconnection of the appliance. Ensure the quick-connect is compatible with your grill's hose.
Leak Testing
This is a critical safety step. After all connections are made, and before turning the main gas supply back on, the line must be pressure tested for leaks. Professionals use a manometer to perform a pressure test, ensuring no leaks are present. For DIYers, a simple soap and water solution can be applied to all connections once the gas is turned back on. Bubbles indicate a leak, which must be immediately addressed by tightening the connection or re-applying pipe joint compound. Never use an open flame to check for gas leaks.
Understanding the Safety Landscape of Gas Line Installation
A Radar Chart of Key Considerations
Working with natural gas lines involves balancing several critical factors. The following radar chart visually represents the importance of different aspects when considering an outdoor natural gas line installation. Each spoke represents a key consideration, and the higher the value, the more critical that aspect is for a safe and successful installation.
As the radar chart illustrates, "Leak Testing Rigor" stands out as the most critical factor, emphasizing that even minor oversights can have severe consequences. "Professional Expertise" and "Adherence to Codes" are also exceptionally high, reinforcing the idea that this is not a project to be taken lightly by inexperienced individuals. "Capacity Assessment," "Proper Materials," and "Long-term Maintenance" are also highly important, ensuring both initial functionality and enduring safety.
Connecting Your Outdoor Appliance
The Final Steps to Enjoying Your Gas Line
Once the gas line is installed and thoroughly tested for leaks, the final step is to connect your appliance and begin enjoying the convenience of natural gas.
Appliance Compatibility and Connection
Ensure your outdoor appliance (grill, fire pit, etc.) is rated for natural gas. Many propane grills can be converted to natural gas with a conversion kit, but this should only be done by a professional to ensure safety and proper operation. The natural gas hose from your appliance will typically connect to the quick-connect fitting on your newly installed outdoor gas line.
Maintenance of Exterior Gas Lines
Even after successful installation, ongoing maintenance is vital for exterior gas lines:
- Corrosion Protection: Regularly inspect painted black iron pipes for chipping or peeling paint. Reapply rust-resistant enamel as needed to prevent corrosion from exposure to weather.
- Physical Damage: Periodically check the gas line for any signs of physical damage, kinks (especially on flexible lines), or wear. Address any issues promptly.
- Professional Inspections: Consider periodic professional inspections to ensure the integrity of the gas line and all connections.
Understanding Gas Line Components and Considerations
A Closer Look at the Essential Elements
To further understand the intricacies of natural gas line installation, it's helpful to be familiar with the various components and specific considerations involved. This table summarizes key aspects discussed throughout the guide.
| Component/Consideration | Description | Importance/Best Practice |
|---|---|---|
| Black Iron Pipe | Standard, durable material for gas lines. | Must be painted with rust-resistant enamel for outdoor use to prevent corrosion. |
| Flexible Connectors (CSST) | Corrugated Stainless Steel Tubing. | Convenient for certain applications but ensure it's rated for gas and outdoor exposure. Check local codes. |
| Pipe Joint Compound | Paste-like sealant for threaded gas pipe connections. | Essential for creating leak-proof seals. Do not use thread tape on steel pipes. |
| Shut-off Valves | Valves to control gas flow (main, house-side, appliance-specific). | Critical for safety during installation, maintenance, and emergencies. |
| Drip Leg (Sediment Trap) | A short vertical pipe section to collect debris before it enters the appliance. | Protects appliances from impurities in the gas stream. |
| Pipe Sizing | Determining the correct diameter of the pipe. | Crucial for ensuring adequate gas flow (BTU capacity) to all connected appliances, especially over longer runs. |
| Burial Depth (Underground) | Minimum depth for buried gas lines. | At least 18 inches below ground surface to protect against damage. |
| Securing Pipes | Attaching pipes to structural elements. | Pipes should be secured every 6 feet using appropriate straps to prevent movement and stress. |
| Leak Testing | Verifying the integrity of all connections. | Mandalory using a manometer or soap solution. Never use an open flame. |
| Permits and Inspections | Legal requirements for gas line work. | Ensures compliance with safety codes and proper installation. Usually required. |
Visualizing Gas Line Installation
Expert Insights on Connecting Gas Lines
For a visual understanding of the process, here's a highly relevant video from This Old House, demonstrating how a natural gas line is installed for a barbecue grill. This video offers practical insights into pipe routing, connections, and safety considerations from a professional perspective.
Video: How to Install a Natural Gas Barbecue Grill | Ask This Old House
This video provides a clear, step-by-step demonstration of installing a natural gas line for an outdoor grill. Richard Trethewey, the plumbing and heating expert from This Old House, highlights key aspects such as assessing home gas capacity, routing the line, making secure connections, and the importance of leak testing. It emphasizes the need for proper materials like black steel pipe and the application of rust-resistant paint for outdoor exposure. Watching this demonstration can help homeowners visualize the process and understand the precision required for a safe and functional installation.
Frequently Asked Questions (FAQ)
Conclusion
Installing a natural gas line to the exterior of your home for outdoor appliances is a valuable upgrade that enhances convenience and usability. While the allure of DIY might be strong, the critical importance of safety, compliance with local building codes, and the inherent risks associated with natural gas make professional involvement highly advisable. From correctly sizing the pipes and choosing the right materials to meticulous leak testing and long-term maintenance, every step requires precision and expertise. By prioritizing safety and, when in doubt, enlisting the help of qualified professionals, you can confidently enjoy a reliable and efficient natural gas supply for all your outdoor living needs.
Recommended Further Exploration
- Understanding local natural gas line codes and regulations.
- Benefits of natural gas vs. propane for outdoor appliances.
- Cost breakdown for professional natural gas line installation.
- Advanced safety features for outdoor natural gas systems.