
Crafting the Cosmos: Building a Bespoke Starlight Ceiling for Your A-Frame Library
Transform your reading sanctuary with the meticulous artistry of a Bentley-inspired fiber optic star ceiling, tailored for unique architecture.
Highlights
- Bespoke Design for A-Frames: Understand the unique challenges and solutions for installing a luxurious star ceiling on sloped library roofs, ensuring structural integrity and aesthetic harmony.
- Master Craftsman's Process: Follow a detailed, phase-by-phase guide covering consultation, material selection (fiber optics, panels, illuminators), fabrication, and meticulous installation techniques.
- Luxury Materials & Effects: Explore options ranging from premium acoustic panels to faux-leather finishes, combined with advanced fiber optic systems offering varying star sizes and twinkle effects for ultimate realism.
Conceptualizing Your Celestial Library Canopy
Blending Luxury Aesthetics with Library Serenity
Imagine settling into your favorite armchair, book in hand, beneath a private, twinkling night sky. This project aims to replicate the awe-inspiring ambiance of a Bentley's Starlight Headliner within the unique architectural embrace of your library's A-Frame roof. More than just lighting, it's about crafting an immersive experience. The core technology involves using fine fiber optic strands, individually lit by a central source (illuminator), to create points of light across the ceiling surface. Unlike a standard flat ceiling, the library setting calls for a serene, perhaps slightly dimmer, and acoustically considerate design, transforming the space into a tranquil haven for reading and contemplation.
Addressing the A-Frame Challenge
An A-Frame roof, with its characteristic steep slopes meeting at a central peak, presents specific challenges compared to conventional ceilings. Access for installation can be difficult and requires careful planning, potentially involving scaffolding or lifts. The sloped surfaces necessitate precise measurements and often benefit from custom-fabricated panels rather than attempting to work directly into existing drywall or plaster, especially if overhead access is limited. Mounting systems must be robust to securely hold panels or frameworks against gravity on the incline, ensuring a seamless and lasting finish.
Phase 1: Design and Material Selection
Crafting the Vision: Consultation and Starfield Design
As a craftsman, the first step is always a deep dive into your vision. How dense should the starfield be? Should it replicate actual constellations visible from your location, or create a more abstract, artistic celestial pattern? We must consider the library's overall aesthetic, the desired mood (calming, awe-inspiring?), and the scale of the A-frame ceiling.
Mapping the Heavens
Once the vision is clear, a detailed map or template is created. This blueprint dictates the placement of each "star" (fiber optic point). Precision here ensures a balanced and visually appealing distribution across the unique angles of the A-frame. Using varying diameters of fiber optic strands (e.g., 0.75mm, 1.0mm, 1.5mm) is key to simulating stars of different magnitudes, adding depth and realism comparable to the luxury automotive standard.
Selecting the Optimal Fiber Optic System
The heart of the installation is a high-quality fiber optic kit. This includes:
- The Illuminator (Light Engine): A powerful, reliable LED light source is crucial. Look for models offering adjustable brightness (dimming), and ideally, a "twinkle" or "shimmer" effect wheel to mimic atmospheric distortion for added realism. Consider color temperature options (warm white, cool white, or even RGBW for custom moods). Ensure the chosen unit has adequate cooling and meets ventilation requirements, as it will likely be housed in an enclosed space.
- Fiber Optic Harness: A bundle containing hundreds, potentially over a thousand, individual fiber optic strands of varying diameters. The quantity depends on the ceiling area and desired star density (aiming for 5-10 stars per square foot is a common starting point for a rich effect).
Choosing the Right Canvas: Ceiling Materials
For an A-Frame roof, installing the starfield into custom panels is often the most practical and high-quality approach. These panels are prepared on the ground and then mounted.
- Substrate Options: High-Density Fiberboard (HDF) or MDF provides a smooth, stable base. Acoustic panels are an excellent choice for a library, offering sound absorption alongside the visual appeal. Foam-core panels can be lightweight alternatives if properly supported.
- Surface Finish: To achieve the desired "night sky" effect and luxury feel, panels are typically covered. Options include:
- Matte black or deep navy blue acoustic fabric (excellent for light absorption and sound dampening).
- High-quality vinyl or specialized ceiling wrap material.
- For the ultimate Bentley-esque luxury, perforated faux-leather or suede-like fabric can be used, though this requires expert application.
Working directly into existing drywall on a steep A-frame is possible but more challenging, requiring excellent overhead access and meticulous sealing around each fiber.
Framework and Mounting Essentials
A robust, custom-built framework is essential to support the panels securely on the A-Frame's slopes. This is typically constructed from lightweight wood (like 1x2s or 2x4s, depending on panel weight) or metal framing profiles. The framework must be meticulously measured and securely fastened to the roof joists or rafters, providing a perfectly aligned grid onto which the star panels will be mounted.
Tools and Consumables
Essential tools include a precision drill with bits matching the fiber diameters (e.g., 0.8mm, 1.1mm, 1.6mm), measuring tools, levels, safety gear (eye protection, dust masks), scaffolding or a stable lift for access, wire management supplies (ties, clips), and appropriate adhesives (clear-drying craft glue or specialized fiber optic adhesive) and potentially sealants if working directly into the ceiling.

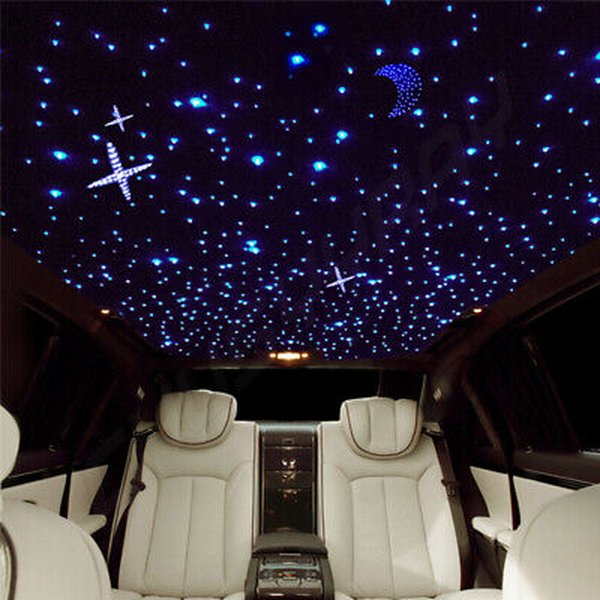
A finished star ceiling effect, demonstrating the immersive ambiance created by fiber optics.
Visualizing Project Factors: A Comparative Look
Choosing the right approach involves balancing several factors. This chart compares potential methods for creating your library's star ceiling, considering the unique A-Frame context. 'DIY Panels' assumes crafting and installing panels yourself, 'Pro Install Panels' involves hiring specialists for panel creation and fitting, and 'Direct Ceiling Install' means integrating fibers into the existing A-frame ceiling surface (assuming access).
Note: Ratings are subjective (1=Low, 10=High). 'A-Frame Suitability' considers ease of adapting the method to sloped surfaces. 'Direct Ceiling Install' difficulty and suitability drop significantly without excellent attic/above-ceiling access.
Phase 2: Fabrication and Installation - The Master Craftsman's Process
Preparing the Canvas: Panel Fabrication (if using panels)
If using the recommended panel approach, this stage involves meticulous work on the ground. Panels are cut precisely to fit the different sections of the A-frame ceiling, accounting for angles and any fixtures. Using the star map template, hundreds or thousands of tiny holes are drilled through the panels from the back side. If wrapping the panels in fabric or another finish, this is done carefully before or after drilling, depending on the material.
Building the Foundation: Framework Installation
The custom wood or metal framework is assembled and installed onto the A-frame's structural members (rafters/joists). This must be perfectly level and plumb relative to the intended panel layout, providing secure mounting points across the slopes. Ensuring the framework can handle the weight of the panels and allows space for fiber bundles is critical.
Weaving the Stars: Fiber Optic Installation
Threading the Filaments
This is the most time-intensive step. Working from the back side of the panels (or the attic space if working directly on the ceiling), individual fiber optic strands are carefully pushed through each drilled hole. The goal is to have the tip of the fiber sit flush with, or protrude just slightly (less than 1mm) from, the visible surface.
Securing and Bundling
Once threaded, each fiber is secured on the back side with a small dab of clear adhesive near the hole. This prevents them from slipping out. As fibers are installed, they are carefully gathered into manageable bundles. These bundles are routed neatly along the framework or across the ceiling joists, all leading towards the predetermined location for the illuminator. Cable ties or clips help manage the bundles and prevent tangling or damage.
Bundled fiber optic strands ready for connection to the light engine.
Bringing it Together: Panel Installation and Illuminator Setup
With the fibers installed and secured, the panels are carefully lifted and mounted onto the prepared framework on the A-frame ceiling. Connections between panels need to be seamless. The bundled ends of the fiber optics are trimmed cleanly and inserted into the illuminator's port(s). The illuminator itself is placed in its designated, ventilated location (e.g., attic space, dedicated closet, custom enclosure) and connected to power.
The Final Reveal: Trimming and Testing
Once everything is connected, the final step on the visible side is to trim any protruding fiber tips perfectly flush with the ceiling surface using sharp clippers or a specialized tool. This ensures a clean, almost invisible finish when the lights are off. Then comes the magical moment: dim the room lights, turn on the illuminator, and inspect the starfield. Check for any unlit fibers, adjust brightness and twinkle speed to perfection, and admire the celestial canopy you've crafted.
Key Considerations for a Library Star Ceiling
Planning and executing a project of this nature involves many interconnected elements. This mind map provides a visual overview of the critical factors to consider when designing and building your bespoke library star ceiling, especially focusing on the nuances of an A-Frame structure.
Material and Feature Comparison
Selecting the right materials and features is crucial for achieving the desired look, feel, and functionality in your library's unique A-Frame setting. This table compares common choices:
| Feature/Material | Description | Pros | Cons | Suitability for Library/A-Frame |
|---|---|---|---|---|
| Acoustic Fabric Panels | Panels made with sound-absorbing core material, wrapped in dark acoustic fabric. | Excellent sound dampening (ideal for library), good light absorption, clean finish. | Can be more expensive than basic MDF, fabric choice impacts final look. | Very High - Combines aesthetics and function perfectly for a quiet space; panels simplify A-frame install. |
| MDF/HDF Panels with Paint/Vinyl | Medium/High-Density Fiberboard panels painted matte black/blue or wrapped in vinyl. | Cost-effective, smooth surface, easy to drill. | No acoustic benefit, paint finish quality is critical, vinyl can be tricky to apply perfectly. | High - Good structural base for panels on an A-frame, budget-friendly. |
| Faux-Leather/Suede Panels | Panels wrapped in premium synthetic leather or suede-like material. | Ultimate luxury look and feel, mimics high-end automotive interiors. | Most expensive option, requires expert application, potentially harder to clean. | Medium-High - Primarily aesthetic choice; ensure material is suitable for ceiling application on slopes. |
| Varying Fiber Diameters | Using fibers of 0.75mm, 1.0mm, 1.5mm etc. in the same installation. | Creates realistic effect of stars with different magnitudes/brightness. | Requires more planning, slightly more complex drilling/handling. | Very High - Essential for achieving a high-end, non-uniform starfield look. |
| Twinkle Effect Illuminator | Light engine with a rotating wheel or electronic control to make stars subtly shimmer. | Adds dynamic realism and magic to the starfield. | Increases illuminator cost, mechanical wheels can add slight noise (check specs). | High - Greatly enhances the effect, ensure noise level is acceptable for a library. |
| Direct Ceiling Installation | Drilling and threading fibers directly into the existing A-frame ceiling material (e.g., drywall). | Can be lower material cost if no panels needed. | Very difficult without excellent attic access, hard to achieve clean finish, potential air leaks if not sealed well, challenging on slopes. | Low-Medium - Generally not recommended for A-frames unless conditions are ideal and access is superb. Panels offer more control. |
Enhancing the Experience: Optional Features
Twinkle Effects and Color Control
Beyond simple on/off, modern LED illuminators offer sophisticated controls. A "twinkle wheel" physically modulates light to some fibers, creating a gentle shimmer. Electronic twinkle effects offer silent operation. RGBW illuminators allow you to change the color of the stars, perhaps shifting from a cool white night sky to a warm ambient glow, all controlled via remote or smart home integration.
Integrated Ambient Lighting
Consider complementing the star ceiling with subtle perimeter lighting. Hidden LED strips installed within coves or along the edges of the A-frame can provide a soft, indirect wash of light, enhancing the overall ambiance without competing with the stars. This can also serve as functional low-level lighting.
Acoustic Enhancements
As mentioned, using acoustic panels as the base for your starfield is highly recommended for a library. This helps absorb sound reflections, reducing echo and creating a more focused, peaceful reading environment. The fabric finishes typically used on these panels also provide an ideal dark, non-reflective surface for the stars.
Installation Insights: A Visual Guide
Watching experienced installers tackle a fiber optic ceiling project can provide valuable insights into the techniques and potential challenges. This video offers a comprehensive guide to installing a fiber optic star ceiling, demonstrating many of the steps discussed, such as handling fibers, connecting the illuminator, and achieving a clean finish. While it may not show an A-frame specifically, the core principles of fiber installation are universal.
A step-by-step guide showcasing the DIY installation process for fiber optic star ceilings.
Frequently Asked Questions (FAQ)
How long does a project like this typically take? ▼
The duration heavily depends on the ceiling size, complexity of the A-frame, star density, whether using panels, and the installer's experience. For a moderately sized library using custom panels, expect anywhere from 40 to 100+ hours of labor, potentially spread over several days or weeks. Planning, fabrication, and installation are all time-consuming steps requiring precision.
What is a realistic budget range? ▼
Costs vary widely based on materials and labor. A DIY kit with a basic illuminator and several hundred fibers might start around $300-$500. High-quality kits with twinkle effects, varying diameters, and more fibers (800+) can range from $500 to $2000+. Panel materials, fabric/finishes, framework, and potential professional installation labor can add significantly, potentially bringing the total cost for a high-end, professionally installed A-frame library ceiling into the several thousand dollar range.
Can I create specific constellations? ▼
Absolutely! This is a key part of the customization. You can provide a star chart or map of desired constellations (e.g., Ursa Major, Orion) which can be scaled and accurately transferred onto the panels or ceiling template during the design phase. Using slightly larger diameter fibers or grouping small fibers can help emphasize the main stars within the constellations.
What kind of maintenance is required? ▼
Fiber optic star ceilings are generally low maintenance. The fibers themselves require no upkeep. The main component is the LED illuminator, which has a long lifespan (often 20,000-50,000 hours) but may eventually need replacement. Ensuring easy access to the illuminator's location during installation is crucial for future maintenance. The ceiling surface itself may require occasional gentle dusting according to the material manufacturer's recommendations.
Is the system safe? ▼
Yes, fiber optic lighting is very safe. The fibers themselves carry only light, not electricity, so there is no risk of shock or heat at the star points on the ceiling. The illuminator is the only electrical component, typically operating at low voltage. Ensure the illuminator is properly installed in a ventilated area according to manufacturer guidelines and that all electrical connections comply with local building codes. Using reputable, certified kits adds an extra layer of safety assurance.
References
-
How to Create a Fiber Optic Starfield Ceiling - Instructables
- FAQ - Starlight Custom
- Starlight Headliners: The Ultimate Guide - CarsModify
- Star Ceiling Installation Guide - The Fiber Optic Store
- How to Make a Star Ceiling - Stellar Lighting
- Star Ceiling Installation Instructions (PDF Example) - Digilin
-
Star Ceiling Light: Installation, Benefits, Cost & Suppliers - Maria Electricals
Recommended Further Exploration
 stellarlighting.squarespace.com
Last updated April 22, 2025