
Mastering Your BETAFPV405: A Comprehensive Guide to Betaflight 4.6 Upgrade Success
Unlock new features and enhanced performance by navigating the Betaflight firmware upgrade process with confidence and precision.
Essential Insights for a Seamless Upgrade
- Prioritize Compatibility: Always ensure your Betaflight Configurator is the absolute latest version (10.10.0 or higher) to support Betaflight 4.6, as older versions are incompatible.
- Critical Preparations: Before attempting any upgrade, meticulously back up your existing Betaflight CLI dump and settings. This safeguard is paramount for recovery if issues arise.
- Precise Flashing Procedure: Successfully flashing requires the correct flight controller target (e.g., BETAFPVF405), consistent DFU mode entry, and performing a full chip erase for a clean installation.
Upgrading your BETAFPV405 flight controller from Betaflight 4.5.2 to 4.6 is a common endeavor for drone enthusiasts seeking enhanced features and performance. While straightforward in principle, the process can present challenges due to compatibility issues, driver conflicts, or incorrect flashing procedures. Betaflight 4.6, often in a development or release candidate stage, introduces new capabilities such as improved position hold and requires careful attention to detail during the upgrade. This comprehensive guide synthesizes expert advice and troubleshooting steps to ensure a smooth transition, minimizing the risk of issues like unresponsive OSD, motor detection failures, or connectivity problems.
The BETAFPV405, a popular flight controller in FPV drones, relies on Betaflight's open-source firmware for its operation. The Betaflight Configurator serves as the primary interface for flashing and configuring this firmware. For Betaflight versions 4.4 and newer, the upgrade process typically involves an online build system, generating a custom firmware ".hex" file tailored to your selections. Understanding your specific BETAFPV F405 variant (e.g., Pavo Pico, Pavo20, or F405 2-4S AIO) and its corresponding firmware target (e.g., BETAFPVF405) is crucial for a successful upgrade.
Pre-Upgrade Checklist: Laying the Groundwork for Success
Before you begin the flashing process, meticulous preparation can prevent most common upgrade failures. This includes ensuring your software environment is ready and your current configuration is safely backed up.
Current Configurator and Firmware Versions
One of the most frequent reasons for upgrade failure is using an outdated Betaflight Configurator. Betaflight 4.6, being a newer and potentially experimental version, necessitates the absolute latest compatible Configurator. For example, Betaflight 4.5 required Configurator 10.10.0 or newer. Therefore, for Betaflight 4.6, ensure you download and install the most recent Configurator version, ideally a release candidate or development version that explicitly supports 4.6 firmware flashing.
Backup Your Configuration – A Crucial Safeguard
Before any firmware upgrade, creating a comprehensive backup of your current flight controller settings is non-negotiable. This "CLI dump" contains all your custom settings, PIDs, and modes. In Betaflight Configurator, navigate to the CLI tab and type "dump" or "diff all" to generate a complete list of your settings. Copy and paste this output into a text file and save it in a safe location. This allows you to restore your previous configuration if the upgrade fails or if 4.6 introduces unforeseen compatibility issues with your existing settings. While some minor version upgrades might allow retaining settings, a major jump from 4.5.2 to 4.6 often benefits from a clean configuration, making the backup even more vital for reference.
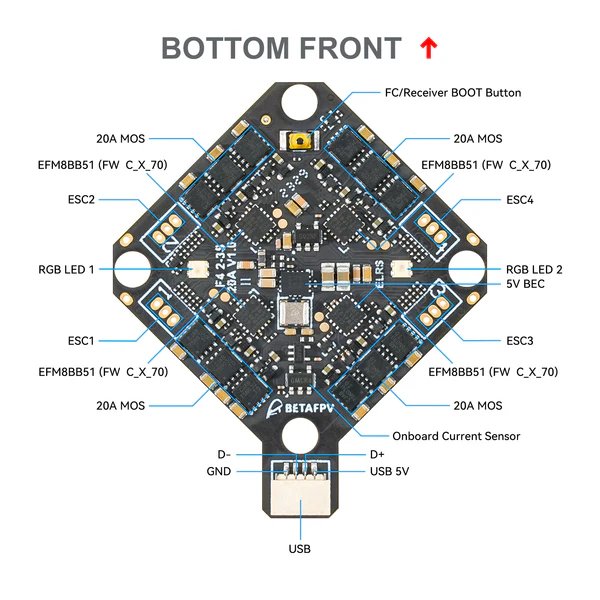
Bottom view of a BETAFPV F405 AIO Flight Controller, showing various solder pads and components crucial for flashing and connectivity.
The Firmware Flashing Procedure: A Step-by-Step Guide
Executing the flash correctly is paramount. This section details the precise steps to upgrade your BETAFPV405.
Connecting and Entering DFU Mode
Connect your BETAFPV405 flight controller to your computer using a reliable USB data cable. A common pitfall is using a charging-only cable, which prevents data transfer. Ensure the cable is capable of data communication. To flash firmware, your flight controller must be in DFU (Device Firmware Upgrade) mode, also known as bootloader mode. Betaflight Configurator often attempts to automatically put the board into DFU mode when you click "Flash Firmware." If auto-detection fails, you may need to manually enter DFU mode. This usually involves holding down a dedicated "boot" button on the flight controller while plugging in the USB cable.
Utilizing the Firmware Flasher Tab
Within Betaflight Configurator, navigate to the "Firmware Flasher" tab. This is where you will select your board, firmware version, and initiate the flashing process.
- Select Correct Target: It's crucial to select the precise firmware target for your BETAFPV405. The configurator might auto-detect it, but confirm it's
BETAFPVF405or the exact variant relevant to your board. Flashing with the wrong target can lead to incorrect sensor drivers or an unresponsive board. - Choose Betaflight 4.6: Since 4.6 might still be in development, you may need to enable "Expert Mode" and "Show release candidates" in the Firmware Flasher tab to see and select development versions. Then, choose the specific 4.6.x version you wish to flash.
- Full Chip Erase: Always select "Full Chip Erase" before flashing new firmware, especially when upgrading between major versions. This ensures a clean installation, removing any remnants of the old firmware that could cause conflicts or unexpected behavior.
- Online Build and Flash: Betaflight 4.4 and later versions leverage an online build system. After selecting your target and features, click "Load Firmware [online]" to download the custom-built firmware (.hex file). Once downloaded, click "Flash Firmware." Do not disconnect the USB cable during this critical process, as it can potentially "brick" your flight controller. The process typically takes a few minutes.
Post-Flash Reconnection and Configuration
After the flashing process completes, the flight controller will reboot. Disconnect and then reconnect it. Hit "Connect" in the Betaflight Configurator. Your flight controller will now be running Betaflight 4.6 with default settings. At this point, you can paste your backed-up CLI dump into the CLI tab to restore your settings. However, it's highly recommended to review the CLI output for any warnings or errors, as certain settings or features might have changed or become incompatible in Betaflight 4.6. For major upgrades, configuring from scratch is often the safest approach to avoid unforeseen issues, using your CLI dump as a reference rather than a direct import.
Common Troubleshooting Scenarios and Solutions
Despite careful preparation, issues can arise. Here's how to address the most common problems encountered during a Betaflight firmware upgrade.
Radar chart illustrating various aspects of a successful Betaflight upgrade, highlighting key areas of focus and their relative importance for a smooth process.
Connectivity and Driver Issues
If your flight controller isn't detected by Betaflight Configurator, or if the flashing process consistently fails, these are common culprits:
- USB Cable: As mentioned, a faulty or charging-only USB cable is the most common reason for connectivity problems. Always try a different, known good data cable.
- Drivers: Outdated or incorrect USB drivers can prevent your computer from recognizing the flight controller. Tools like the ImpulseRC Driver Fixer can resolve these issues. Ensure all necessary drivers are installed.
- USB Port: Try connecting to different USB ports on your computer, as some ports may have power or data transfer limitations.
Post-Flashing Problems: OSD, Motors, and Receivers
After a successful flash, you might encounter new issues. These often stem from compatibility changes between Betaflight versions or incorrect settings being loaded.
- Lost OSD (On-Screen Display): Users have reported OSD issues, particularly with DJI O3 systems, after upgrading BETAFPV405 boards. If your OSD is missing or displays incorrectly, check Betaflight's OSD tab to ensure all elements are enabled and configured correctly. Sometimes, specific firmware versions might have quirks with particular VTX systems.
- Motors Not Spinning/Recognized: If motors are unresponsive, verify your ESC protocol (e.g., DSHOT) is set correctly in the Motors tab. Ensure your motor output assignments align with your drone's configuration.
- Receiver Issues: If your radio receiver isn't communicating, double-check the serial port settings and the receiver protocol (e.g., CRSF for ELRS) in Betaflight's Ports and Receiver tabs. For ELRS SPI receivers, verify that the main version number matches between your receiver firmware and transmitter firmware (e.g., ELRS 3.x).
- SmartAudio Not Working: Some configurations, particularly after importing old settings, might lead to SmartAudio failure. Reconfigure your VTX settings from scratch if this occurs.
Navigating Betaflight 4.6: New Features and Considerations
Betaflight 4.6 brings exciting new features, but being a newer release, it might be less stable than previous stable versions. Awareness of its experimental nature and new functionalities is key.
Understanding Betaflight 4.6 Stability
As of June 2025, Betaflight 4.6 is largely in an experimental or release candidate phase. This means it may have bugs or stability issues that are actively being addressed. Users of beta versions should proceed with caution and be prepared for potential inconsistencies. Always test new firmware in a safe environment.
Key Features and Their Requirements
Betaflight 4.6 aims to enhance features like Altitude Hold and Position Hold. These functionalities, particularly Position Hold, significantly benefit from or even require a GPS module and a magnetometer for optimal performance. If you plan to leverage these new features, ensure your BETAFPV405 setup includes compatible hardware.
Here's a visual representation of the Betaflight upgrade process and its challenges:
A mindmap illustrating the complete Betaflight upgrade journey, from preparation to troubleshooting and post-upgrade verification.
Summary of Key Upgrade Steps and Troubleshooting Points
This table encapsulates the critical actions and considerations for a successful Betaflight 4.6 upgrade on your BETAFPV405 flight controller.
| Phase | Action/Consideration | Details & Best Practices |
|---|---|---|
| Preparation | Backup CLI Dump & Settings | Save your current configuration using "dump" or "diff all" in CLI. Essential for reverting or reconfiguring. |
| Update Betaflight Configurator | Download the latest version (10.10.0+), supporting Betaflight 4.6. Older versions are incompatible. | |
| Ensure Data USB Cable | Use a reliable USB cable that supports data transfer, not just charging. | |
| Flashing | Connect in DFU/Bootloader Mode | Automatically via Configurator or manually by shorting boot pins while plugging in USB. |
| Select Correct Firmware Target | Crucial: choose BETAFPVF405 or your exact board's target. Auto-detect often helps. |
|
| Choose Betaflight 4.6 (Online Build) | Enable "Expert Mode" and "Show release candidates" to access 4.6. Select desired features for custom build. | |
| Perform "Full Chip Erase" | Highly recommended for major version upgrades to ensure a clean installation and prevent conflicts. | |
| Do Not Interrupt Flash | Maintain stable USB connection; disconnecting can brick the FC. | |
| Post-Upgrade | Reconnect & Test Basic Functions | Verify receiver inputs, motor functionality, and OSD display. |
| Cautious Settings Restoration | Restore CLI dump, but review for errors or changes. Consider configuring from scratch. | |
| Troubleshooting | Resolve Connectivity Issues | Try different USB ports/cables. Use ImpulseRC Driver Fixer for driver problems. |
| Address Post-Flash Malfunctions | Re-check OSD, ESC protocol, and serial port settings. Refer to Betaflight documentation. | |
| Awareness of 4.6 Stability | Be aware that 4.6 may be experimental; test thoroughly. Downgrade if stability issues persist. |
A visual guide on how to force or fix DFU/Bootloader mode can be incredibly helpful if you encounter connection issues during the flashing process. Here's a relevant video:
This video, titled "How To Force or Fix DFU/Bootloader Mode On Any Betaflight Board That Won't Update," is directly relevant to troubleshooting common flashing failures where the flight controller isn't recognized or won't enter DFU mode. It provides practical steps to manually put your Betaflight board into bootloader mode, which is often a critical hurdle during firmware upgrades. This is especially useful for the BETAFPV405 if automatic DFU mode entry fails.
Frequently Asked Questions (FAQ)
Conclusion
Successfully upgrading your BETAFPV405 flight controller to Betaflight 4.6 requires a systematic approach, combining careful preparation, precise execution of the flashing procedure, and diligent troubleshooting. By prioritizing compatibility with the latest Configurator, backing up your settings, ensuring correct DFU mode entry, and performing a full chip erase, you significantly enhance your chances of a smooth upgrade. While Betaflight 4.6 introduces exciting new features, remember its potentially experimental nature and be prepared to address any post-upgrade issues related to OSD, motors, or receiver communication. With this comprehensive guide, you are well-equipped to unlock the full potential of your BETAFPV405 with the latest Betaflight firmware.
Recommended Further Exploration
- How to troubleshoot Betaflight DFU mode connectivity issues?
- Betaflight 4.6 new features and configuration guides?
- Best practices for Betaflight CLI dump and restore?
- Understanding Betaflight flight controller targets and firmware versions?
