
Unlock Your Athletic Potential: Build a Strava AI Training Coach with SvelteKit & TypeScript
Leverage your Strava data to receive personalized training suggestions powered by AI, built on a modern web stack.
Developing a web application that analyzes Strava activities to suggest personalized training plans is an exciting project. By combining the power of SvelteKit for full-stack development, TypeScript for robust code, the Strava API for data access, and AI for intelligent analysis, you can create a powerful tool for athletes. This guide outlines the steps involved, integrating best practices and leveraging the capabilities of these technologies.
Highlights
- Full-Stack Integration: Utilize SvelteKit's API routes and server-side capabilities alongside TypeScript for a type-safe backend and frontend development experience.
- Secure Strava Connection: Implement Strava's OAuth 2.0 flow securely using libraries like Auth.js to allow users to connect their accounts and grant necessary permissions.
- AI-Powered Insights: Integrate AI analysis (custom logic, ML libraries, or external services) to process activity data and generate actionable, personalized training suggestions.
Phase 1: Setting Up Your SvelteKit & TypeScript Foundation
Initializing Your Development Environment
The first step is to create your SvelteKit project, configured to use TypeScript. This provides a robust foundation with features like server-side rendering (SSR), API endpoints, and type safety.
Project Scaffolding
Use the SvelteKit command-line interface (CLI) to initialize your project. Open your terminal and run:
npm create svelte@latest my-strava-analyzer
cd my-strava-analyzer
npm install
During the setup process, ensure you select the option to use TypeScript. This command creates the basic project structure, including the crucial src/routes directory where your pages and API endpoints will reside.
Why SvelteKit?
SvelteKit is well-suited for this application because it simplifies building full-stack applications. Its file-based routing system allows you to easily create both user-facing pages (+page.svelte) and backend API endpoints (+server.ts). These server endpoints are essential for securely handling interactions with the Strava API and your database.
TypeScript for Robustness
Using TypeScript throughout your project enhances code quality and maintainability, especially when dealing with external APIs and complex data structures like those from Strava. Define interfaces for your data models:
// Example: src/lib/types/strava.ts
export interface StravaActivity {
  id: number;
  name: string;
  distance: number; // meters
  moving_time: number; // seconds
  elapsed_time: number; // seconds
  total_elevation_gain: number; // meters
  type: string; // e.g., 'Run', 'Ride', 'Swim'
  start_date: string; // ISO 8601 format
  start_date_local: string; // ISO 8601 format
  timezone: string;
  map: {
    id: string;
    summary_polyline: string | null;
    resource_state: number;
  };
  average_speed: number; // meters per second
  max_speed: number; // meters per second
  average_heartrate?: number; // beats per minute
  max_heartrate?: number; // beats per minute
  // Add other relevant fields based on Strava API documentation
}

export interface StravaAthlete {
  id: number;
  username: string;
  firstname: string;
  lastname: string;
  city: string;
  state: string;
  country: string;
  sex: 'M' | 'F' | null;
  profile_medium: string; // URL to profile picture
  profile: string; // URL to profile picture
  // Add other relevant fields
}
Using such interfaces ensures that the data you fetch and manipulate conforms to expected structures, catching potential errors during development.
Phase 2: Implementing User Authentication
Managing User Accounts
Your application needs its own user management system to store user preferences and associate Strava tokens with specific users. While you could build this from scratch, using an authentication library simplifies the process considerably.
Using Auth.js (formerly NextAuth.js)
Auth.js provides excellent SvelteKit integration and supports various authentication strategies, including email/password and OAuth providers like Strava. It handles session management, security, and the complexities of authentication flows.
Install Auth.js for SvelteKit:
npm install @auth/sveltekit @auth/coreConfigure Auth.js by creating a hook and an API route. Set up the main configuration in src/hooks.server.ts:
// src/hooks.server.ts
import { SvelteKitAuth } from "@auth/sveltekit";
import Strava from "@auth/sveltekit/providers/strava";
import { STRAVA_CLIENT_ID, STRAVA_CLIENT_SECRET } from "$env/static/private"; // Use SvelteKit's env handling

export const handle = SvelteKitAuth({
  providers: [
    // You can add other providers like Email/Password here if needed
    Strava({
      clientId: STRAVA_CLIENT_ID,
      clientSecret: STRAVA_CLIENT_SECRET,
      authorization: {
        params: {
          scope: "read,read_all,profile:read_all,activity:read_all", // Request necessary scopes
          approval_prompt: "auto"
        }
      }
    }),
  ],
  callbacks: {
    async jwt({ token, account, profile }) {
      // Persist the OAuth access_token and refresh_token to the token right after signin
      if (account) {
        token.accessToken = account.access_token;
        token.refreshToken = account.refresh_token;
        token.expiresAt = account.expires_at; // Store expiry time (timestamp in seconds)
        token.stravaId = profile?.id; // Assuming profile contains Strava user ID
      }
      // TODO: Handle token refresh logic here if needed
      return token;
    },
    async session({ session, token }) {
      // Send properties to the client, like an access_token and user ID from the token.
      session.accessToken = token.accessToken as string;
      session.refreshToken = token.refreshToken as string;
      session.stravaId = token.stravaId as number;
      session.error = token.error as string; // Pass errors, e.g., refresh failure
      // Ensure the user object exists and add custom properties
      if (session.user) {
         session.user.id = token.sub ?? session.user.id; // Use token 'sub' as user ID if available
      }
      return session;
    },
  },
  // Add adapter here if you want to persist users/sessions to a database (e.g., using Prisma, Supabase)
  // secret: process.env.AUTH_SECRET, // Add a secret for production
  // trustHost: true, // Required for some environments
});
This setup configures Auth.js to handle authentication, including the Strava OAuth provider which we'll detail next. You'll also need API routes (e.g., src/routes/auth/[...authjs]/+server.ts) to expose the necessary endpoints for Auth.js.
Database Integration
For storing user profiles, linked Strava tokens (especially refresh tokens), and processed activity data, you'll need a database. Options like Supabase (PostgreSQL) or MongoDB Atlas integrate well with SvelteKit backends. Auth.js adapters can help manage user and session data persistence.
Phase 3: Connecting to Strava via OAuth 2.0
Authorizing Access to User Data
To access a user's Strava activities, you must implement the Strava OAuth 2.0 authentication flow. This allows users to grant your application permission to read their data without sharing their Strava password.
Strava Application Registration
First, register your application on the Strava Developer Portal. Navigate to 'My API Application' under your settings.
- Provide an application name, website, and description.
- Set the "Authorization Callback Domain". For local development, this is often
localhost. For production, it's your application's domain. - Note down your Client ID and Client Secret. Store these securely, for example, using environment variables (
$env/static/privatein SvelteKit).
Register your application via the Strava Developer Portal to get API credentials.
Implementing the OAuth Flow with Auth.js
The Auth.js configuration shown previously already includes the Strava provider. When a user clicks a "Connect to Strava" button on your frontend, you trigger the sign-in flow provided by Auth.js:
<script lang="ts">
  import { signIn } from '@auth/sveltekit/actions';
</script>

<!-- In your Svelte component -->
<button on:click={() => signIn('strava')}>Connect Strava Account</button>
Auth.js handles the following steps:
- Redirect to Strava: The user is sent to Strava's authorization page, requesting the scopes defined in your Auth.js config (e.g.,
activity:read_all). - User Authorization: The user logs into Strava (if not already) and approves your application's request.
- Redirect Back to Your App: Strava redirects the user back to your application's callback URL (handled automatically by Auth.js) with a temporary authorization code.
- Token Exchange: Your backend (Auth.js) securely exchanges this code, along with your Client ID and Client Secret, for an access token and a refresh token.
- Token Storage: The access token (short-lived, used for API calls) and refresh token (long-lived, used to get new access tokens) are stored securely, associated with the user's session or profile (managed by Auth.js callbacks and potentially a database adapter).
Handling Tokens and Scopes
Ensure you request the necessary scopes (permissions) during the authorization step. For analyzing activities, activity:read_all is essential. The profile:read_all scope can be useful for fetching user profile information. Securely store the refresh token in your database, as it's needed to maintain long-term access without requiring the user to reconnect frequently.
Phase 4: Fetching Strava Activities
Keeping Data Synchronized
To provide up-to-date analysis, your application needs to fetch new activities as the user posts them on Strava.
Polling vs. Webhooks
Strava offers Webhooks for receiving notifications about new activities, but setting them up requires a subscription process and handling event validation. A common alternative, especially during development or for simpler setups, is polling.
Polling involves periodically querying the Strava API for new activities for each connected user.
Implementing Polling with Background Tasks
Directly polling within a user's browser session or a standard SvelteKit API request isn't suitable for continuous, background monitoring. You need a separate process:
- Scheduled Jobs: Use a task scheduler (like
node-schedulewithin a long-running Node.js process, or cloud services like Vercel Cron Jobs, AWS Lambda Scheduled Events, or Google Cloud Scheduler) to trigger a function at regular intervals (e.g., every 15-30 minutes). - Task Logic: This function should:
- Retrieve users from your database whose Strava accounts are connected.
- For each user, fetch their valid Strava access token (potentially refreshing it using the stored refresh token if it's expired).
- Call the Strava API's
/athlete/activitiesendpoint. Use theafterparameter with the timestamp of the last synced activity to fetch only new ones efficiently. - Process and store the relevant data from new activities in your database.
- Update the timestamp of the last sync for that user.
// Example: Conceptual server-side polling function (e.g., in an API route triggered by a scheduler) import type { StravaActivity } from '$lib/types/strava'; import { db } from '$lib/database'; // Your database client import { refreshStravaToken } from '$lib/stravaAuth'; // Function to handle token refresh async function pollUserActivities(userId: string) { const user = await db.getUser(userId); // Fetch user data, including Strava tokens and last sync time if (!user?.stravaRefreshToken) return; let accessToken = user.stravaAccessToken; // Check if access token is expired and refresh if necessary if (Date.now() / 1000 > user.stravaTokenExpiresAt) { const newTokens = await refreshStravaToken(user.stravaRefreshToken); if (!newTokens) { console.error(<code>Failed to refresh token for user ${userId}); // Handle error: maybe mark user connection as invalid return; } accessToken = newTokens.accessToken; // Update stored tokens in DB await db.updateUserTokens(userId, newTokens.accessToken, newTokens.refreshToken, newTokens.expiresAt); } const lastSyncTimestamp = user.lastSyncTimestamp || 0; // Get timestamp of last activity fetched const apiUrl =https://www.strava.com/api/v3/athlete/activities?after=${lastSyncTimestamp}&per_page=50; try { const response = await fetch(apiUrl, { headers: { Authorization:Bearer ${accessToken}}, }); if (!response.ok) { // Handle API errors (e.g., rate limits, invalid token) console.error(Strava API error for user ${userId}: ${response.statusText}); return; } const activities: StravaActivity[] = await response.json(); if (activities.length > 0) { // Process and store new activities in your database await db.storeActivities(userId, activities); // Update the last sync timestamp to the start time of the latest fetched activity const latestActivityTimestamp = Math.floor(new Date(activities[0].start_date).getTime() / 1000); await db.updateLastSync(userId, latestActivityTimestamp); console.log(Synced ${activities.length} new activities for user ${userId}); } } catch (error) { console.error(Error polling activities for user ${userId}:, error); } } // Function to be called by scheduler for all users async function runPollingForAllUsers() { const userIds = await db.getAllConnectedUserIds(); for (const userId of userIds) { await pollUserActivities(userId); // Add delay between users to respect rate limits if necessary await new Promise(resolve => setTimeout(resolve, 1000)); // e.g., 1 second delay } }
Respecting Rate Limits
The Strava API has rate limits (e.g., per 15 minutes and daily). Design your polling strategy carefully to stay within these limits, especially if you have many users. Implement exponential backoff for failed requests and potentially stagger polling jobs.
Phase 5: Data Analysis and AI-Powered Suggestions
Extracting Insights and Generating Plans
Once you have the user's activity data stored in your database, the core feature is analyzing it to provide training suggestions.
Fetching Detailed Activity Data
For in-depth analysis, you might need more details than the summary provided by the /athlete/activities endpoint. Use the /activities/{id} endpoint to fetch comprehensive data for specific activities, including heart rate zones, power data, cadence, and GPS streams if needed.
AI Analysis Approaches
There are several ways to implement the AI analysis component:
- Rule-Based Logic: Start with simpler logic based on common training principles. Analyze trends in distance, duration, pace, elevation, heart rate, etc., over recent weeks. Suggest increases or decreases in volume/intensity, rest days, or specific workout types based on predefined rules.
- Machine Learning Models: Train custom ML models (e.g., using Python with scikit-learn, TensorFlow, or PyTorch, possibly exposed via an API) to identify complex patterns and predict optimal training loads or recovery times based on historical data. Libraries like TensorFlow.js allow running some models directly in Node.js or even the browser.
- Large Language Models (LLMs): Use services like OpenAI's GPT or Anthropic's Claude. Provide the LLM with structured activity data and prompt it to generate analysis summaries and training suggestions in natural language. Projects like strava-mcp explore bridging LLMs with Strava data.
- External AI Fitness Services: Integrate with specialized third-party AI fitness platforms via their APIs, sending them the user's Strava data for analysis and receiving back recommendations.
- Strava's Athlete Intelligence: Leverage insights potentially available through Strava's own features, although direct API access to these specific AI summaries might be limited for third-party developers. Check the official API documentation for any available endpoints related to analysis or insights.
Example AI Integration (Conceptual)
Your backend would orchestrate this: Fetch processed data from your database, send it to your chosen AI component (internal model or external API), receive the analysis/suggestions, and store them for display to the user.
// Example: API endpoint in SvelteKit to trigger analysis
// src/routes/api/analyze/+server.ts
import type { RequestHandler } from './$types';
import { db } from '$lib/database';
import { getAISuggestions } from '$lib/aiAnalyzer'; // Your AI analysis module

export const POST: RequestHandler = async ({ locals }) => {
  // Ensure user is authenticated (using Auth.js session/token)
  const session = await locals.getSession();
  if (!session?.user?.id) {
      return new Response(JSON.stringify({ error: 'Unauthorized' }), { status: 401 });
  }
  const userId = session.user.id;

  // Fetch relevant activity data for the user from your DB
  const activities = await db.getRecentActivities(userId);

  if (!activities || activities.length === 0) {
      return new Response(JSON.stringify({ message: 'No activities found for analysis.' }), { status: 200 });
  }

  // Perform AI analysis
  const suggestions = await getAISuggestions(activities);

  // Store suggestions in DB (optional)
  await db.storeTrainingSuggestions(userId, suggestions);

  // Return suggestions to the frontend
  return new Response(JSON.stringify({ suggestions }), { status: 200 });
};
Phase 6: Frontend Display and Visualization
Presenting Data and Suggestions
The final step is to build the user interface in SvelteKit to display the fetched activities, analysis, and training suggestions.
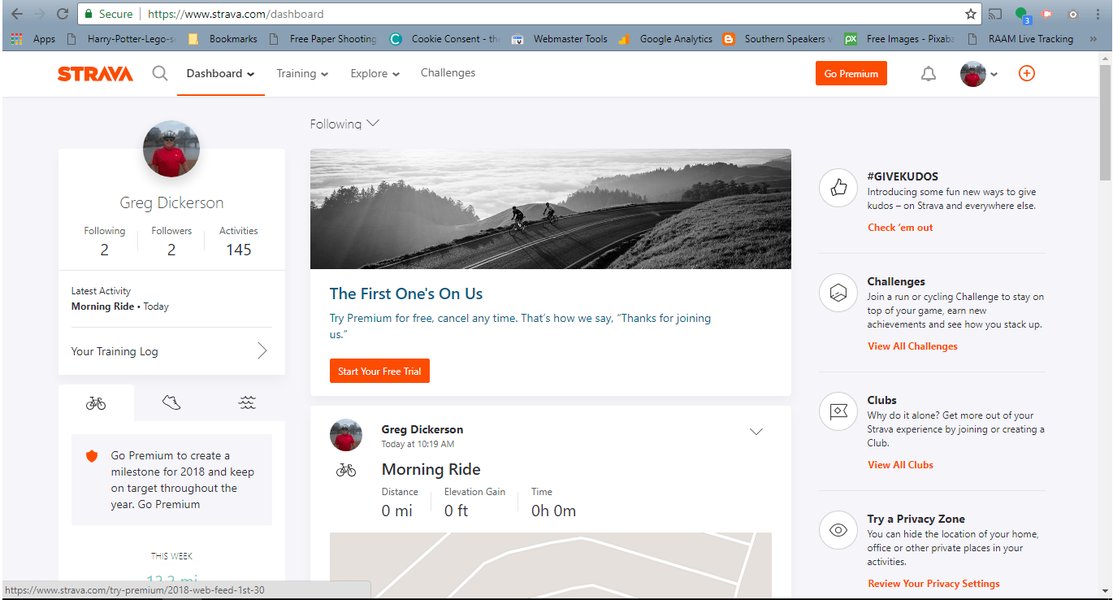
Dashboard Components
Create Svelte components (.svelte files) for different parts of the UI:
- A dashboard overview page.
- Activity list/details view.
- Charts for visualizing trends (e.g., weekly distance, pace improvement).
- A section displaying the AI-generated training suggestions.
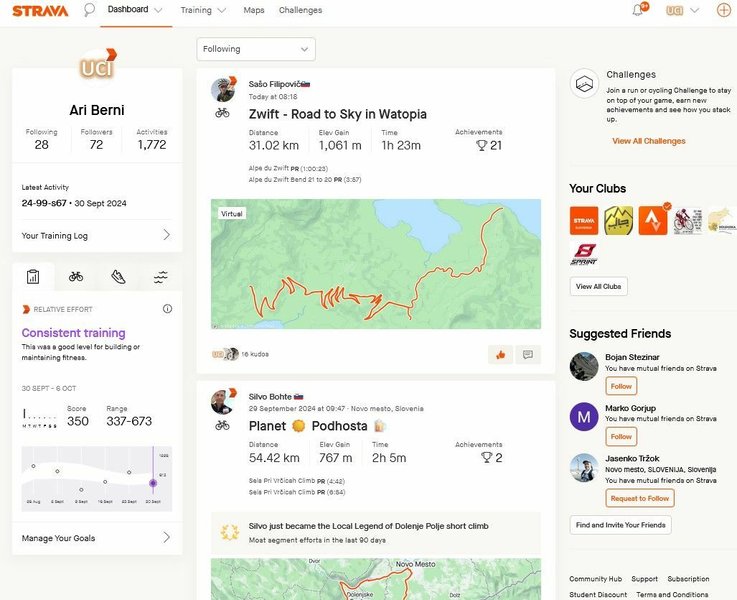
Build a user-friendly dashboard to display activity data and training insights.
Data Fetching in SvelteKit Pages
Use SvelteKit's load functions in your page scripts (+page.ts or +layout.ts) to fetch data from your backend API endpoints before the page renders.
<!-- src/routes/dashboard/+page.svelte -->
<script lang="ts">
  import type { PageData } from './$types';
  import { onMount } from 'svelte';

  export let data: PageData; // Data loaded from +page.ts

  let suggestions: any = null; // To store AI suggestions fetched client-side

  async function fetchSuggestions() {
    const response = await fetch('/api/analyze', { method: 'POST' }); // Trigger analysis
    if (response.ok) {
      const result = await response.json();
      suggestions = result.suggestions;
    } else {
      console.error("Failed to fetch suggestions");
    }
  }

  onMount(() => {
    // Optionally trigger analysis when component mounts or via a button
    // fetchSuggestions();
  });

</script>

<h1>Your Dashboard</h1>
<p>Welcome, {data.user?.name || 'User'}!</p>

<h2>Recent Activities</h2>
{#if data.activities && data.activities.length > 0}
  <ul>
    {#each data.activities as activity}
      <li>{activity.name} - {(activity.distance / 1000).toFixed(2)} km</li>
    {/each}
  </ul>
{:else}
  <p>No recent activities found. Connect your Strava account and sync some activities!</p>
{/if}

<!-- Section for AI Suggestions -->
<h2>Training Suggestions</h2>
<button on:click={fetchSuggestions}>Get AI Suggestions</button>
{#if suggestions}
  <div>
    <!-- Display suggestions here -->
    <pre>{JSON.stringify(suggestions, null, 2)}</pre>
  </div>
{:else}
  <p>Click the button to generate training suggestions based on your recent activities.</p>
{/if}

<!-- Add Charts and other visualizations here -->
// src/routes/dashboard/+page.ts
import type { Load } from '@sveltejs/kit';

export const load: Load = async ({ fetch, parent }) => {
  const { session } = await parent(); // Get session data from root layout
  if (!session?.user) {
      // Redirect or handle unauthorized access
      return { activities: [], user: null };
  }

  // Fetch activities from your own backend API endpoint which queries your DB
  const response = await fetch('/api/activities'); // Example endpoint
  let activities = [];
  if (response.ok) {
    activities = await response.json();
  }

  return {
    activities: activities, // Pass activities to the page component
    user: session.user     // Pass user info
  };
};
Visualizing Training Focus
Understanding AI Suggestions with a Radar Chart
A radar chart can effectively visualize the focus areas of the AI-generated training suggestions. For instance, it could compare aspects like recommended volume, intensity, recovery focus, workout specificity, and consistency encouragement based on the analysis of recent activities versus an ideal profile or past performance.
The chart below provides a hypothetical example comparing the AI's suggestions for the upcoming week against the user's previous week's activity profile across key training dimensions. This helps the user quickly grasp the recommended adjustments.
Architectural Overview
Mapping the Application Flow
A mind map helps visualize the overall structure and flow of the application, from user interaction on the frontend to backend processes involving authentication, data fetching, AI analysis, and database storage.
This mind map illustrates the key components: the SvelteKit frontend handling user interactions, the SvelteKit backend managing authentication, Strava communication, data storage via a database, the core AI analysis logic, and interactions with external services like the Strava API itself.
Key Strava API Endpoints
Understanding Your Data Sources
Effectively interacting with Strava requires understanding its API endpoints. The table below summarizes some of the most relevant endpoints for this type of application.
| Endpoint Path | HTTP Method | Description | Required Scope | Use Case |
|---|---|---|---|---|
/oauth/authorize |
GET | Initiates the OAuth 2.0 authorization flow. | N/A (User interaction) | Redirecting users to Strava to grant permissions. |
/oauth/token |
POST | Exchanges an authorization code or refresh token for access/refresh tokens. | N/A (Server-to-server) | Obtaining and refreshing API access tokens. |
/athlete |
GET | Retrieves the profile information for the authenticated athlete. | profile:read_all or read |
Getting basic user details (name, profile picture). |
/athlete/activities |
GET | Retrieves a list of activities for the authenticated athlete, filterable by date/time. | activity:read_all or activity:read |
Fetching recent activities for polling/syncing. |
/activities/{id} |
GET | Retrieves detailed information about a specific activity. | activity:read_all or activity:read |
Getting detailed data (HR, power, map) for analysis. |
/activities/{id}/streams |
GET | Retrieves streams (time series data like lat/lng, heartrate, watts) for an activity. | activity:read_all or activity:read |
Performing detailed time-series analysis if needed. |
Refer to the official Strava API Documentation for complete details, parameters, and response structures for these and other available endpoints.
Learning from Examples: Building a Fitness Dashboard
Visualizing Strava Data
Understanding how to interact with the Strava API and visualize the data is crucial. While not specific to SvelteKit, the following video provides a practical walkthrough of building a fitness dashboard using the Strava API, covering authentication, data fetching, and visualization concepts that are transferable to your project.
This video demonstrates connecting to the Strava API, fetching activity data, and setting up visualizations, offering valuable insights for your project.
Frequently Asked Questions (FAQ)
How do I handle Strava API rate limits?
How should I securely store Strava API tokens?
What kind of AI analysis can I perform on Strava data?
Can I use SvelteKit for the entire application (frontend and backend)?
Recommended Next Steps
Explore these related topics for deeper insights:
- How to implement Strava OAuth token refresh flow in a Node.js backend?
- Best practices for scheduling background tasks in a SvelteKit application on Vercel?
- Using TensorFlow.js for time-series analysis of fitness data?
- Compare database options like Supabase vs Firebase for SvelteKit apps?
References
Last updated May 5, 2025