UniApp 在 Vue 3 版本中使用 Hooks 方法全面指南

一、Vue 3 组合式 API 简介
Vue 3 引入了组合式 API(Composition API),为开发者提供了一种更灵活和模块化的代码组织方式。组合式 API 的核心在于将组件的逻辑代码拆分成多个独立的函数(即 Hooks),这些函数可以在不同的组件中复用。相比于 Vue 2 的选项式 API,组合式 API 更加适合大型项目的开发和维护。
1. 核心概念
组合式 API 提供了多个函数,用于创建和管理响应式数据、计算属性以及监听数据变化等。以下是一些常用的组合式 API 方法:
ref和reactive:用于创建响应式数据。computed:用于创建计算属性。watch和watchEffect:用于监听数据变化。onMounted、onUnmounted等生命周期 Hooks:用于在组件的不同生命周期阶段执行代码。useStore:用于在组件中使用 Pinia 状态管理库。
二、生命周期 Hooks 的使用与适配
1. Vue 3 中的生命周期 Hooks
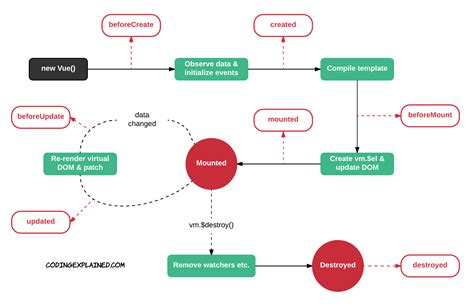
Vue 3 的组合式 API 将生命周期钩子函数集成到了 setup() 函数中,使用时需以 on 开头。例如:
import { onMounted, onUnmounted } from 'vue';

export default {
  setup() {
    onMounted(() => {
      console.log('组件已挂载');
    });

    onUnmounted(() => {
      console.log('组件已卸载');
    });
  },
};
2. UniApp 中的生命周期与 Vue 3 的结合
UniApp 是一个基于 Vue 的跨平台框架,支持小程序、H5 和 App 等多个平台。在将 UniApp 迁移到 Vue 3 时,需要适配 UniApp 的页面生命周期与 Vue 3 的组合式 API 生命周期钩子。UniApp 提供了一些特定的页面生命周期函数,如 onLoad、onShow、onHide 等,这些函数可以在 Vue 3 组件中使用:
import { onLoad, onShow, onReady } from '@dcloudio/uni-app';

export default {
  setup() {
    onLoad(() => {
      console.log('页面加载完成');
    });

    onShow(() => {
      console.log('页面显示');
    });

    onReady(() => {
      console.log('页面准备完成');
    });
  },
};
通过在 <script setup> 中使用这些生命周期函数,可以更好地控制页面的行为,并与 Vue 3 的生命周期钩子进行协调。
三、常用 Hooks 方法
1. 响应式数据管理
在 Vue 3 中,ref 和 reactive 是创建响应式数据的两大核心方法:
1.1 ref 和 reactive
ref 通常用于包装基本类型的数据,而 reactive 则用于包装对象或数组。
import { ref, reactive } from 'vue';

const count = ref(0);

const state = reactive({
  message: 'Hello, UniApp!',
});
2. 计算属性和监听器
computed
用于创建基于响应式数据的计算属性。
import { ref, computed } from 'vue';

const count = ref(0);
const doubleCount = computed(() => count.value * 2);
watch 和 watchEffect
用于监听响应式数据的变化。
import { ref, watch, watchEffect } from 'vue';

const count = ref(0);

watch(count, (newValue, oldValue) => {
  console.log(`count changed from ${oldValue} to ${newValue}`);
});

watchEffect(() => {
  console.log(`count is ${count.value}`);
});
3. 路由 Hooks
使用 uni-native-router 包,可以创建和管理路由,配合 Vue 3 的组合式 API 使用。
// router.ts
import { createRouter } from 'uni-native-router';
export { useRoute, useRouter } from 'uni-native-router';

import pages from '@/pages.json';
import { App } from 'vue';

export let router = createRouter({ routes: pages.pages });

export const setupRouter = (app: App) => {
  app.use(router);

  // Route guards
  router.beforeEach(async (to: any, from: any, next: any) => {
    next();
  });

  router.afterEach((to: any, from: any) => {
    // Additional logic here
  });
};
在组件中使用路由 Hooks:
// MyComponent.vue
<view class="uni-native-router">
<view class="jump-btn" @click="jump">路由跳转</view>
</view>
4. 授权 Hooks
处理用户授权是 UniApp 开发中的常见需求。以下示例展示了如何创建一个处理用户授权的 Hook:
// src/composable/index.ts
export const useShowPullAuth = () => {
  const pullAuth = (scope: keyof UniApp.AuthSetting): void => {
    const map: Record = {
      'scope.userInfo': '用户信息',
      'scope.userLocation': '地理位置',
      'scope.userLocationBackground': '后台定位',
      'scope.address': '通信地址',
      'scope.record': '录音功能',
      'scope.writePhotosAlbum': '保存到相册',
      'scope.camera': '摄像头',
      'scope.invoice': '获取发票',
      'scope.invoiceTitle': '发票抬头',
      'scope.werun': '微信运动步数',
    };

    uni.getSetting({
      success: (res) => {
        if (map[scope]) {
          // 请求授权
          uni.authorize({
            scope,
            fail: () => {
              const word = map[scope];
              uni.showModal({
                content: `检测到您没打开${word}权限,是否去设置打开?`,
                confirmText: '确认',
                cancelText: '取消',
                success: (res) => {
                  if (res.confirm) {
                    // 打开设置页面
                    uni.openSetting({
                      success: (res) => {
                        if (res.authSetting[scope]) {
                          uni.showToast({
                            title: '授权成功',
                            icon: 'none',
                          });
                        } else {
                          uni.showToast({
                            title: '未授权,将会影响使用小程序部分功能,可自行去右上角(...)中-设置手动打开!',
                            icon: 'none',
                          });
                        }
                      },
                    });
                  } else {
                    uni.showToast({
                      title: '未授权,将会影响使用小程序部分功能,可自行去右上角(...)中-设置手动打开!',
                      icon: 'none',
                      duration: 2500,
                    });
                  }
                },
              });
            },
          });
        } else {
          // 处理不存在的 scope
          uni.showToast({
            title: '无此授权功能',
            icon: 'none',
          });
        }
      },
    });
  };

  return { pullAuth };
};
在组件中使用授权 Hook:
// MyComponent.vue
5. 常用工具 Hooks
5.1 Toast 和 Loading Hooks
创建用于显示 Toast 消息和加载指示器的 Hooks:
// src/hooks/index.ts
export const showToast = (title = '...', icon = 'none', duration = 2000) => {
  uni.showToast({
    title,
    icon,
    duration,
    mask: true,
  });
};

export const showLoading = (title = '...') => {
  uni.showLoading({
    title,
    mask: true,
  });
};

export const hideLoading = () => {
  uni.hideLoading();
};
在组件中使用这些 Hooks:
// MyComponent.vue
5.2 元素信息 Hooks
创建一个用于获取元素矩形信息的 Hook:
// src/hooks/index.ts
export const getRect = (selector: string) => {
  return new Promise((resolve) => {
    uni.createSelectorQuery()
      .select(selector)
      .boundingClientRect((data) => {
        resolve(data);
      })
      .exec();
  });
};
在组件中使用该 Hook:
// MyComponent.vue
6. 状态管理 Hooks
利用 Pinia 状态管理库的 useStore Hook,可以在组件中访问和修改全局状态:
import { useStore } from 'pinia';

const store = useStore();

function increment() {
  store.increment();
}
四、自定义 Hooks 的创建与使用
1. 什么是自定义 Hooks?
自定义 Hooks 是普通的 JavaScript 函数,用于封装和复用 Vue 的组合式 API 方法,如 ref、computed 等。通过自定义 Hooks,可以将可复用的逻辑抽取到独立的文件中,供多个组件使用。
2. 创建自定义 Hooks
以下是创建一个计数器自定义 Hook 的示例:
// src/hooks/useCounter.js
import { ref } from 'vue';

export function useCounter(initialValue = 0) {
  const count = ref(initialValue);

  const increment = () => {
    count.value++;
  };

  const decrement = () => {
    count.value--;
  };

  return { count, increment, decrement };
}
3. 在组件中使用自定义 Hooks
在组件中引入并使用自定义 Hook:
// MyComponent.vue
Count: {{ count }}
五、注意事项与最佳实践
1. 生命周期 Hooks 的作用范围
- 应用生命周期 Hooks:如
onLaunch,只能在App.vue中使用。 - 页面生命周期 Hooks:如
onLoad,只能在页面组件中使用。
2. 事件适配
Vue 3 移除了 .native 修饰符,事件监听需要通过 emits 选项声明。例如:
export default {
  emits: ['custom-event'],
  setup(props, { emit }) {
    const triggerEvent = () => {
      emit('custom-event');
    };
    return { triggerEvent };
  },
};
3. v-model 的变化
在 Vue 3 中,v-model 的默认属性从 value 改为 modelValue,事件从 input 改为 update:modelValue。
<template>
<CustomComponent v-model="data" />
</template>
4. 小程序平台的特殊处理
在小程序中使用 Vue 3 时,可能需要添加 data-eventsync="true" 属性来解决事件延迟问题。例如:
<button data-eventsync="true" @click="handleClick">点击我</button>
六、总结
在 UniApp 中结合 Vue 3 使用 Hooks 方法,可以显著提升代码的可维护性和复用性。通过利用组合式 API 提供的响应式数据管理、生命周期 Hooks 以及自定义 Hooks,开发者能够更高效地构建复杂的应用逻辑。此外,结合 UniApp 的特定生命周期函数和工具 Hooks,如路由管理和用户授权,可以进一步优化开发流程。以下是本指南涵盖的关键点:
-
组合式 API:使用
ref、reactive、computed等方法管理响应式数据。 -
生命周期 Hooks:在组件和页面级别使用组合式 API 的生命周期钩子。
-
常用 Hooks:包括路由管理、用户授权、Toast 和 Loading 提示、元素信息获取等。
-
自定义 Hooks:创建和使用可复用的逻辑函数,提高代码复用性。
-
注意事项:了解不同生命周期 Hooks 的作用范围,适配事件和小程序平台的特殊需求。
通过充分利用这些 Hooks 方法,开发者可以编写出更加清晰、模块化和高效的 UniApp 应用。
参考链接
Last updated January 4, 2025