
Mastering the Art of Halo Effects in Lightroom Portraits
Unlocking Atmospheric Glows and Creative Separations for Stunning Imagery
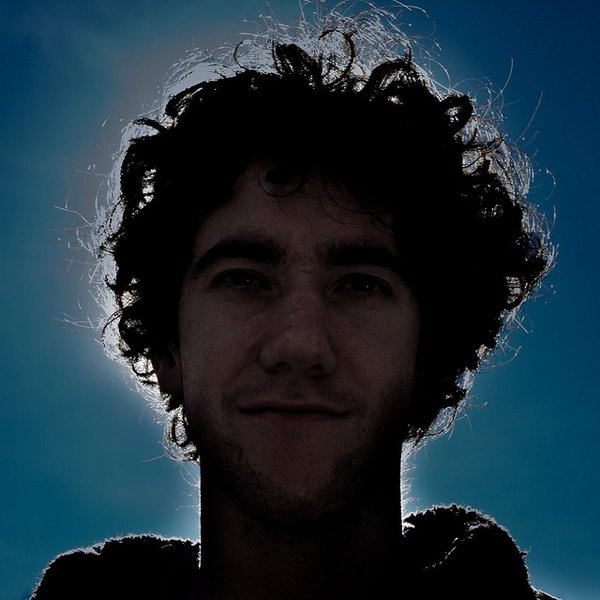
Creating a captivating halo effect behind a subject in Adobe Lightroom can dramatically enhance a portrait, adding a sense of depth, atmosphere, and separation from the background. This technique can range from a subtle, ethereal glow to a more pronounced, "stage light" appearance, effectively drawing the viewer's eye to your main subject. While achieving a desirable halo effect requires careful application, Lightroom offers a robust set of tools, primarily its masking capabilities, to accomplish this with precision.
Key Highlights for Crafting Halos
- Leveraging Masks for Precision: The foundation of a successful halo effect in Lightroom lies in the precise application of masks, particularly Radial and Brush tools, to isolate and enhance the area around your subject.
- Strategic Adjustment of Tones and Effects: Achieving a glow involves a nuanced interplay of exposure, highlights, dehaze, and clarity, allowing you to manipulate light and create the desired ethereal or dramatic illumination.
- Avoiding Unwanted Halos: Understanding the common pitfalls that lead to unintended haloing, such as over-sharpening or aggressive global adjustments, is crucial for producing clean, professional results.
Understanding the Halo Effect
Defining the Desired Glow
A "halo effect" in portrait photography generally refers to an intentional light or color outline that separates a subject from their background, often creating a luminous or ethereal quality. This can be achieved in-camera through specific lighting setups (like backlighting) or in post-processing using software like Adobe Lightroom.
When done correctly, a halo effect guides the viewer's attention to the subject, adds a sense of depth, and can significantly contribute to the mood and narrative of the image. It's distinct from unwanted "halos" or "fringing" that occur due to over-processing, which we'll also discuss how to avoid.
The Power of Backlighting for a Natural Halo
Before diving into post-processing, it's worth noting that the most natural and appealing halo effects often originate from proper lighting during the shoot. Backlighting, where the light source is positioned behind the subject, naturally creates a rim light or a soft glow around their edges. This provides a strong foundation for enhancing the effect in Lightroom.
Step-by-Step Guide to Creating a Halo Effect in Lightroom
Lightroom's powerful masking tools are your primary allies in creating an intentional halo effect. The goal is to selectively brighten and manipulate the area immediately surrounding your subject.
Phase 1: Initial Image Preparation
Import and Basic Adjustments
Always start by importing your portrait into Lightroom, preferably in raw format, to maximize the data available for editing. Begin with fundamental adjustments:
- White Balance: Ensure your white balance is accurate to provide a neutral starting point.
- Exposure, Highlights, and Shadows: Make initial adjustments to your overall exposure. If the original photo was slightly underexposed, you might have more flexibility to create a glow. Conversely, if dealing with harsh sunlight, ensure you haven't overexposed to preserve detail.
- Vibrance and Saturation: Apply subtle vibrance to liven up colors without over-saturating.
Phase 2: Crafting the Halo with Masks
This is where the magic happens. Lightroom's masking tools allow you to apply adjustments to specific areas of your image without affecting others.
Utilizing the Radial Gradient Tool
The Radial Gradient (often activated by pressing Shift+M) is excellent for creating a localized, soft glow around your subject, especially for portraits where the subject is centered. Here’s how:
Draw a radial gradient around your subject, ensuring it encompasses the area where you want the glow to appear. The key is to invert the mask so that the adjustments apply *outside* the circle or, if you want the glow on the subject, keep it un-inverted.
- Invert Mask (if targeting background): If you want the glow on the *background* around the subject, ensure the mask is inverted. This means the adjustments will apply to the area *outside* the circle.
- Exposure: Slightly increase the exposure within the masked area to create the initial brightness.
- Highlights: Boost the highlights to enhance the luminosity.
- Dehaze: A slight negative dehaze can introduce a soft, atmospheric quality, contributing to the glow.
- Clarity: Reduce clarity to soften the edges and create a dreamy, ethereal effect.
- Feather: Crucially, increase the feathering significantly. This creates a smooth, gradual transition, preventing a harsh line and making the halo look natural.
- Hue Shift (for colored glow): If you want a colored halo, you can shift the hue in the masked area, for example, to red for a sunset glow.
Employing the Adjustment Brush for Precision
For more intricate outlines or if your subject isn't perfectly circular, the Adjustment Brush is invaluable:
- Select Brush: Choose the Adjustment Brush.
- Brush Settings: Set the feather to a high value and adjust the flow and density for controlled application.
- Apply Adjustments: Paint over the areas around your subject where you want the halo. Similar to the radial gradient, apply increases in exposure, highlights, and possibly a negative dehaze and reduced clarity.
- Refine: Use the 'Erase' mode of the brush to clean up any areas where the halo extends too far or affects the subject themselves.
Combining Masks for Complex Effects
For advanced halo effects, you might combine different masks:
- Start with a "Select Subject" mask, then use the "Subtract" option with a brush or radial gradient to refine the area around your subject.
- You can also create multiple masks, each with slightly different settings, to build up layers of glow and depth.
Phase 3: Refining the Glow
Tone Curve Adjustments
The Tone Curve is a powerful tool for finessing the overall mood and glow:
- S-Curve: A subtle S-curve can add contrast, but be careful not to create harshness that might counteract your soft glow.
- Raising the Black Point: Slightly raising the black point on the tone curve can add a hazy, faded look, which often complements a dreamy glow.
Using the Effects Panel
- Post-Crop Vignetting: A subtle negative vignetting can help to draw the eye towards the center of the image and enhance the surrounding glow.
- Grain: Adding a touch of grain can sometimes lend a film-like quality that complements the ethereal aesthetic.
Avoiding Unwanted Halos and Fringing
While we aim to create intentional halos, it's equally important to distinguish them from undesirable artifacts. Unwanted halos, often bright or dark outlines around high-contrast edges, can detract from your image's quality. They are typically a side effect of aggressive editing.
This radar chart illustrates the relative importance and skill levels required for various aspects of creating intentional halo effects and avoiding unwanted ones in Lightroom. 'Precision Masking' and 'Feathering' are critical for any intentional halo, while 'Exposure & Highlights' are key drivers for the glow itself. 'Dehaze & Clarity' are vital for shaping the softness and atmosphere. 'Hue Adjustment' becomes important when a specific color glow is desired. Finally, 'Avoiding Unwanted Halos' is a crucial skill that underpins all effective editing, preventing distractions and maintaining image integrity. A higher score indicates greater importance or desired proficiency in that area for the specified effect.
Common Causes of Unwanted Halos:
- Aggressive Clarity/Sharpening: Over-applying clarity or sharpening, especially to images with hard edges against smooth tones (like a person against a bright sky), can create bright or dark fringes. The 'Texture' slider is often a safer alternative to 'Clarity'.
- High Contrast Adjustments: Extreme adjustments to highlights and shadows can lead to halos, particularly on high-contrast boundaries.
- Imprecise Masking: When using local adjustments (like brushes or gradients), if the mask isn't precise and feathered properly, it can leave a visible line or halo where the adjustment begins or ends.
- Dehaze Tool: While generally resistant to generating halos, extreme use can sometimes contribute.
- HSL Luminance Adjustments: Adjusting the luminance of specific colors can sometimes create halos.
Troubleshooting and Solutions
If you encounter unwanted halos, here are some strategies:
- Dial Back Adjustments: Often, the simplest solution is to reduce the intensity of the problematic sliders (Clarity, Highlights, Shadows). Aim for a more natural look.
- Refine Masks: Use the 'Subtract' brush in your masking panel to carefully remove the effect from haloed areas. Adjust feathering, flow, and density for precise control.
- Defringe Settings: Check the 'Lens Corrections' panel for 'Defringe' settings. While primarily for chromatic aberration, they can sometimes help with general color fringes.
- Color Range Mask: For specific color halos, create a color range mask and use the eyedropper to select the halo color. Then, reduce the saturation of that color within the masked area.
- Luminance Range Mask: Similar to the color range, a luminance range mask can target bright or dark halos. Refine the range and feathering to isolate the halo.
Creative Variations and Advanced Tips
Achieving a Dreamy or Atmospheric Effect
Beyond a simple halo, you can expand on the glow to create a more atmospheric or dreamy feel:
- Negative Dehaze: As mentioned, negative dehaze is key for a soft, hazy look.
- Reducing Contrast: Globally reducing contrast (or using a tone curve to lift the blacks) can further contribute to a dreamy aesthetic.
- Soft Glow Tutorial: Adobe Lightroom itself provides tutorials on adding a soft glow to enhance atmosphere.
Stage Light Portraits
For a more dramatic "stage light" effect, where the subject is brightly lit and the background falls off into darkness:
- Use a radial filter centered on your subject. Increase exposure, whites, and highlights within this circle.
- Outside this circle, you can use a separate radial filter (inverted) or brush to selectively darken the background by reducing exposure and shadows.
- Dodge and burn techniques (using the Adjustment Brush to selectively brighten or darken areas) can further enhance the dramatic contrast.
When to Consider Photoshop
While Lightroom is powerful, some complex halo or glow effects might be easier or more precisely achieved in Photoshop, especially for very detailed selections or layered effects. If Lightroom isn't giving you the desired results, consider exporting your image to Photoshop for advanced techniques like:
- Creating new layers via copy for highlights.
- Expanding light objects using filters like "Minimum."
- Applying Gaussian Blur and setting layer blend modes (e.g., Screen or Soft Light) for a sophisticated glow.
Summary of Key Adjustments and Their Impact
This table provides a quick overview of the key Lightroom adjustments used for creating and refining a halo effect, along with their primary impact.
| Adjustment | Primary Effect on Halo | Notes for Use |
|---|---|---|
| Exposure | Controls overall brightness of the halo area. | Slight increase for subtle glow, more for dramatic effect. |
| Highlights | Enhances the brightest parts of the halo. | Boosts luminosity, especially in light sources or rim light. |
| Shadows | Influences darker tones; lightening can reduce harshness. | Often lightened slightly within the halo area to soften transitions. |
| Dehaze | Negative values add a soft, atmospheric haze. | Crucial for a dreamy, ethereal glow. |
| Clarity | Negative values soften edges and reduce local contrast. | Essential for a smooth, diffused halo effect. |
| Texture | Less likely to cause halos than Clarity; affects fine detail. | Preferable over Clarity for general softening without halo risk. |
| Feather (Masks) | Controls the softness of the mask's edge. | High feathering is critical for natural-looking transitions. |
| Hue (Color Mixer) | Shifts the color of the halo. | Use for adding specific color tones, like a warm sunset glow. |
| Tone Curve | Fine-tunes overall contrast and light distribution. | Can lift blacks for haziness or create subtle contrast. |
Visualizing Halo Effects: A Practical Demonstration
To further illustrate the creation of a halo effect and how different adjustments contribute, here's a highly relevant video tutorial:
This video, "Separate Client From Background With Halo Effect in Lightroom Classic 2024," offers a practical walkthrough. It focuses on using Lightroom Classic's masking tools to create a separation and halo effect around a subject, making them stand out from the background. The tutorial demonstrates how to leverage the software's capabilities to achieve a professional and aesthetically pleasing result, directly addressing the user's query by showing the step-by-step process of isolating the subject and applying the desired glow.
Frequently Asked Questions (FAQ)
Conclusion
Creating a compelling halo effect in Lightroom is a powerful technique to elevate your portraits, drawing focus to your subject and imbuing your images with an artistic, often ethereal, quality. By mastering the strategic use of masking tools—like the Radial Gradient and Adjustment Brush—and understanding the subtle interplay of exposure, highlights, dehaze, and clarity, you can craft glows that range from soft and dreamy to dramatic and impactful. Remember that precision in applying these adjustments and a keen eye for avoiding unwanted artifacts are key to achieving professional and aesthetically pleasing results. With practice, you’ll be able to consistently separate your subjects with a beautiful, intentional halo, transforming ordinary portraits into extraordinary works of art.
Recommended Further Exploration
- Explore advanced portrait lighting setups for dramatic effects.
- Discover techniques for achieving soft skin and luminous tones in Lightroom.
- Learn to master the various masking tools in Adobe Lightroom for precise local adjustments.
- Understand how to identify and fix common editing mistakes in Lightroom portraits.
References
 photo.stackexchange.com
Last updated May 21, 2025