
Creating AXI4 Bus IP in Vivado: A Comprehensive Guide
Understanding the Process and Best Practices for AXI4 IP Integration
Key Takeaways
- You cannot create AXI4 bus IP directly through the IP Integrator.
- The "Create and Package IP" wizard is essential for generating custom AXI4 peripherals.
- Proper integration involves both IP packaging and subsequent integration within Vivado's IP Integrator.
Introduction
In the realm of FPGA design and system-on-chip (SoC) development, the Advanced eXtensible Interface 4 (AXI4) protocol plays a pivotal role. AXI4 facilitates high-performance, high-throughput data transfers between various functional blocks within a system. When designing custom peripherals or integrating new components into an existing design, understanding how to create and implement AXI4 bus IP is essential. This guide delves into the intricacies of creating AXI4 bus IP using Vivado, dispelling common misconceptions and providing a step-by-step approach to ensure successful integration.
Understanding the AXI4 Protocol
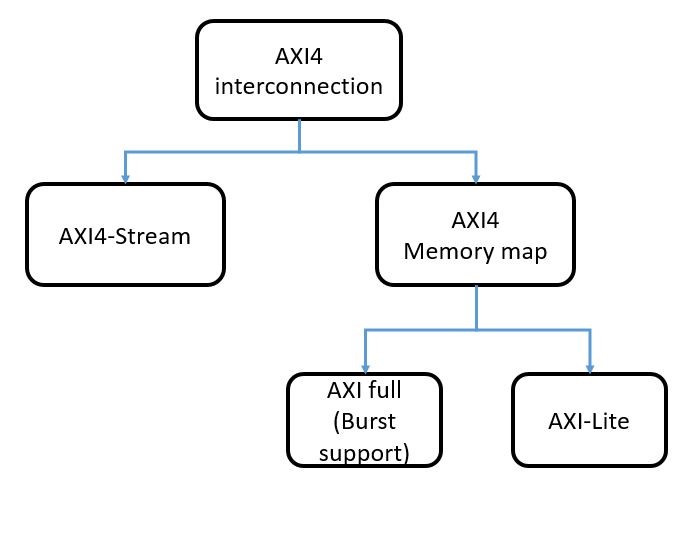
The AXI4 protocol, developed by ARM, is a widely adopted standard for interconnecting components within SoCs. It offers several variations tailored to different performance and complexity requirements:
| AXI4 Variant | Description | Use Case |
|---|---|---|
| AXI4-Full | Supports high-bandwidth, burst transactions with multiple outstanding transactions. | High-performance peripherals like memory controllers and DMA engines. |
| AXI4-Lite | A simplified version supporting single, non-burst transactions. | Control registers and simple peripheral interfaces. |
| AXI4-Stream | Designed for unidirectional data streaming with minimal handshake signaling. | Data streaming applications like video processing and network interfaces. |
Understanding these variants is crucial when designing custom IP, as it determines the complexity and performance characteristics of your peripheral.
Why You Can't Create AXI4 Bus IP Directly through IP Integrator
Vivado's IP Integrator is a powerful tool designed for assembling and connecting pre-existing IP cores into a cohesive system. However, it is not intended for the creation of new IP cores, especially those requiring custom AXI4 interfaces. Attempting to create AXI4 bus IP directly within IP Integrator lacks the necessary tools and functionalities, leading to potential configuration and integration issues.
The primary reason for this limitation is that IP Integrator focuses on system-level integration rather than low-level IP development. Creating a custom AXI4 peripheral involves detailed configuration of AXI interfaces, defining registers, and implementing specific functionalities, which are beyond the scope of IP Integrator's capabilities.
To effectively create custom AXI4 bus IP, leveraging Vivado's "Create and Package IP" wizard is essential. This tool provides the necessary framework and flexibility to design, configure, and package custom peripherals that conform to the AXI4 standards.
Creating Custom AXI4 Bus IP Using the "Create and Package IP" Wizard
Step 1: Launch Vivado and Start the IP Creation Wizard
Begin by opening Vivado and launching the "Create and Package IP" wizard. This wizard guides you through the process of defining the foundational aspects of your custom IP.
-
Access the Wizard: Navigate to
Tools → Create and Package IPwithin Vivado. -
Select the IP Creation Option: Choose
Create a new AXI4 peripheralwhen prompted. This selection ensures that the wizard configures the appropriate AXI4 interfaces for your IP.
Step 2: Configure the AXI4 Interface
Configuring the AXI4 interface is a critical step that defines how your custom IP will communicate with other system components.
-
Define IP Properties: Assign a name to your IP (e.g.,
Custom_AXI4_Peripheral). Specify the AXI4 interface type—whether it's AXI4-Full, AXI4-Lite, or AXI4-Stream—based on your design requirements. -
Set Interface Parameters: Determine the number of registers, data widths, address widths, and other relevant parameters. These settings will influence the data handling capabilities of your IP.
-
Allocate Address Space: Assign appropriate address ranges for your peripheral to ensure seamless integration within the system's memory map.
Step 3: Customize the IP Logic
With the AXI4 interface configured, the next phase involves adding custom logic to define the functionality of your peripheral.
-
Edit Generated HDL Files: The wizard generates template HDL (VHDL or Verilog) files. Open these files and implement the specific functionalities your IP requires.
-
Implement AXI Protocol Compliance: Ensure that your custom logic adheres to the AXI4 protocol's handshake mechanisms, such as managing
VALIDandREADYsignals correctly during read and write operations. -
Incorporate Additional Features: Depending on your application, you might need to integrate interrupt handling, data buffering, or other advanced features into your IP.
Step 4: Package the IP
After customizing the IP logic, packaging the IP is essential to make it reusable and integrable within other Vivado projects.
-
Finalize Packaging: Return to the IP Packager interface and review the configurations. Ensure all necessary files and settings are correctly specified.
-
Add to IP Catalog: Complete the packaging process, which adds your custom AXI4 IP to Vivado's IP catalog, making it accessible for future integration.
Integrating Custom AXI4 IP into Vivado's IP Integrator
Step 1: Create a New Block Design
With your custom AXI4 IP packaged, the next step involves integrating it into a system design using Vivado's IP Integrator.
-
Start a New Block Design: In Vivado, navigate to
Flow Navigator → IP Integrator → Create Block Designand provide a name for your design. -
Configure the Processing System: Add the necessary processing system IP (e.g., Zynq7 Processing System) to your block design. This component will act as the master interface for your AXI4 peripheral.
Step 2: Add and Connect Custom AXI4 IP
-
Add Custom IP: From the IP catalog, locate your custom AXI4 IP and add it to the block design.
-
Establish Connections: Connect the AXI4 interface of your custom IP to the processing system or other master interfaces using AXI interconnect blocks. Ensure data widths and address mappings are consistent across connections.
-
Configure Clock and Reset: Assign appropriate clock and reset signals to your custom IP to synchronize its operations within the system.
Step 3: Validate the Design
Ensuring that your integrated design functions correctly is paramount. Validation involves both simulation and hardware testing.
-
Synthesize the Design: Run synthesis to check for any logical or connectivity errors. Address any issues highlighted during this phase.
-
Implement the Design: Proceed to implementation, ensuring that timing constraints are met and that the design adheres to the target hardware specifications.
-
Generate Bitstream: Once synthesis and implementation are successful, generate the bitstream required for programming the FPGA.
-
Hardware Testing: Deploy the bitstream to your FPGA hardware and perform functional tests to verify the operation of your custom AXI4 peripheral within the system.
Troubleshooting Common Issues
Issue 1: AXI Interface Configuration Errors
Misconfiguration of the AXI4 interface is a common source of errors during IP creation and integration. Ensure that the data widths, address ranges, and protocol variants match across all connected components. Mismatches can lead to synthesis warnings or functional discrepancies during runtime.
Issue 2: Handshake Signal Mismanagement
AXI4 relies on a robust handshake mechanism using VALID and READY signals. Incorrect handling of these signals can disrupt data transfers. Verify that your custom IP correctly asserts and deasserts these signals in response to transaction states.
Issue 3: Integration Connectivity Problems
During the integration phase, connectivity issues can arise if blocks are not correctly linked or if interconnects are improperly configured. Utilize Vivado's connectivity analysis tools to identify and rectify such issues.
Recommended Solutions:
-
Double-check AXI4 configuration parameters during IP creation.
-
Use simulation tools to verify handshake signal behavior.
-
Ensure that all AXI interconnects are properly mapped and that address ranges do not overlap unintentionally.
-
Refer to Vivado's built-in debugging tools, such as the Integrated Logic Analyzer (ILA), for real-time monitoring.
Best Practices for AXI4 IP Development
Adhere to AXI4 Standards
Compliance with AXI4 standards ensures interoperability and reduces integration issues. Carefully follow the AXI4 specifications, particularly concerning signaling protocols and transaction handling.
Modular Design Approach
Designing your custom IP in a modular fashion enhances reusability and simplifies debugging. Encapsulate distinct functionalities within separate modules, facilitating easier integration and maintenance.
Comprehensive Testing and Validation
Implement robust testing methodologies, including simulation with testbenches and hardware validation, to ensure the reliability of your AXI4 IP. Utilize AXI Bus Functional Models (BFMs) to create comprehensive test scenarios.
Documentation and Version Control
Maintain thorough documentation of your IP configurations, customization steps, and integration procedures. Employ version control systems to track changes and facilitate collaborative development.
Utilize Vivado's Debugging Tools
Vivado offers a suite of debugging tools, including simulation environments and hardware analyzers. Leverage these tools to identify and resolve issues efficiently during the development process.
Conclusion
Creating a custom AXI4 bus IP within Vivado involves a methodical approach leveraging the "Create and Package IP" wizard rather than attempting to use IP Integrator directly. By meticulously configuring the AXI4 interfaces, implementing compliant logic, and adhering to best practices, developers can design robust and efficient peripherals that seamlessly integrate into complex SoC architectures. Proper understanding and execution of these steps not only streamline the development process but also enhance the performance and reliability of the final system.
References
Last updated January 23, 2025