
Mastering DIY Drip Irrigation for Your Small Garden
Unlock Efficient Watering and Thriving Plants with a Simple, Self-Installed System
Key Insights into DIY Drip Irrigation
- Water Conservation: Drip irrigation significantly reduces water waste by delivering water directly to the plant roots, minimizing evaporation and runoff, making it ideal for water-thrifty gardening.
- Ease of Installation: Many drip irrigation systems are designed for DIY enthusiasts, with components that snap together easily and require minimal tools, often making it a beginner-friendly project.
- Customization and Automation: Systems can be tailored to various garden layouts, from raised beds to container plants, and can be easily automated with timers for a "set it and forget it" approach, saving time and effort.
Drip irrigation is an incredibly efficient and effective method for watering your garden, especially for smaller plots or container plants. Unlike traditional sprinkler systems, which can lose a significant amount of water to evaporation and runoff, drip irrigation delivers water slowly and directly to the plant's root zone. This targeted approach not only conserves water but also promotes healthier plant growth by providing consistent moisture where it's needed most. For DIY enthusiasts, installing a drip irrigation system can be a rewarding project that saves time, money, and water in the long run.
Understanding the Core Benefits of Drip Irrigation
Drip irrigation systems offer numerous advantages over conventional watering methods, making them an increasingly popular choice for home gardeners. These benefits extend beyond simple water delivery to encompass plant health, time savings, and environmental responsibility.
Enhanced Water Efficiency
One of the primary reasons to adopt drip irrigation is its superior water efficiency. Traditional watering methods, such as hoses or sprinklers, can result in 25% to 35% water loss due to evaporation, wind, and runoff. In contrast, drip systems allow plants to absorb up to 90% of the applied water. This precision watering minimizes waste and ensures that every drop contributes to plant hydration. It's particularly beneficial in areas prone to water shortages or where water conservation is a priority.
An illustration highlighting how drip irrigation delivers water directly to the plant roots.
Promoting Plant Health and Growth
By delivering water directly to the root zone, drip irrigation ensures that plants receive a steady, consistent supply of moisture. This eliminates the stress caused by fluctuating soil moisture levels, which can occur with infrequent, deep watering or frequent, shallow watering. Consistent hydration leads to stronger root systems and overall healthier plants. Furthermore, because water is applied at the soil level, foliage remains dry, reducing the risk of fungal diseases that thrive in moist conditions.
Weed Suppression and Nutrient Delivery
Since drip irrigation targets water only to desired plants, it significantly reduces water availability for weeds, thereby suppressing their growth. This means less time spent on weeding and more time enjoying your garden. Additionally, drip systems can be integrated with fertigation, allowing you to deliver nutrients directly to the roots along with water, ensuring efficient fertilizer uptake and minimizing nutrient runoff.
Time and Labor Savings
Once installed, a drip irrigation system can be automated with a timer, eliminating the need for manual watering. This "set it and forget it" convenience saves hours of hand-watering, especially for larger gardens or during vacation periods. The minimal maintenance required for most DIY drip systems also contributes to overall time savings.
Key Components of a Drip Irrigation System
A basic drip irrigation system for a small garden typically consists of several interconnected components that work together to deliver water efficiently. Understanding these parts is crucial for successful DIY installation.

A visual breakdown of the essential components in a typical drip irrigation setup.
| Component | Function | Notes for Small Gardens |
|---|---|---|
| Water Source Connection | Connects the system to your outdoor faucet or rain barrel. | Often a hose bib connection with a Y-connector to allow for regular hose use. |
| Backflow Preventer | Prevents irrigation water from flowing back into your drinking water supply. | Crucial for health and safety; usually screws directly onto the faucet. |
| Filter | Removes sediment and debris from the water to prevent clogs in emitters. | Essential for system longevity, especially if using well water or rain barrels. |
| Pressure Regulator (Reducer) | Reduces water pressure to the optimal range (typically 10-25 psi) for drip systems. | Protects components from high pressure and ensures uniform water delivery. |
| Mainline Tubing (1/2" or 5/8") | The primary hose that carries water from the source to different areas of the garden. | Flexible polyethylene tubing is common for DIY; lay it out to form your grid. |
| Micro Tubing (1/4") | Smaller lines that branch off the mainline to individual plants or containers. | Connects to the mainline using barbed fittings; allows for precise placement. |
| Emitters/Drippers | Devices that release water slowly and precisely to the plant roots. | Available in various flow rates (e.g., 0.5 GPH, 1 GPH) and types (button, adjustable). |
| Fittings (Tees, Elbows, Connectors, End Caps) | Connect and direct the tubing to form the desired layout. | Snap-together or barbed fittings are common for DIY; ensure secure connections. |
| Stakes/Hold-downs | Secure the tubing and emitters in place to prevent dislodgement. | Keeps the system tidy and ensures water is delivered exactly where intended. |
| Timer (Optional but Recommended) | Automates the watering schedule, turning the system on and off at set times. | Hose-end timers are simple to install and ideal for small garden setups. |
Planning and Designing Your Small Garden Drip System
Before you start buying components, a little planning goes a long way. A well-thought-out design ensures efficient watering and minimizes wasted materials.
Mapping Your Garden Layout
Begin by sketching a map of your garden. Mark out all the plants, garden beds, pots, and trees you want to water. This visual plan will help you determine the optimal placement for your mainline and feeder lines, as well as the number and type of emitters needed. Consider dividing your garden into zones if you have different plant types with varying water needs or if your garden is spread across multiple areas.
Choosing the Right Emitters and Tubing
The type of emitter you choose depends on the plant and its water requirements. For individual plants or potted containers, a single dripper or a micro-spray might be appropriate. For rows of plants or dense plantings, drip line (tubing with pre-punched emitters at set intervals) can be more efficient. For small gardens, 1/2-inch or 5/8-inch mainline tubing is typically sufficient, with 1/4-inch micro tubing for individual plant connections.
Step-by-Step Installation Guide for DIY Drip Irrigation
Installing a drip irrigation system for a small garden is a straightforward process that even beginners can tackle. Many resources, including video tutorials, can guide you through each step.
Connecting to the Water Source
Start by attaching the backflow preventer to your outdoor faucet. Next, add the filter, followed by the pressure regulator. If you plan to use your faucet for other purposes, a Y-connector can be installed before these components. Finally, connect your mainline tubing to the pressure regulator.
Laying Out the Mainline and Branch Lines
Lay out the mainline tubing according to your garden map. You can use stakes to hold it in place. For areas requiring water, use a hole punch to create openings in the mainline. Insert barbed tees or connectors into these holes to attach branch lines (if needed) or directly attach emitters.

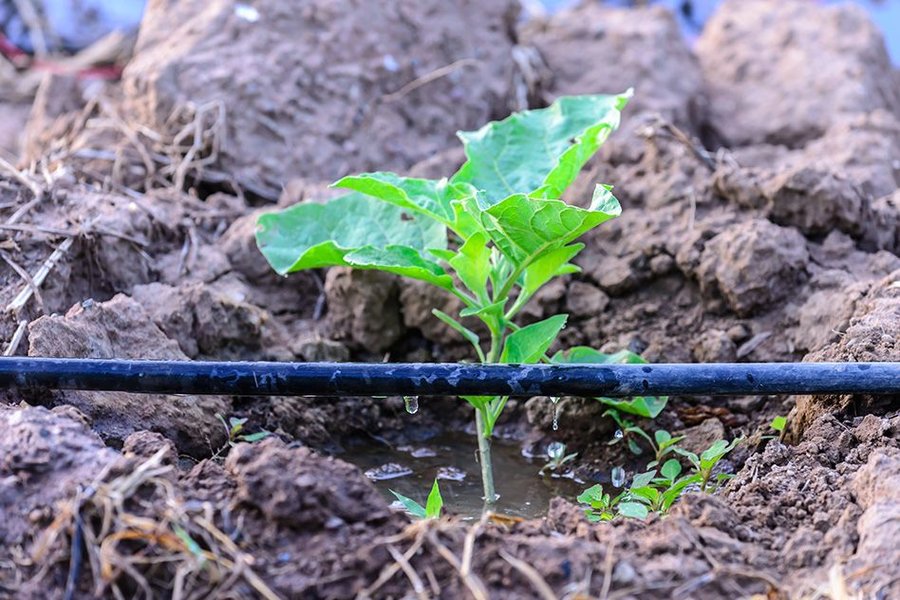
Drip irrigation tubing meticulously laid out in a garden bed, ready for efficient watering.
Installing Emitters and Feeder Lines
Attach emitters to the mainline or at the ends of 1/4-inch micro tubing that leads to individual plants. Position the emitters 6-12 inches from plant stems, ensuring water is delivered directly to the root zone. Secure all tubing with stakes to prevent movement.
Automating with a Timer (Optional)
For ultimate convenience, connect a hose-end timer between your faucet and the backflow preventer. Program the timer to water your garden at specific times, allowing for a fully automated watering schedule.
Performance Evaluation of Drip Irrigation Systems
To further illustrate the advantages and characteristics of DIY drip irrigation systems, consider the following radar chart. This chart provides a subjective assessment of key performance indicators, highlighting why drip irrigation is an excellent choice for small gardens.
As the radar chart illustrates, DIY Drip Irrigation excels in Water Efficiency and Plant Health Impact, scoring very high marks. Its Ease of Installation and Cost-Effectiveness are also strong points, making it an accessible option for most gardeners. While its Maintenance Level might be slightly higher than some automated sprinkler systems due to potential emitter clogging, the overall benefits, especially when coupled with Automation Potential, make it a superior choice for targeted garden watering.
Video Resources for DIY Drip Irrigation Installation
Visual guides can be incredibly helpful when undertaking a DIY project. The following video provides a comprehensive walkthrough for installing a drip irrigation system, specifically catering to beginners and small garden setups. This video is chosen for its clear instructions and focus on practical, step-by-step implementation, which aligns perfectly with the user's query for a DIY system in a small garden.
A comprehensive guide to installing a DIY drip irrigation system for beginners.
The video linked above, "DIY Drip Irrigation: The Ultimate Easy Beginners Guide On How To Install A Drip Irrigation System," is an excellent starting point for anyone looking to set up their own system. It covers essential steps, from planning the layout to connecting components and troubleshooting common issues. Watching a visual demonstration can clarify many aspects that might seem complex in text, such as how to properly punch holes in tubing or connect barbed fittings. It demystifies the process, making it approachable for novice gardeners.
Frequently Asked Questions (FAQ)
Conclusion: Empowering Your Garden with DIY Drip Irrigation
Installing a DIY drip irrigation system for your small garden is a highly beneficial endeavor that combines water conservation, improved plant health, and significant time savings. By carefully planning your layout, selecting the right components, and following straightforward installation steps, you can create an efficient watering solution tailored to your garden's unique needs. The initial effort of setting up the system quickly pays off through reduced water bills, thriving plants, and the freedom from daily manual watering. Embrace the power of drip irrigation to transform your gardening experience into a more sustainable and enjoyable hobby.
Recommended Further Exploration
- Explore advanced drip irrigation techniques for vegetable gardens.
- Learn how to troubleshoot common problems in drip irrigation systems.
- Discover how to integrate drip irrigation with smart garden technology.
- Understand the specific benefits of drip irrigation for container plants.