
Unlock Your Yard's Drainage Potential: Can You Repurpose an Existing Well into a DIY Dry Well?
Explore the feasibility, steps, and crucial considerations for transforming an old well into a functional stormwater solution.
Managing excess water runoff from downspouts, sump pumps, or low spots in your yard is crucial for protecting your foundation and preventing soggy landscapes. A dry well offers an effective solution by collecting stormwater and allowing it to gradually seep into the surrounding soil. While installing a new dry well is a common project, you might be wondering if that old, unused well on your property could be repurposed for this task. This guide delves into the possibility of converting an existing well into a DIY dry well, outlining the necessary steps, potential challenges, and important safety and regulatory factors.
Key Insights for Repurposing an Existing Well
- Feasibility Check is Crucial: Repurposing an old water well is possible but requires thorough inspection for structural integrity, depth, and potential contamination. Not all existing wells are suitable.
- Regulatory Hurdles Exist: Directing surface water into an old well may classify it as an "injection well" under EPA or state regulations, potentially requiring permits and adherence to specific guidelines to protect groundwater.
- Preparation is Key: The existing well must be cleaned of debris and old equipment (pumps, pipes). Modifications like adding gravel and landscape fabric are necessary for proper drainage function.
Understanding the Difference: Dry Wells vs. Water Wells
What is a Dry Well?
A traditional dry well is an underground structure, typically a pit filled with gravel or containing a specialized container (like a plastic tank), designed specifically to collect surface runoff or discharge from systems like sump pumps or roof gutters. Its primary function is infiltration – allowing water to slowly percolate into the surrounding soil, thereby reducing surface water pooling and potential erosion.
What is an Existing Water Well?
An existing water well, on the other hand, was originally constructed to access groundwater for supply purposes. These wells are often much deeper than typical dry wells and penetrate various soil and rock layers to reach an aquifer. When abandoned or unused, they might seem like convenient candidates for repurposing as drainage points.
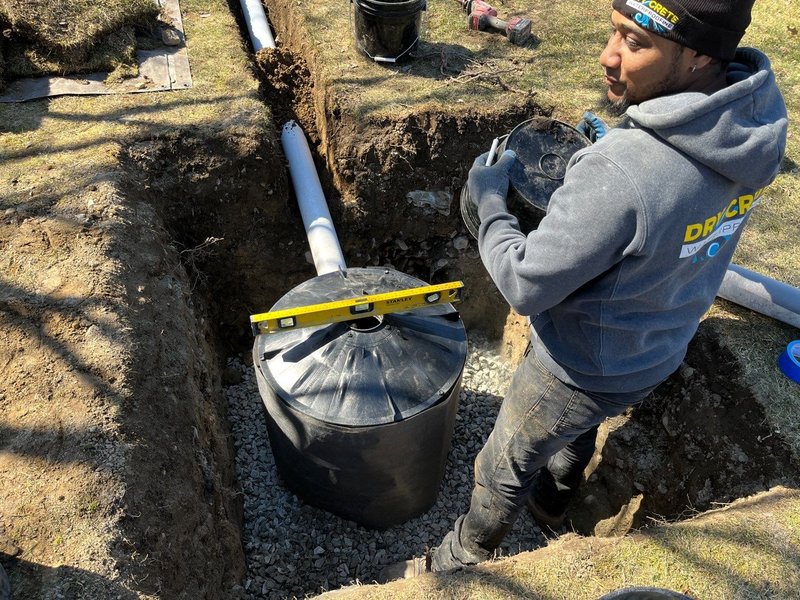
Visual showing the installation of components for a subsurface drainage system like a dry well.
Can You Actually Use an Old Water Well as a Dry Well?
The Possibility and the Caveats
Yes, it is technically possible to convert an old, unused water well into a functional dry well, but it's not as simple as just directing a pipe into the old hole. Several critical factors must be addressed:
Structural Integrity and Condition
Old wells, especially those abandoned for years, may have deteriorating casings or structural weaknesses. Before considering reuse, a professional inspection is essential to assess its condition. A compromised well could collapse or fail to function correctly.
Regulatory Compliance (Injection Wells)
Perhaps the most significant hurdle is regulation. In the United States and many other regions, intentionally piping surface water (like stormwater runoff or sump pump discharge) into the ground, especially into a structure that accesses deeper soil layers or groundwater, can classify the system as an "injection well." These are often regulated by the Environmental Protection Agency (EPA) or state environmental agencies to prevent groundwater contamination. You must check local and state regulations. Permits may be required, and some jurisdictions might outright prohibit this practice.
Contamination Risk
Surface runoff can carry pollutants like pesticides, fertilizers, oil, and bacteria. Introducing this potentially contaminated water directly into an old water well, which might connect to groundwater sources, poses a significant environmental risk. Proper filtering and understanding the well's depth and connection to aquifers are vital.
Soil Type and Drainage Capacity
The effectiveness of any dry well, including a converted one, depends heavily on the surrounding soil's permeability. Clay-heavy soils drain poorly, which could render the system ineffective, leading to overflow or backup. While an existing well might reach more permeable layers deeper down, its overall capacity still needs to match the expected inflow.
DIY Steps for Converting an Existing Well (Proceed with Caution)
If, after considering the risks and checking regulations, you determine conversion is feasible and permissible, here’s a general approach. Remember: Professional assessment of the well's condition and local regulations is highly recommended before starting.
Step 1: Thorough Inspection and Assessment
Professional Evaluation
Hire a qualified well contractor or inspector to assess the well's structural soundness, depth, casing material, and whether it's truly abandoned and sealed off from potable water sources.
Water Quality Testing
If any standing water is present, test it for contaminants. This helps understand potential risks if overflow were to occur.
Regulatory Check
Contact your local planning/zoning department, health department, or state environmental agency to understand the rules regarding well conversion and injection wells.
Utility Location
Before any digging for connecting pipes, call 811 or your local utility locating service to mark underground lines.
Step 2: Cleaning and Preparing the Well
Remove Obstructions
Any old pumps, pipes, wiring, debris, or sediment must be carefully removed from the well. This might require specialized equipment, often necessitating professional help.
Clean the Casing
Ensure the well casing is clear and stable.
Step 3: Modifying the Well for Drainage
Adding Drainage Media
Partially fill the cleaned well with layers of clean gravel or crushed stone (e.g., 3/4-inch washed stone). This creates void space for water storage and facilitates percolation. The amount needed depends on the well's depth and desired capacity.
Lining with Geotextile Fabric
Consider lining the upper portions of the well or wrapping the inlet pipe area with non-woven geotextile (landscape) fabric. This prevents surrounding soil and silt from migrating into the gravel, which would reduce its effectiveness over time.
Step 4: Connecting the Drainage Pipes
Digging Trenches
Excavate a trench from the water source (e.g., downspout outlet, sump pump discharge pipe) to the well location. The trench should be deep enough to protect the pipe (typically 18-24 inches) and must have a consistent downward slope towards the well (minimum 1/8 to 1/4 inch per foot) to ensure gravity flow.
Installing Pipes
Use solid PVC pipe (e.g., 4-inch diameter) for the main run from the source. Close to the well, you might transition to perforated PVC pipe to help disperse water, though the primary dispersion mechanism will be the well itself. Ensure connections are secure.
Connecting to the Well
Direct the pipe securely into the top portion of the modified well, ensuring it discharges onto the gravel bed. Use appropriate fittings or adapters to secure the pipe entrance.
Step 5: Backfilling and Finishing
Backfill Trenches
Carefully backfill the trenches with the excavated soil, compacting gently in layers.
Secure the Well Opening
Ensure the top of the old well is securely covered, perhaps with a suitable grate or lid that allows water entry but prevents debris accumulation and accidental falls. This cover might need to integrate with the inlet pipe.
Landscaping
Restore the surface with topsoil and sod, grass seed, or other landscaping as desired.
Step 6: Testing and Monitoring
After the first significant rainfall or by running water through the system (e.g., from a hose into the connected downspout), observe how the system functions. Check for backups, pooling around the well area, or slow drainage, which might indicate capacity issues or clogging.
Visualizing the Process: Key Considerations Mindmap
Converting an existing well involves several decision points and factors. This mindmap outlines the critical path from initial idea to potential implementation, highlighting key considerations like regulations and well suitability.
(Structural Integrity, Depth)"] id1b["Identify Well Type
(Water Well vs. Other)"] id1c["Assess Soil Permeability"] id1d["Check Proximity to Foundations
& Septic Systems (>10 ft)"] id2["Regulatory Compliance"] id2a["Check Local/State/EPA Rules
(Injection Well Classification?)"] id2b["Obtain Necessary Permits"] id2c["Understand Groundwater
Protection Laws"] id3["Preparation & Modification"] id3a["Professional Inspection Recommended"] id3b["Clean Well (Remove Debris, Pumps)"] id3c["Add Drainage Media (Gravel/Stone)"] id3d["Install Geotextile Fabric Liner"] id4["Installation Steps"] id4a["Plan Drainage Route & Slope"] id4b["Dig Trenches (Min. 1/8\" per ft slope)"] id4c["Install PVC Piping (Solid/Perforated)"] id4d["Connect Pipe Securely to Well"] id4e["Backfill Trenches & Secure Well Opening"] id5["Potential Risks"] id5a["Groundwater Contamination"] id5b["System Failure (Clogging, Overflow)"] id5c["Structural Collapse of Old Well"] id5d["Regulatory Fines if Non-Compliant"] id6["Alternatives"] id6a["Install a NEW Dry Well"] id6b["Other Drainage Solutions
(French Drain, Rain Garden)"]
Comparing Approaches: New Dry Well vs. Existing Well Conversion
Deciding whether to build a new dry well or attempt to convert an existing one involves trade-offs. This table summarizes the key pros and cons of each approach:
| Feature | Building a New Dry Well | Converting an Existing Well |
|---|---|---|
| Pros |
|
|
| Cons |
|
|
Factors Influencing Success: A Comparative Look
The success of converting an existing well depends on multiple factors. This radar chart provides a visual comparison of key elements influencing the viability and risk associated with this type of project compared to installing a standard new dry well. Higher values generally indicate a more favorable condition or lower risk for that factor.
As the chart suggests, while potentially offering some savings in excavation, converting an existing well generally carries higher risks and complexities, particularly concerning regulations, environmental safety, and structural reliability, compared to installing a new system designed specifically for drainage.
Video Guide: Installing a Standard Dry Well
While this video demonstrates the installation of a new, purpose-built dry well, many principles like pipe connection, slope requirements, and using gravel apply universally. Understanding the standard process provides valuable context, even if you are considering modifying an existing structure. This segment from "This Old House" outlines the fundamental steps.
Key takeaways from typical dry well installations include ensuring the system is located at least 10 feet away from foundations, using appropriate materials like PVC pipes and landscape fabric, and ensuring proper slope for water flow.
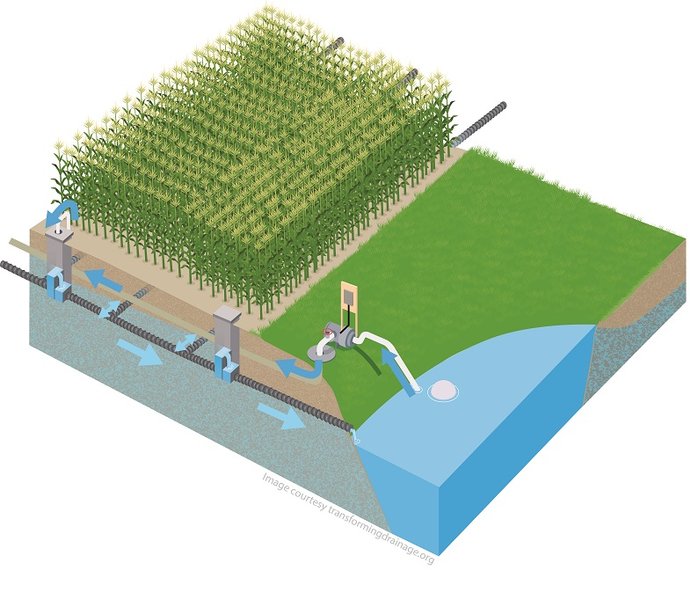
Conceptual diagram illustrating how water moves and is managed below the surface, similar to how a dry well facilitates infiltration.
Maintenance and Long-Term Care
Whether new or converted, a dry well requires periodic maintenance:
- Annual Inspection: Check the inlet pipes, downspouts, and the area around the well for debris, blockages, erosion, or settling, ideally before the rainy season.
- Clean Gutters and Inlets: Keep the sources feeding the dry well clear to prevent leaves and debris from entering and clogging the system.
- Monitor Performance: After heavy rains, check if water is draining effectively. Pooling water around the dry well area indicates a potential problem (clogging, insufficient capacity, or poor soil drainage).
- Flushing: Occasionally flushing the system with clean water can help dislodge minor sediment buildup.
Frequently Asked Questions (FAQ)
Recommended Further Exploration
- What are the specific regulations in my area regarding converting old wells for drainage use?
- How can I get a professional assessment of my old well's condition before considering reuse?
- What are effective yard drainage solutions if my soil type is not suitable for a dry well?
- What are the potential environmental impacts of directing surface runoff into deeper ground layers?
References
Last updated May 4, 2025