
Unlocking Potential Benefits: A Cautious Approach to Your Red Light Setup
Navigating energy, skin, and hair goals with modified heat lamps – safety is paramount.
It's interesting that you're exploring the potential of light therapy using your existing red light lamps. While red light therapy (RLT) is studied for various benefits, using high-wattage lamps designed for animals, like your 250W chicken lamps, requires extreme caution. Standard RLT devices use specific, tested wavelengths and intensities for human safety and efficacy. Your setup primarily delivers heat (infrared) and potentially some red light, but likely not the precise wavelengths or controlled output found in therapeutic devices. This guide provides a potential routine based on general light and heat therapy principles but adapted for the significant risks associated with your high-powered, non-standard equipment. This information is not medical advice. It is crucial to consult a healthcare professional or dermatologist before starting or continuing this routine to assess risks and suitability for your specific situation.
Key Considerations & Highlights
Essential insights before you begin:
- Safety First is Non-Negotiable: Your 250W lamps pose a significant burn risk at 30cm. Increasing distance and strictly limiting exposure time are critical modifications.
- Heat vs. Targeted Light: Your setup likely functions more like an infrared heat source than specific red light therapy. Benefits may differ, and risks (especially burns) are higher.
- Monitor Diligently: Pay close attention to your skin's reaction. Any discomfort, excessive redness, or blistering means immediate cessation and professional consultation.
Understanding Your Setup: Heat Lamps vs. Therapeutic RLT
Distinguishing between infrared heat and specific light wavelengths.
Therapeutic Red Light Therapy (RLT) typically utilizes specific wavelengths of red (around 630-660nm) and near-infrared (around 810-850nm) light. These wavelengths have been studied for their ability to penetrate the skin and influence cellular processes, such as stimulating mitochondria (energy production), boosting collagen synthesis, reducing inflammation, and improving circulation.
Lamps designed for warming chickens, like your 250W bulbs, are primarily intended to produce heat (infrared radiation). While they emit visible red light, it's unlikely they are optimized for the specific therapeutic wavelengths used in RLT. Furthermore, their high wattage (6 lamps x 250W = 1500W total) generates substantial heat, making the primary effect thermal rather than photochemical (light-based).
Implications for Your Goals:
- Energy & Flexibility: Heat can improve circulation and relax muscles, potentially aiding flexibility and providing a sense of warmth/relaxation that might be perceived as energizing. RLT targets cellular energy production more directly.
- Hair Growth: RLT studies suggest stimulation of follicles via specific wavelengths. Heat alone is less likely to produce this effect and could potentially cause scalp irritation.
- Skin Healing (Acne, Scars, Frowns): RLT aims to reduce inflammation and boost collagen. Excessive heat can worsen inflammation (like some types of acne) and poses a burn/hyperpigmentation risk, counteracting healing goals.
Therefore, while some benefits might be experienced due to warmth and improved local circulation, achieving results comparable to clinical RLT is uncertain, and the risks, particularly burns, are significantly elevated.
Safety First: Essential Modifications for Your Routine
Adjusting your current practice to minimize significant risks.
Using high-wattage heat lamps intended for animals on human skin carries substantial risks. The following modifications are crucial to minimize potential harm. Failure to adhere to these could result in burns, skin damage, or eye injury.
Critical Adjustments:
- Increase Distance Significantly: 30 cm (12 inches) is likely too close for 250W heat lamps. Increase the distance to at least 50-60 cm (approx. 20-24 inches) or further. Test the heat cautiously: place your hand at the intended distance. If it becomes uncomfortably warm within 30 seconds, increase the distance further. The goal is gentle warmth, not intense heat.
- Drastically Reduce Exposure Time: Forget typical 10-20 minute RLT sessions. With these lamps, start with extremely short exposures. Limit exposure to any single area to maximum 2-3 minutes. Your total session time initially should not exceed 5-10 minutes.
- Mandatory Eye Protection: Never look directly at the lights. Use opaque, blackout goggles designed specifically to block intense light, not just sunglasses. High-intensity light, even if not UV, can potentially harm your eyes.
- Skin Monitoring is Crucial: Check your skin immediately after each session and over the next 24 hours. Mild, temporary pinkness might occur, but any significant redness lasting hours, pain, blistering, or changes in pigmentation are signs of damage. Stop immediately if any adverse effects occur.
- Ventilation and Hydration: Use the lamps in a well-ventilated area to avoid overheating. Drink plenty of water before and after sessions, as heat exposure can be dehydrating.
Remember: These are harm reduction strategies, not guarantees of safety. The safest option is to use devices specifically designed and tested for human light therapy.
Proposed Cautious Routine & Schedule
A structured approach prioritizing safety.
This routine assumes you have implemented the critical safety modifications above (increased distance, short duration, eye protection). Consistency is often key in therapy, but safety always overrides consistency with this type of equipment.
Frequency and Duration:
- Frequency: Start with 3 sessions per week on non-consecutive days (e.g., Monday, Wednesday, Friday) to allow skin recovery time.
- Session Duration: Limit total session time to 5-10 minutes initially. Gradually increase towards a maximum of 15 minutes ONLY if tolerated well, with no adverse skin reactions after several weeks.
- Duration Per Area: Strictly limit exposure to any single body part to 2-3 minutes maximum within a session.
Timing and Preparation:
- Timing: Morning or evening can work. Some find morning sessions energizing.
- Preparation: Use on clean, dry skin. Remove all makeup, lotions, or creams, as these could interfere with light/heat penetration or cause unwanted reactions. You can apply moisturizers *after* the session.
Example Weekly Schedule (Focusing on Rotation):
This table outlines a possible weekly plan, rotating focus areas to distribute exposure.
| Day | Focus Areas | Total Time | Potential Target (with caveats) |
|---|---|---|---|
| Monday | Back & Shoulders (rotate sides) | 5-10 mins | Flexibility, Relaxation |
| Wednesday | Legs & Arms (rotate sections) | 5-10 mins | Circulation, Flexibility |
| Friday | Chest/Abdomen & Face/Scalp* (rotate carefully) | 5-10 mins | Energy, Skin/Hair* |
*Facial/Scalp Exposure: Exercise extreme caution. Use the shortest duration (e.g., 1-2 minutes total for the entire area), ensure maximum distance, and use complete blackout eye protection. Monitor skin response very closely. Heat can potentially worsen some skin conditions like acne or rosacea.
Positioning and Rotation Strategy
Optimizing exposure while minimizing hot spots.
Lamp Setup:
- Arrange your 6 lamps in a semi-circle or array facing your treatment area.
- Ensure they are securely mounted at the increased safe distance (50-60cm+).
- Avoid positioning them where direct overlap creates intense hot spots.
Body Positioning and Rotation:
- Maintain Distance: Consistently keep all body parts at the determined safe distance from the lamps.
- Even Exposure: The goal is gentle, even warming, not focused intensity.
- Rotation Technique: Stand or sit centrally relative to the lamps. Slowly rotate your body every 30-60 seconds to expose different areas sequentially. For a 2-3 minute exposure per area (e.g., back), you might rotate slightly every 30 seconds to cover the left, center, and right aspects.
- Full Body (Energy/Flexibility): Rotate 90 degrees every minute (e.g., Front -> Right Side -> Back -> Left Side).
- Targeted Areas (Skin/Hair): Position the specific area towards the lamps, rotating gently (e.g., tilting head slowly for scalp/face, rotating a limb for scars). Remember the strict time limits and increased caution for face/scalp.
- Continuous Movement: Slow, continuous rotation is generally safer than holding static positions under intense heat sources.
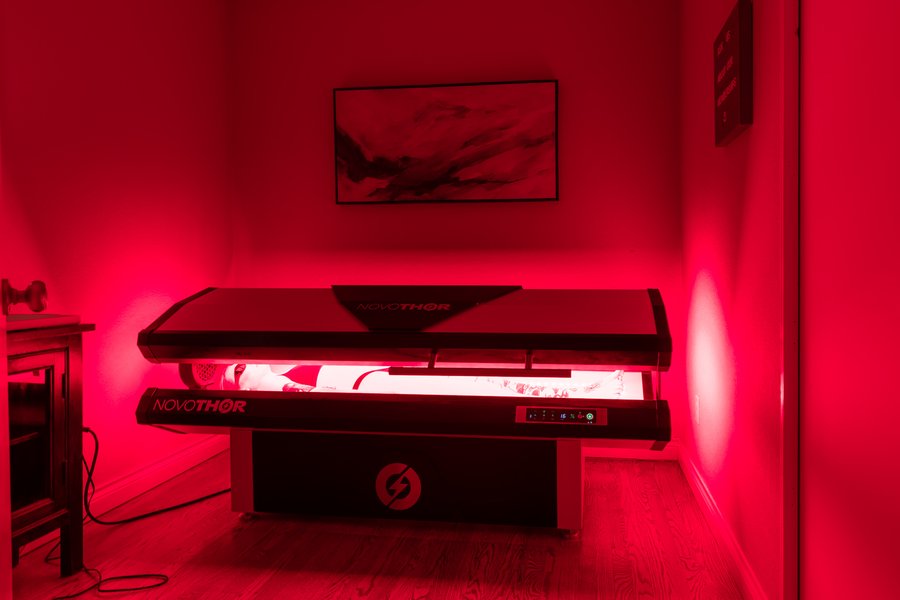
Example of a professional, controlled full-body light therapy environment (Note: This differs significantly from using chicken heat lamps).
Potential Benefits vs. Significant Risks Analysis
Weighing the uncertain gains against the concrete dangers.
While standard RLT and heat therapy offer potential benefits, applying these expectations to your DIY setup requires significant caveats due to the high power and likely non-optimal wavelengths.
Potential Benefits (Highly Speculative with Your Setup):
- Energy/Well-being: Warmth and potential slight improvement in circulation might offer temporary relaxation or a feeling of well-being.
- Flexibility: Heat can temporarily ease muscle stiffness and improve local blood flow, potentially aiding flexibility.
- Hair Growth: Highly uncertain. While RLT is studied for this, heat alone is not a primary mechanism, and excessive heat could be detrimental.
- Skin Healing: Potential for very mild benefits from increased circulation (heat). However, the risk of heat-induced inflammation, burns, or worsening acne/scars is significant and may negate any potential positives. Collagen benefits are primarily linked to specific RLT wavelengths, likely lacking in your setup.
Significant Risks (High Probability with Your Setup):
- Thermal Burns: This is the **most significant risk** due to the high wattage (1500W total) at close proximity. Even with increased distance, the risk remains.
- Skin Irritation & Damage: Redness, blistering, peeling, and long-term changes like hyperpigmentation (darkening) or hypopigmentation (lightening) are possible.
- Eye Damage: Intense visible light and potential non-visible radiation can pose risks to the retina without proper, opaque eye protection.
- Dehydration & Overheating: Significant heat output can lead to fluid loss and potentially heat exhaustion, especially in longer sessions or poorly ventilated spaces.
- Worsening Skin Conditions: Heat can exacerbate certain conditions like rosacea, melasma, or inflammatory acne.
- Fire Hazard: High-wattage lamps generate significant heat; ensure they are positioned away from flammable materials and wiring is appropriate for the load.
DIY Heat Lamps vs. Standard RLT: A Comparative View
This chart provides a conceptual comparison between your DIY setup and standard therapeutic RLT devices based on general principles. Ratings are illustrative (1=Low, 5=High).
This comparison highlights the significantly higher risk profile and lower certainty of specific benefits associated with using non-standard heat lamps compared to devices designed for human therapy.
Visualizing Your Approach: Key Considerations
A mindmap overview of the process.
This mindmap summarizes the critical elements involved in attempting to use your setup, emphasizing the necessary precautions and steps.
Expert Insights on Red Light Therapy
Understanding RLT from a Dermatologist's Perspective
To gain a clearer understanding of how conventional red light therapy devices are assessed and used for skin benefits, consider insights from dermatology professionals. While your setup differs significantly, understanding the principles and considerations for standard devices can provide valuable context. This video features a dermatologist discussing home RLT devices, their potential benefits, limitations, and whether they are generally considered worthwhile, which can help contrast with the risks of using non-standard equipment.
Watching this may help you evaluate the potential effectiveness and safety profile differences between regulated therapeutic devices and your current DIY approach using high-power heat lamps.
Frequently Asked Questions (FAQ)
Addressing common concerns about this approach.
Are chicken heat lamps the same as red light therapy devices?
No, they are fundamentally different. Chicken heat lamps are designed primarily to produce infrared heat to keep animals warm. While they emit red light, they typically lack the specific, optimized wavelengths (like 660nm or 850nm) and controlled energy output (irradiance) found in therapeutic RLT devices designed for human use. Using them carries significant risks, primarily from excessive heat.
What are the biggest risks I need to watch out for?
The most immediate and serious risk is thermal burns due to the high heat output of the 250W lamps, especially at close distances. Other risks include skin irritation, blistering, changes in skin pigmentation (dark or light spots), eye damage from intense light, dehydration, and potentially worsening certain skin conditions like acne or rosacea due to heat.
How quickly can I expect to see results for energy, skin, or hair?
With standard RLT devices, results typically take time and consistent use (weeks to months). For your setup, it's highly uncertain if you will achieve the desired results due to the likely incorrect wavelengths and predominance of heat. Any perceived benefits might be temporary effects of warmth (like muscle relaxation). Do not increase exposure time or frequency beyond the cautious recommendations in an attempt to speed up results, as this primarily increases risk.
What should I do if my skin feels irritated or looks very red after a session?
Stop using the lamps immediately. Do not perform any more sessions. Mild, transient pinkness might be acceptable, but significant redness, pain, tenderness, blistering, or any discomfort is a sign of overexposure or a burn. Allow your skin to recover fully. If symptoms are severe or persist, consult a healthcare professional or dermatologist promptly.
Recommended Next Steps & Further Research
Exploring safer and more effective options.
Given the risks associated with your current setup, consider exploring these related topics:
- What are the specific wavelengths needed for effective red light therapy?
- Safe and affordable alternatives to DIY red light therapy at home
- Documented risks of using infrared heat lamps directly on human skin
- How to choose an FDA-cleared red light therapy device for home use
References
Sources used in this synthesis.
Last updated May 5, 2025