
Comprehensive DNS Configuration Examples
Mastering DNS Setup: From Basics to Advanced Configurations
Key Takeaways
- Understand Essential DNS Records: Grasp the purpose and configuration of A, CNAME, MX, PTR, and TXT records.
- Configure DNS Servers Across Platforms: Learn step-by-step procedures for setting up DNS on Windows and Linux servers.
- Implement Advanced DNS Features: Enhance your DNS setup with DNSSEC, Reverse DNS, and Dynamic DNS for improved security and functionality.
1. Introduction to DNS Configuration
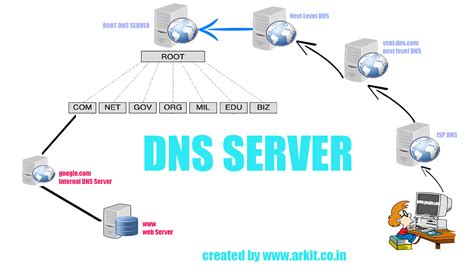
The Domain Name System (DNS) is a fundamental component of the internet, translating human-readable domain names like example.com into IP addresses that computers use to identify each other on the network. Proper DNS configuration ensures reliable and efficient domain resolution, which is critical for the accessibility and performance of websites and online services.
What is DNS?
DNS acts as the phonebook of the internet, enabling users to access resources using memorable domain names instead of complex IP addresses. DNS servers store records that map domain names to their corresponding IP addresses and other related information.
2. Essential DNS Records
Understanding the various types of DNS records is crucial for effective DNS configuration. Each record serves a specific purpose in the domain resolution process.
| Record Type | Purpose | Example |
|---|---|---|
| A Record | Maps a domain name to an IPv4 address. | example.com. IN A 192.0.2.1 |
| AAAA Record | Maps a domain name to an IPv6 address. | example.com. IN AAAA 2001:0db8:85a3:0000:0000:8a2e:0370:7334 |
| CNAME Record | Creates an alias from one domain to another canonical domain name. | www.example.com. IN CNAME example.com. |
| MX Record | Specifies mail servers for the domain. | example.com. IN MX 10 mail.example.com. |
| PTR Record | Reverse lookup mapping an IP address back to a domain name. | 1.2.0.192.in-addr.arpa. IN PTR example.com. |
| TXT Record | Stores text-based information, often used for verification and security (e.g., SPF, DKIM). | example.com. IN TXT "v=spf1 include:_spf.example.com ~all" |
3. Configuring DNS Servers
DNS servers can be configured on various operating systems. Below are detailed examples for configuring DNS on Windows Server and Linux using BIND.
3.1. DNS Configuration on Windows Server
Windows Server provides a straightforward GUI-based approach to DNS configuration through the DNS Manager. Here's how to set up a DNS server on Windows Server:
Steps to Configure DNS on Windows Server
-
Install the DNS Server Role:
- Open
Server Manager. - Select Add roles and features.
- Navigate through the wizard and select the DNS Server role.
- Follow the prompts to complete the installation.
- Open
-
Create a New Forward Lookup Zone:
- Open
DNS Manager(dnsmgmt.msc). - Right-click on Forward Lookup Zones and select New Zone.
- Choose Primary Zone and specify your domain name (e.g.,
example.com). - Configure zone replication as needed.
- Open
-
Add DNS Records:
- Within the newly created zone, right-click and choose New Host (A or AAAA).
- Enter the hostname (e.g.,
www) and the corresponding IP address. - Repeat for other records like
mail,ns1,ns2, etc. - To add an MX record, right-click the zone, select New Mail Exchanger (MX), and specify the mail server and priority.
-
Configure Reverse Lookup Zone (Optional):
- Right-click on Reverse Lookup Zones and create a new zone corresponding to your IP range.
- This allows reverse DNS lookups, mapping IP addresses back to hostnames.
3.2. DNS Configuration on Linux using BIND
BIND (Berkeley Internet Name Domain) is a widely used DNS server software on Linux systems. Below are the steps to configure BIND:
Steps to Configure BIND on Linux
-
Install BIND:
sudo apt-get install bind9 -
Edit the BIND Configuration File:
- Open
/etc/bind/named.conf.localin a text editor. - Define your zones. For example:
zone "example.com" { type master; file "/etc/bind/zones/example.com.db"; }; zone "2.0.192.in-addr.arpa" { type master; file "/etc/bind/zones/192.0.2.db"; }; - Open
- Create the
/etc/bind/zones/directory if it doesn't exist. -
Create Zone Files:
- Create
example.com.dbfor forward DNS records:
$TTL 86400 @ IN SOA ns1.example.com. admin.example.com. ( 2025011401 ; Serial 3600 ; Refresh 1800 ; Retry 604800 ; Expire 86400 ) ; Minimum TTL ; Name Servers IN NS ns1.example.com. IN NS ns2.example.com. ; A Records ns1 IN A 192.0.2.1 ns2 IN A 192.0.2.2 @ IN A 192.0.2.10 www IN CNAME example.com. mail IN A 192.0.2.20 ; MX Records @ IN MX 10 mail.example.com. - Create
- Create
192.0.2.dbfor reverse DNS records: -
Start and Enable BIND Service:
sudo systemctl start bind9 sudo systemctl enable bind9 -
Verify DNS Configuration:
dig @localhost example.com dig @localhost mail.example.com dig -x 192.0.2.10Ensure that the DNS records resolve correctly using the
digcommand.
$TTL    86400
@       IN      SOA     ns1.example.com. admin.example.com. (
                         2025011401 ; Serial
                         3600       ; Refresh
                         1800       ; Retry
                         604800     ; Expire
                         86400 )    ; Minimum TTL

; Name Servers
        IN      NS      ns1.example.com.
        IN      NS      ns2.example.com.

; PTR Records
10      IN      PTR     example.com.
20      IN      PTR     mail.example.com.
4. Advanced DNS Configurations
Beyond basic DNS setup, advanced configurations can enhance security, reliability, and functionality. This section covers DNSSEC, Reverse DNS, and Dynamic DNS.
4.1. DNSSEC (DNS Security Extensions)
DNSSEC adds a layer of security by enabling DNS responses to be validated, preventing attacks like cache poisoning and spoofing.
Steps to Configure DNSSEC with BIND
-
Generate DNSSEC Keys:
dnssec-keygen -a RSASHA256 -b 2048 -n ZONE example.comThis command generates a Key Signing Key (KSK) and a Zone Signing Key (ZSK).
-
Update
named.conf:zone "example.com" { type master; file "/etc/bind/zones/example.com.db"; auto-dnssec maintain; inline-signing yes; }; -
Sign the Zone:
dnssec-signzone -o example.com /etc/bind/zones/example.com.db -
Publish DNSSEC Keys:
- Update the parent zone with DS records provided by your registrar.
- This step is crucial for DNSSEC to function correctly.
Note: DNSSEC configuration requires careful key management and regular updates to maintain security.
4.2. Reverse DNS (rDNS)
Reverse DNS resolves IP addresses back to domain names, which is useful for logging, email verification, and troubleshooting.
Example Reverse DNS Zone File
$TTL    86400
@       IN      SOA     ns1.example.com. admin.example.com. (
                         2025011401 ; Serial
                         3600       ; Refresh
                         1800       ; Retry
                         604800     ; Expire
                         86400 )    ; Minimum TTL

; Name Servers
        IN      NS      ns1.example.com.
        IN      NS      ns2.example.com.

; PTR Records
10      IN      PTR     example.com.
20      IN      PTR     mail.example.com.
This configuration maps IP addresses to their corresponding hostnames within the 192.0.2.0/24 network.
4.3. Dynamic DNS (DDNS)
Dynamic DNS allows automatic updates of DNS records when IP addresses change, which is especially useful in environments with frequently changing IPs.
Example DHCP Configuration with DDNS in BIND
-
Enable DDNS in BIND:
options { allow-update { key "dhcp-update"; }; }; key "dhcp-update" { algorithm hmac-sha256; secret "BASE64SECRETKEY=="; }; -
Configure DHCP Server to Update DNS:
ddns-updates on;
ddns-update-style standard;
update-static-leases on;

zone example.com. {
    primary 192.0.2.1;
    key dhcp-update;
}

zone 2.0.192.in-addr.arpa. {
    primary 192.0.2.1;
    key dhcp-update;
}
This setup ensures that the DHCP server automatically updates the DNS records when clients receive IP addresses.
5. Common DNS Configuration Examples
Below are specific examples of DNS configurations, covering various record types and scenarios.
5.1. Basic A Record Configuration
- Purpose: Maps a domain name to an IPv4 address.
- Format:
example.com. IN A 192.168.1.1 - Usage: Points your domain directly to a server's IP address.
5.2. CNAME Record Configuration
- Purpose: Creates an alias from one domain to another.
- Format:
www.example.com. IN CNAME example.com. - Usage: Commonly used to map subdomains to main domains.
5.3. MX Record Configuration
- Purpose: Specifies mail servers for the domain.
- Format:
example.com. IN MX 10 mail.example.com. - Priority: Lower numbers indicate higher priority.
5.4. NS Record Configuration
- Primary NS:
ns1.example.com. - Secondary NS:
ns2.example.com. - Format:
example.com. IN NS ns1.example.com.
5.5. TXT Record Configuration
- Purpose: Stores text-based information, often for verification and security.
- Format:
example.com. IN TXT "v=spf1 include:_spf.example.com ~all" - Common Use: SPF records for email validation, domain verification for services.
5.6. PTR Record Configuration
- Purpose: Maps an IP address to a domain name for reverse DNS lookups.
- Format:
1.2.0.192.in-addr.arpa. IN PTR example.com.
5.7. TTL (Time To Live) Configuration
- Recommended Value: 86400 seconds (24 hours)
- Format:
example.com. 86400 IN A 192.168.1.1 - Purpose: Specifies how long DNS records are cached by resolvers.
6. Using Third-Party DNS Services
Many organizations choose to utilize third-party DNS providers for enhanced reliability, scalability, and additional features such as advanced security and performance optimizations.
6.1. Example Configuration with Cloudflare DNS
-
Create an Account and Add Your Domain:
- Sign up for an account on Cloudflare.
- Add your domain (e.g.,
example.com) to Cloudflare.
-
Update DNS Records via Cloudflare Dashboard:
- Log in to Cloudflare.
- Navigate to the DNS management section.
- Add or modify records (A, CNAME, MX, etc.) using the intuitive interface.
-
Change Nameservers at Registrar:
- Update your domain registrar to use Cloudflare’s nameservers as provided during setup.
- This step delegates DNS resolution to Cloudflare.
Benefits of Using Cloudflare DNS:
- Enhanced security features like DDoS protection and DNSSEC.
- Performance improvements via CDN and caching.
- User-friendly management with a web interface.
6.2. Example Configuration with Google Cloud DNS
-
Set Up a Google Cloud Project:
- Create or select a project in the Google Cloud Console.
- Enable the Cloud DNS API.
-
Create a Managed Zone:
- Navigate to the Cloud DNS section.
- Create a new managed zone, specifying your domain name and DNS name server settings.
-
Add DNS Records:
- Add various DNS records (A, CNAME, MX, etc.) within the managed zone.
-
Update Nameservers at Registrar:
- Change your domain’s nameservers to the ones provided by Google Cloud DNS.
Using third-party DNS services like Cloudflare and Google Cloud DNS can offload the complexity of DNS management and provide additional benefits such as global load balancing and enhanced security.
7. Troubleshooting DNS Configurations
Effective DNS configuration requires the ability to troubleshoot common issues. Below are tools and techniques to ensure your DNS setup is functioning correctly.
7.1. Using Diagnostic Tools
- dig: A powerful DNS query tool used to perform DNS lookups and diagnose DNS problems.
- nslookup: Another utility for querying DNS to obtain domain name or IP address mapping.
- host: Simplistic tool to perform DNS lookups.
7.2. Common Issues and Solutions
- Propagation Delays:
- Issue: DNS changes are not reflecting immediately.
- Solution: Wait for the TTL to expire and ensure records are correctly configured.
- Incorrect DNS Records:
- Issue: Services are not reachable due to misconfigured DNS records.
- Solution: Verify DNS records using
digornslookupand correct any discrepancies.
- DNS Server Unreachable:
- Issue: Clients cannot reach the DNS server.
- Solution: Check network connectivity, firewall settings, and DNS server status.
- Reverse DNS Issues:
- Issue: Reverse lookups fail, affecting services like email verification.
- Solution: Ensure PTR records are correctly configured in the reverse DNS zone.
7.3. Best Practices for DNS Management
- Regularly back up DNS configurations and zone files.
- Implement DNSSEC to enhance security.
- Monitor DNS performance and availability.
- Use descriptive and consistent naming conventions for DNS records.
- Limit zone transfers to authorized DNS servers only.
8. Conclusion
Proper DNS configuration is vital for the seamless operation of websites and online services. By understanding essential DNS records, configuring DNS servers on various platforms, implementing advanced features, and adhering to best practices, you can ensure reliable and secure domain resolution. Whether managing a simple personal website or a complex enterprise network, mastering DNS configurations is a fundamental skill for IT professionals.
Final Recap
-
Grasp the functions and formats of key DNS records.
-
Follow systematic steps to configure DNS servers on Windows and Linux.
-
Enhance your DNS setup with advanced features like DNSSEC and Dynamic DNS.
-
Utilize third-party DNS services for added reliability and features.
-
Employ diagnostic tools to troubleshoot and maintain your DNS configurations.
References
Last updated January 14, 2025