
Test Secure httpbin with OAuth2-Proxy and Keycloak using OpenID Connect
A comprehensive Docker Compose setup for secure testing environments
Highlights
- Integrated Environment: Set up Keycloak as an identity provider, OAuth2-Proxy for authentication, and httpbin as your secured backend—all through Docker Compose.
- Secure by Design: Configure OAuth2-Proxy with OpenID Connect settings to safely forward requests and protect applications, ensuring robust flow between services.
- Step-by-Step Guide: Detailed instructions on installing the components, Docker Compose configuration, and testing strategies to validate your secure setup.
Introduction
In this guide, we detail a comprehensive approach to testing a secure setup for httpbin using OAuth2-Proxy integrated with Keycloak under the OpenID Connect framework. This setup is particularly useful for developers and DevOps practitioners who need a reliable and replicable environment to test authentication and authorization flows. By leveraging Docker Compose, this environment is encapsulated into a portable and isolated system. The key components include:
- Keycloak: An open-source identity and access management solution that provides single sign-on (SSO), user federation, and support for standard protocols such as OpenID Connect.
- OAuth2-Proxy: A reverse proxy that manages authentication and passes the approved requests to backend services (in this case, httpbin) along with the necessary HTTP headers.
- httpbin: A simple HTTP service used to test and debug HTTP requests. In this scenario, it acts as our protected upstream application.
This setup is intended for experimental and testing purposes in a controlled environment. In production, several additional security measures, monitoring, and scaling considerations should be addressed.
Step-By-Step Setup Guide
1. Environment Overview
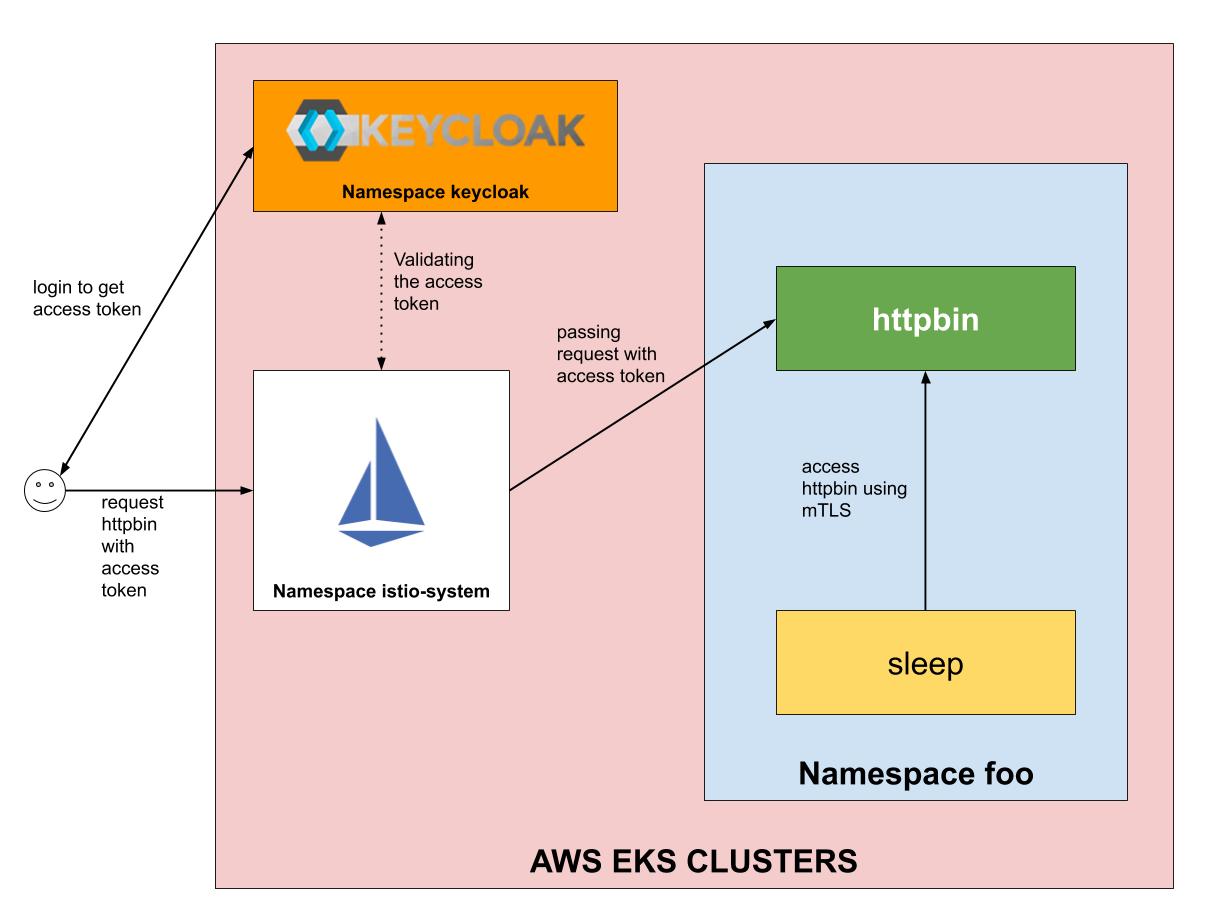
The objective is to secure the httpbin service using OAuth2-Proxy which interacts with Keycloak to handle OpenID Connect flows. The authentication process is managed by Keycloak and OAuth2-Proxy acts as an intermediary. When a user accesses httpbin through the proxy, they are redirected to Keycloak to authenticate. Upon successful authentication, OAuth2-Proxy then forwards the request to httpbin carrying the necessary authentication headers.
2. Preparing Your Docker Environment
Before you begin, make sure Docker and Docker Compose are installed on your machine. Your setup involves creating a Docker Compose file that defines the services required for the setup. The three primary services are:
- Keycloak Container: Uses the official or provided Keycloak image to run the authentication server.
- OAuth2-Proxy Container: Configured to use Keycloak as the OpenID Connect provider. It intercepts incoming requests and enforces authentication.
- httpbin Container: Acts as the protected application that returns diagnostic information about HTTP requests.
3. Creating and Configuring the Docker Compose File
Below is a sample Docker Compose configuration that defines the three necessary services along with networks ensuring isolated communication between containers. This file also maps host ports to container ports for easy access.
# docker-compose.yml
version: '3.8'

services:
  keycloak:
    image: quay.io/keycloak/keycloak:26.1.2
    container_name: keycloak
    environment:
      KEYCLOAK_ADMIN: admin
      KEYCLOAK_ADMIN_PASSWORD: admin
    ports:
      - "9080:8080"
    command: start-dev
    networks:
      - auth-net
      - backend-net

  httpbin:
    image: kennethreitz/httpbin
    container_name: httpbin
    ports:
      - "8081:80"
    networks:
      - backend-net

  oauth2-proxy:
    image: quay.io/oauth2-proxy/oauth2-proxy:latest
    container_name: oauth2-proxy
    volumes:
      - ./oauth2-proxy.cfg:/oauth2-proxy.cfg
    command:
      - --config=/oauth2-proxy.cfg
    ports:
      - "4180:4180"
    depends_on:
      - keycloak
      - httpbin
    networks:
      - auth-net
      - backend-net

networks:
  auth-net: {}
  backend-net: {}
In this compose file:
- The Keycloak service is available on host port 9080, while internally running on port 8080.
- httpbin is mapped to host port 8081.
- The OAuth2-Proxy service listens on port 4180, which acts as the gateway to httpbin.
- Two networks, "auth-net" and "backend-net", are defined to manage inter-service communication securely.
4. Configuring OAuth2-Proxy
Create the configuration file for OAuth2-Proxy (named oauth2-proxy.cfg) which instructs the proxy on how to interact with Keycloak as its identity provider. This file defines parameters such as the provider type, client IDs, secrets, and the upstream for httpbin requests.
# oauth2-proxy.cfg
provider = "oidc"
email_domains = ["*"]
upstream = "http://httpbin:80"
oidc_issuer_url = "http://keycloak:8080/realms/oauth2-proxy"
client_id = "oauth2-proxy"
client_secret = "YOUR_CLIENT_SECRET_HERE"
redirect_url = "http://oauth2-proxy:4180/oauth2/callback"
cookie_secret = "RANDOM_SECRET_BASE64"  # Generate a secure random string
Important Configuration Notes:
- Replace YOUR_CLIENT_SECRET_HERE with the secret value generated by Keycloak after creating the client.
- The cookie_secret should be a base64-encoded string (for example, generated with
openssl rand -base64 32). - The oidc_issuer_url must be valid – in this example, it points to the realm oauth2-proxy created in Keycloak. Modify this value if you choose a custom realm name.
5. Configuring Keycloak
Once Keycloak is running, access its admin console via http://localhost:9080 using the admin credentials specified in the Docker Compose file. Follow these steps in the Keycloak admin console:
Step 5.1: Creating a Realm
Create a new realm (or use the default realm if preferred) where this client will reside. For clarity, you can name the realm oauth2-proxy since the configuration in oauth2-proxy.cfg refers to it.
Step 5.2: Creating a Client
With your realm ready, navigate to the Clients section and create a new client. Use the following settings:
| Parameter | Value |
|---|---|
| Client ID | oauth2-proxy |
| Client Protocol | openid-connect |
| Access Type | confidential |
| Valid Redirect URIs | http://oauth2-proxy:4180/oauth2/callback |
| Web Origins | http://oauth2-proxy:4180 |
After saving the client, navigate to the Credentials tab where you will see the client secret. This secret must be placed into your oauth2-proxy.cfg file in place of YOUR_CLIENT_SECRET_HERE.
6. Bringing Up the Environment
With all configurations in place, start your Docker Compose environment from the directory containing your docker-compose.yml and configuration files. Use the following command:
# Start the Docker Compose environment in detached mode
docker-compose up -d
Docker Compose will pull the necessary images and start the containers based on the defined configurations. Monitor the logs to ensure that all components initialize correctly. If there are any issues related to networking or service readiness, check container logs for troubleshooting.
7. Testing the Setup
With your containers running, it’s time to test the security flow:
- Open your preferred web browser and visit http://localhost:4180. This endpoint is served by OAuth2-Proxy.
- The browser will redirect you to the Keycloak login screen. Enter the user credentials that have been set up in Keycloak. If user accounts are not yet created, add a user from the Keycloak admin console.
- After successful authentication, you will be redirected back to OAuth2-Proxy, which then forwards your request to the httpbin service. You should see the typical structured httpbin output that confirms your HTTP request details.
This flow demonstrates that all components are correctly communicating: the OAuth2-Proxy acts as a gatekeeper, the Keycloak server handles authentication via OpenID Connect, and the httpbin service provides a test response.
8. Additional Security Considerations for Production
Although the above setup is excellent for testing and evaluation, additional security practices are recommended for production environments:
- SSL/TLS Encryption: Ensure all communication between clients, OAuth2-Proxy, Keycloak, and backend services is encrypted using valid SSL/TLS certificates.
- Environment Variables: Rather than hardcoding sensitive information (like client secrets or admin passwords) into configuration files, utilize Docker secrets or environment variable management strategies.
- Network Segmentation: Use dedicated, isolated networks or virtual private clouds (VPCs) for different components to minimize the risk of lateral movement in case of a breach.
- Logging and Monitoring: Implement centralized logging and regular monitoring of authentication and service logs to detect any anomalies.
- Regular Updates: Keep Keycloak, OAuth2-Proxy, and other images up-to-date with security patches and improvements.
- Rate Limiting and Firewall Policies: Enforce rate limiting on authentication endpoints and secure your environment with robust firewall rules.
9. Troubleshooting Common Issues
While the configuration is straightforward, you might encounter several issues:
Issue: OAuth2-Proxy Not Redirecting to Keycloak
Verify that the redirect_url parameter in the oauth2-proxy.cfg exactly matches the Keycloak client configuration. Even minor differences such as trailing slashes can cause mismatches.
Issue: Network Connectivity Between Containers
Ensure that the services belong to the proper Docker networks and that container names are resolvable across these networks. Check the Docker Compose network configuration if any container fails to find another.
Issue: Incorrect Client Secret or Misconfigured Realm
Double-check the client secret configured in Keycloak and ensure it is accurately reflected in the OAuth2-Proxy configuration file. Additionally, review the realm and URL settings to match the proper endpoints.
Detailed Architecture Overview
The following table provides an architecture summary of the solution, including port mappings and interdependencies:
| Service | Container Name | Host Port | Internal Port | Primary Role |
|---|---|---|---|---|
| Keycloak | keycloak | 9080 | 8080 | Identity Provider & Authentication Server |
| OAuth2-Proxy | oauth2-proxy | 4180 | 4180 | Authentication Gateway (Reverse Proxy) |
| httpbin | httpbin | 8081 | 80 | Protected Upstream HTTP Service |
This table summarises the key details of each service. The robust setup ensures that authentication requests are securely handled, and only authenticated users can eventually access the httpbin service.
Practical Testing Scenarios
After the successful configuration and deployment, consider performing the following tests:
- Login Flow Test: Open http://localhost:4180 in your browser and verify that the redirect to the Keycloak login page functions as expected. Check for correct redirection upon login.
- Session Handling: Ensure that subsequent requests during a session do not prompt repeated re-authentication. OAuth2-Proxy should maintain session cookies securely.
- Access Control Checks: Confirm that accessing httpbin directly (bypassing the proxy) does not expose sensitive endpoints if network segmentation is properly configured.
- Error and Logging Analysis: Use logging tools or container logs to trace any errors during authentication. This analysis is crucial for diagnosing configuration or network issues.
These scenarios help ensure that your secured httpbin setup performs reliably under various conditions, confirming the stability of your Docker Compose environment.
Advanced Configuration Options
For advanced users, consider exploring additional OAuth2-Proxy configurations:
- Group-Based Authorization: Some environments require role-based or group-based access control. Explore Keycloak’s capabilities to map user roles to specific HTTP headers.
- Custom Error Pages: Configure OAuth2-Proxy to display custom error pages or redirect unauthenticated access to a specific URL.
- Token Claims Mapping: Leverage Keycloak’s token mapping to include additional user information in JWT claims, which OAuth2-Proxy can then pass on as HTTP headers.
- Rate Limiting and WAF Integration: Integrate OAuth2-Proxy with rate limiting configurations or a Web Application Firewall (WAF) to further secure the endpoint from brute force or distributed attacks.
These enhancements will allow you to tailor the environment according to specific security or operational requirements. In production deployments, such configurations help achieve enterprise-grade security standards.
Conclusion and Final Thoughts
In this detailed guide, we have walked through setting up a secure test environment for httpbin using OAuth2-Proxy and Keycloak with OpenID Connect using Docker Compose. This setup demonstrates the integration of a modern authentication system with a lightweight HTTP service as a test proxy. We started with an overview of the necessary components and proceeded with detailed, step-by-step instructions to configure Keycloak, OAuth2-Proxy, and httpbin. The Docker Compose file provided encapsulates the entire environment, ensuring that developers can quickly spin up a secure testing environment and validate authentication flows.
By leveraging the capabilities of Docker Compose along with secure, containerized environments, developers can simulate production-like setups in a local environment. This approach not only aids in testing but also helps in verifying configurations and access controls before deployment in a production environment. Remember to follow additional security best practices when moving towards production, such as using SSL/TLS encryption, secure storage for environment variables, and actively monitoring logs and usage patterns.
This comprehensive testing environment serves as an excellent sandbox to experiment with various authentication configurations and may provide insights into further enhancements in security infrastructure. Whether you are a developer, DevOps engineer, or security practitioner, this guide lays the foundation for creating robust, secure authentication gateways for web applications.
References
- OAuth2Proxy-Keycloak Guide - GitHub
- OAuth2 Proxy Keycloak Configuration Example - GitHub
- Multi-Language Microservices Authorization - Red Hat Developers
- OAuth2 Proxy Keycloak OIDC Configuration - OAuth2 Proxy Docs
- Kubernetes Security SSO Authentication - Medium
- Keycloak Reverse Proxy Configuration - Keycloak Official
Recommended
Last updated February 21, 2025