
Unleash Your Inner Artist: A Comprehensive Guide to Drawing an Adorable Pug
Mastering the charming features of a pug through step-by-step techniques and creative insights.
Key Drawing Highlights
- Start with Basic Shapes: Begin your pug drawing by laying down foundational geometric shapes like ovals and circles for the head and body, making the initial sketching process manageable and less intimidating.
- Emphasize Distinctive Features: Focus on the pug's iconic wrinkled face, large expressive eyes, curled tail, and compact body to capture its unique charm and character effectively.
- Iterative Refinement: Use light, smooth strokes in the initial stages to allow for easy erasing and adjustments, gradually adding detail and definition as your drawing progresses.
Pugs, with their distinctive wrinkled faces, large expressive eyes, and compact bodies, are undeniably one of the most beloved dog breeds. Their charming and often comical expressions make them a fantastic subject for artists of all levels. Whether you're a beginner looking to hone your skills or an experienced artist seeking a new challenge, drawing a pug can be a rewarding experience. This guide will take you through a detailed, step-by-step process, incorporating various techniques to help you capture the adorable essence of a pug.
The Art of Observation: Understanding Pug Anatomy and Expression
Before putting pencil to paper, it's beneficial to observe and understand the key characteristics that define a pug. Their unique features are what give them their undeniable appeal. By focusing on these elements, you can bring more life and accuracy to your drawing.
Characteristic Features of a Pug
Pugs have several distinguishing features that set them apart:
- Head and Face: Pugs are known for their large, round heads with short snouts. The most prominent feature is the deep wrinkles that typically form around their eyes and nose, often creating a "mask."
- Eyes: Their eyes are large, round, and often dark, giving them a very expressive and sometimes bewildered look.
- Ears: Pug ears are small and thin, folding forward close to the head in either a "rose" or "button" shape.
- Body: They have a compact, muscular body that is somewhat square in proportion.
- Tail: A hallmark of the breed is the tightly curled tail, often forming a double curl, resting over their back.
- Legs: Pugs have strong, straight legs of moderate length.

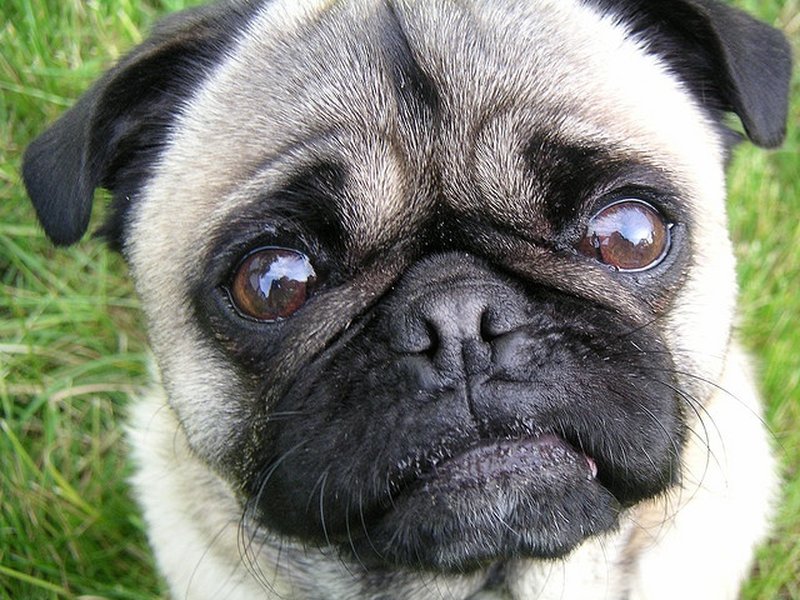
A close-up of a pug's face showcasing its unique facial features.
Getting Started: Essential Drawing Supplies
To embark on your pug drawing journey, you'll need a few basic art supplies. While complex tools can be used, simple materials are often sufficient for beginners.
- Pencils: A range of pencils (e.g., HB, 2B, 4B) will allow you to create varying line weights and shades. HB is good for light sketching, while softer leads like 2B or 4B are great for darker lines and shading.
- Eraser: A good quality eraser (kneaded or vinyl) is crucial for correcting mistakes and creating highlights.
- Paper: Any drawing paper will do, but a slightly heavier weight paper can withstand more erasing and layering.
- Optional: Blending stumps, tortillons, or cotton swabs for smooth shading, and colored pencils or markers if you wish to add color.
Step-by-Step Pug Drawing Tutorial
Let's dive into the drawing process. Remember to start with light strokes and gradually build up your lines and details.
Step 1: Laying the Foundation with Basic Shapes
Begin by sketching the fundamental shapes that will form the pug's body. Use light, smooth strokes, as these will be guides that you'll erase later.
- Head: Draw a large circle or an uneven egg shape for the pug's head. Pugs have disproportionately large heads, so make it prominent.
- Body: Below the head, draw an oblong or a rounded rectangle for the body. This should be horizontally oriented and relatively compact.
- Connecting Lines: Lightly sketch lines to connect the head to the body, forming the neck.
Step 2: Defining the Facial Structure
The pug's face is its most expressive part. Focus on its key features.
- Snout and Nose: Inside the head circle, draw a smaller circle or oval for the snout. Then, sketch an inverted triangle for the nose, adding two small arcs for the nostrils.
- Eye Placement: Position two large circles or ovals for the eyes. Pugs have wide-set eyes, so place them accordingly.
- Ear Placement: Draw two small, floppy triangles or curved shapes at the top sides of the head for the ears. They typically fold forward.
Step 3: Sketching the Body and Limbs
Now, let's give our pug a body.
- Legs: Sketch four cylindrical or rectangular shapes extending from the body for the legs. Pugs have short, stout legs. Ensure they are proportional to the body.
- Paws: Add small, rounded shapes at the bottom of each leg for the paws. You can indicate toes with small curved lines.
- Tail: On one side of the body (typically the back), draw a tight spiral or a double curl for the pug's iconic tail.
A stylized drawing showing the initial shapes for a pug's face.
Step 4: Adding Detail and Refinement
This is where your pug starts to come alive. Begin to refine your initial sketches.
- Facial Wrinkles: This is crucial for a pug. Draw curved lines around the snout and between the eyes to create their characteristic wrinkles. An upside-down "Y" shape can often help define the central facial wrinkles.
- Eyes: Darken the eye outlines. Add smaller circles inside for pupils and a tiny circle for a highlight to give them a lively, glossy look.
- Mouth: Draw a curved line extending from the nose to form the mouth, often with a slight upward curve for a friendly expression.
- Ears: Refine the ear shapes, adding slight curves to make them appear soft and folded.
- Body Outline: Go over the initial body and leg outlines, making them darker and smoother. Add subtle curves to suggest musculature.
Step 5: Shading and Texture
Shading adds depth and realism to your drawing.
- Fur Texture: Use short, quick strokes to mimic the pug's short fur, especially around the body and face.
- Shadows: Identify areas where shadows would naturally fall, such as under the chin, within the wrinkles, under the body, and on the underside of the legs. Use softer pencils (2B, 4B) to create these shadows.
- Highlights: Use your eraser to lift some graphite in areas where light would hit, like the top of the head or the bridge of the nose, and especially in the eyes.
Step 6: Final Touches
Review your drawing and make any last adjustments.
- Outline: If you desire a more cartoonish or defined look, you can outline the entire pug with a darker pencil or pen.
- Background (Optional): Add a simple background element, like a floor line or a shadow beneath the pug, to ground your drawing.
- Color (Optional): If you choose to color your pug, common pug colors include fawn (light tan) with a black mask, all black, or silver. Use different shades to create depth.

A detailed pug drawing demonstrating shading and texture.
Understanding Drawing Complexity for Different Styles
Drawing a pug can range in complexity depending on the desired style. A simple cartoon pug might require fewer steps and less detail, while a realistic portrait demands more intricate work. Below is a radar chart illustrating the perceived complexity of different drawing styles for a pug, based on typical artistic approaches.
The radar chart above visualizes the effort and skill typically involved across different artistic dimensions for various drawing styles. As you can see, a 'Realistic Style' demands higher 'Detail Intricacy', 'Shading Nuance', and 'Realism Challenge', naturally correlating with a greater 'Time Commitment'. In contrast, a 'Cartoon Style' excels in 'Geometric Simplicity' and 'Expressive Capture', requiring less detail but still conveying the pug's spirit effectively. The 'Sketch Style' offers a balanced approach, emphasizing quick strokes and capturing the essence without over-reliance on perfect realism.
Comparative Analysis of Pug Drawing Techniques
Different approaches to drawing a pug cater to various skill levels and desired outcomes. Let's compare some common methods.
| Technique | Description | Pros | Cons | Best For |
|---|---|---|---|---|
| Geometric Shapes Method | Starting with basic shapes like circles, ovals, and rectangles to build the structure. | Simplifies complex forms, good for beginners, easy to correct proportions. | Can initially look abstract, requires good spatial reasoning. | Beginners, quick sketches, establishing foundation. |
| Outline First Method | Drawing the complete contour of the pug before adding internal details. | Focuses on overall silhouette, good for capturing dynamic poses. | Mistakes in outline can be hard to correct later, less forgiving for beginners. | Artists with good freehand control, cartoon styles. |
| Feature-First Method | Starting with the most prominent feature (e.g., eyes or nose) and building the rest around it. | Ensures the core expression is captured early, good for portraits. | Can lead to proportion issues if not careful, less structured. | Experienced artists, detailed facial studies. |
| Grid Method | Using a grid on the reference image and your drawing paper to transfer proportions accurately. | Highly accurate for proportions and placement, great for realism. | Time-consuming to set up, can feel restrictive, less spontaneous. | Highly realistic drawings, beginners learning proportions. |
This table highlights how various drawing techniques offer distinct advantages and disadvantages, making them suitable for different artistic goals and skill levels. Choosing the right method can significantly influence the success and enjoyment of your drawing process.
Visual Learning: Drawing a Pug Puppy
Visual aids, especially videos, can be incredibly helpful for learning to draw. The following video demonstrates how to draw a pug puppy, providing a dynamic, real-time example of the steps involved, which can often clarify techniques better than static images.
An engaging video tutorial on drawing a cute pug puppy.
This particular video, "How To Draw A Pug Puppy" by Art for Kids Hub, is excellent for beginners and younger artists. It breaks down the process into simple, follow-along steps, making it easy to understand the progression from basic shapes to detailed features. The focus on a puppy adds an extra layer of cuteness, emphasizing the large eyes and softer lines often associated with young pugs. This visual demonstration reinforces the principles discussed, such as starting with foundational shapes and gradually adding distinctive elements like wrinkles and expressive eyes.
Advanced Tips for Enhancing Your Pug Drawing
Once you've mastered the basics, consider these tips to elevate your pug drawings:
- Experiment with Expressions: Pugs have a wide range of expressions. Try drawing them happy, curious, sleepy, or even slightly annoyed to capture their full personality.
- Add Texture and Depth: Pay attention to the subtle texture of their short fur. Use cross-hatching or stippling for added depth in shadowed areas.
- Play with Lighting: Consider your light source and how it affects shadows and highlights on the pug's face and body. Dramatic lighting can add character.
- Background Integration: Place your pug in a simple setting. A cozy blanket, a park, or even a plain colored background can enhance the overall composition.
- Study References: Look at many photos of pugs. Observe different angles, poses, and expressions to broaden your understanding of their form.
Frequently Asked Questions (FAQ)
Conclusion
Drawing a pug is a delightful artistic endeavor that combines basic geometric principles with attention to unique details. By following a structured approach—starting with foundational shapes, progressively adding distinctive features like wrinkles and expressive eyes, and finally refining with shading and texture—you can create a charming representation of this beloved breed. Remember that practice is key, and every stroke brings you closer to mastering the art of capturing a pug's irresistible charm. Embrace the process, have fun, and let your creativity shine!
Recommended Further Exploration
- Discover how to draw other popular dog breeds with detailed step-by-step guides.
- Explore advanced shading techniques to add realistic depth and texture to your animal drawings.
- Learn simplified methods for drawing various cartoon animals, perfect for novice artists.
- Uncover expert tips on how to effectively capture the unique expressions and personalities of animals in your artwork.
References
Last updated May 21, 2025