
Restoring Clarity: A Comprehensive Guide to Fixing Cracked Glass
From minor blemishes to significant fractures, discover effective methods and essential considerations for glass repair.
Key Insights into Glass Repair
- Assess the Damage: Not all cracked glass can be effectively repaired. Small cracks and chips (typically under an inch in diameter or short stress cracks) are often good candidates for DIY repair, especially in single-pane windows, glass tabletops, or decorative items. Larger, more extensive cracks, or those in double-pane windows that have compromised the insulating gas layer, usually require professional replacement.
- Epoxy and Adhesives are Your Allies: Two-part epoxy resin and specialized glass adhesives are the most recommended solutions for a durable and clear repair. These products create a strong bond that can prevent further cracking and restore some structural integrity. For temporary fixes, clear tape or nail polish can offer a quick, albeit less aesthetic, solution.
- Safety and Preparation are Paramount: Always prioritize safety by wearing gloves and safety glasses when handling cracked glass. Thorough cleaning of the glass surface and precise application of the repair material are crucial for achieving an effective and nearly invisible mend. Allowing adequate curing time is also essential for the repair's longevity.
Discovering a crack in glass, whether it's a window, a cherished decorative item, or a glass tabletop, can be disheartening. While some damage might necessitate a full replacement, many smaller cracks can be effectively repaired with the right approach and materials. The key to a successful repair lies in understanding the type of crack, selecting the appropriate adhesive, and meticulously following the repair steps. This guide will delve into various methods for fixing cracked glass, from quick temporary solutions to more robust, lasting repairs, empowering you to restore the clarity and integrity of your glass items.
Understanding Glass Cracks: When to Repair vs. Replace
Identifying the severity and type of glass damage is the first step in effective repair.
Before attempting any repair, it's crucial to assess the extent and nature of the crack. Not all glass damage is repairable, and attempting to fix certain types of cracks can be unsafe or yield unsatisfactory results. Understanding the distinctions helps in making an informed decision.
Types of Cracks and Their Repair Viability
- Stress Cracks: These often originate at the edges of a window pane due to extreme temperature variations causing expansion and contraction. They typically appear as fine lines. Small stress cracks are often good candidates for DIY repair.
- Impact Cracks (Chips/Stars): Caused by an object hitting the glass, these can manifest as small chips, star-shaped cracks, or bullseye patterns. If they are small (typically under 1 inch in diameter), they can often be repaired effectively, especially in single-pane glass.
- Linear Cracks: These are straight or slightly branching cracks. Small linear cracks can be repaired, but if they are long or have extensively fractured the glass, replacement is usually the best option.
- Double-Pane Window Cracks: If a crack occurs in a double-pane window, it can compromise the insulating gas layer between the panes, leading to fogging and reduced energy efficiency. While you might be able to repair the visible crack, the insulating properties will likely be affected. Often, professional replacement of the glass unit is recommended for optimal performance.
It's important to remember that glass is a unique material. Once cracked, the structural integrity is compromised. Repairs aim to seal the crack, prevent it from spreading, and improve its appearance, but they generally cannot fully restore the original strength of the glass, especially in single-pane applications where there's no "backup" layer like in a laminated windshield. For safety and long-term durability, especially with windows that are exposed to the elements or impact, professional assessment or replacement might be necessary.
Essential Tools and Materials for Glass Repair
Gathering the right supplies is crucial for a successful and safe repair.
Before beginning any glass repair, ensure you have all the necessary tools and materials. Safety should always be your top priority. Here's a list of common items you might need:
- Safety Gear: Safety glasses and gloves are essential to protect your eyes and hands from sharp edges and chemical contact.
- Cleaning Supplies: Dish soap, water, clean cloths, and rubbing alcohol (or acetone) are needed to thoroughly clean the glass surface. A razor blade can help remove stubborn debris or excess adhesive.
- Adhesives:
- Two-Part Epoxy Resin: Highly recommended for a durable and clear bond. It consists of a resin and a hardener that must be mixed immediately before application.
- Specialized Glass Adhesive/Super Glue: Products like Loctite Super Glue Glass are designed for glass bonding, offering strong, clear, and often water-resistant results.
- UV Glue: Some repair kits, particularly for windshields, use UV-curing resin that hardens when exposed to ultraviolet light.
- Applicators: Wooden sticks, putty knives, or specialized syringes (often included in repair kits) are used for precise application of adhesives.
- Masking Tape/Painter's Tape: Useful for creating clean lines, protecting surrounding areas, and holding pieces in place during curing.
- Glazing Compound: If repairing an older window pane, this might be needed to seal and secure the repaired area back into the sash.
- Optional: Diamond drill bit (for drilling stop-holes for spreading cracks), static solar film (for disguising damage), glass cleaner.
Step-by-Step Guide to Repairing Cracked Glass
Detailed instructions for effective and lasting repairs.
The process of repairing cracked glass generally involves preparation, application of adhesive, and proper curing. While methods may vary slightly based on the specific adhesive used and the type of glass, the core steps remain consistent.
1. Safety First and Preparation
Always put on your safety glasses and gloves. If possible and safe to do so, remove the cracked glass piece from its frame (e.g., a window pane from its sash, or a decorative item). This allows for easier and more thorough repair.
2. Thorough Cleaning of the Glass
Clean the cracked area meticulously. Mix a few drops of dish soap with water and use a clean cloth to wipe down the glass, removing any dirt, grease, or debris. Rinse with clean water and dry completely. For stubborn residues, a wipe with rubbing alcohol or acetone can be beneficial. Ensure the glass is completely dry before applying any adhesive.
3. Preparing the Adhesive
- Two-Part Epoxy: If using a two-part epoxy, cut the ends of both cylinders, ensuring both nozzles are equally open. Squeeze out equal amounts of the resin and hardener onto a clean, disposable surface (like a paper plate or cardboard). Mix them thoroughly with a wooden stick or spatula until uniformly combined. Work quickly, as epoxy has a limited working time before it starts to harden.
- Glass Super Glue/UV Resin: These usually come ready to apply directly from the tube or syringe.
 Figure 1: Typical components of a glass repair kit.
4. Applying the Adhesive to the Crack
Carefully apply a small amount of the prepared adhesive directly into the crack. Use a wooden stick, putty knife, or the applicator tip to daub the epoxy or glue along the broken edge or directly into the crack. For fine cracks, you may need to gently push the adhesive into the fissure to ensure it fills the void completely. If the glass pieces are separated, apply the adhesive to one broken edge and then carefully press the pieces together, ensuring a tight fit. If using UV glue, ensure even distribution within the crack.
5. Curing and Drying
Allow the adhesive to cure completely. Curing times vary significantly depending on the product:
- Epoxy: Typically takes several minutes to set, but a full cure can take 24 hours. Refer to the product's instructions.
- Super Glue: Often bonds within seconds, but full strength may develop over a few hours.
- UV Glue: Requires exposure to UV light (either natural sunlight or a UV lamp) to harden. This process is usually quite fast, often just a few minutes.
During the curing process, avoid disturbing the glass or applying any pressure to the repaired area.
Refining the Repair: Post-Application Techniques
Achieving a smooth, clear finish after the adhesive has cured.
Removing Excess Adhesive
Once the adhesive has fully cured, inspect the repair for any excess material that may have squeezed out or dried on the surface. Carefully use a razor blade or a sharp utility knife to gently scrape away any hardened excess. For smaller smudges, a cotton swab with a few drops of acetone (nail polish remover) can help clean the area, but be cautious not to dissolve the repair itself.
Final Cleaning and Polishing
After trimming any excess, clean the entire glass surface with a standard glass cleaner and a clean, lint-free cloth to restore its sparkle and clarity.
Temporary and Alternative Solutions for Cracked Glass
Quick fixes and unconventional methods for immediate needs.
While epoxy and specialized glass glues offer the most durable repairs, sometimes a temporary fix is needed, or the damage doesn't warrant a full adhesive repair.
Clear Tape or Repair Film
For a very temporary solution, clear packing tape or specialized glass repair film can be applied over the crack. This helps stabilize the crack and reduces stress on the glass, preventing it from worsening immediately. It's an easy, quick fix to prevent drafts or further damage, but it's not aesthetically pleasing and is not a permanent solution.
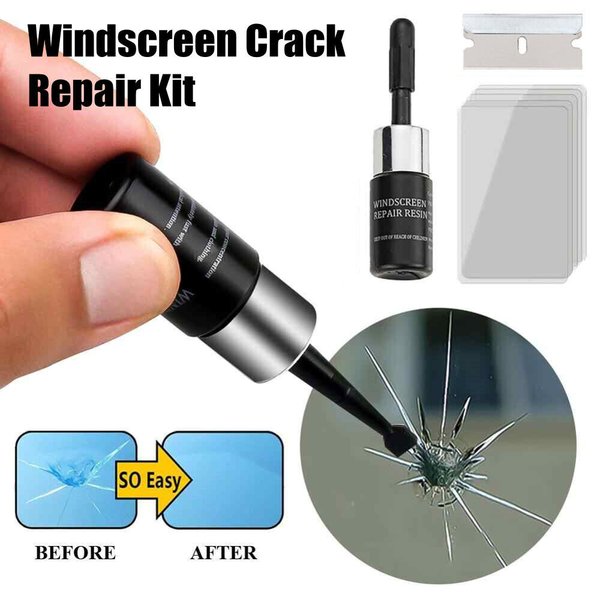 Figure 2: Windshield repair kits can be adapted for some household glass.
Clear Nail Polish
Clear nail polish can serve as a temporary sealant for very small, fine cracks. Clean the area, apply the polish liberally into the crack, and allow it to dry. This can help prevent the crack from spreading, but it's not a strong or permanent repair and might yellow over time.
Drilling Stop-Holes (Advanced Technique)
For linear cracks, an advanced technique involves drilling a small hole at the very end of the crack using a diamond drill bit and water as a lubricant. This can sometimes prevent the crack from spreading further. This method requires precision and specialized tools and should only be attempted by those comfortable with such tasks.
When to Call a Professional: Knowing Your Limits
Recognizing when DIY efforts are insufficient or unsafe.
Despite the various DIY methods available, there are situations where professional intervention is not just advisable, but necessary:
- Large or Extensive Cracks: Cracks that span a significant portion of the glass, or those that have completely fractured the pane, are beyond simple DIY repair.
- Structural Glass: If the cracked glass is part of a structural element (e.g., large commercial windows, load-bearing glass panels), a professional should always be consulted.
- Double-Pane Windows with Compromised Seals: While you might fix the visible crack on one pane, if the insulating seal between the panes is broken (leading to fogging), only a professional can replace the glass unit to restore its energy efficiency.
- Safety Concerns: If the glass is severely shattered or poses a significant safety risk, it's best to contact a professional glass repair or replacement company.
- Desired Flawless Finish: For repairs that need to be virtually invisible, especially on high-visibility items or architectural glass, professional expertise often yields superior aesthetic results.
- Specialized Glass: Tempered glass, laminated glass (like car windshields, which have an interlayer), and stained glass often require specific repair techniques or replacement procedures best handled by specialists. For example, a single pane window with a crack is structurally different from a windshield, which has multiple layers.
Many glass service professionals can replace the glass pane without removing the entire window frame, depending on the window type and accessibility. This can be a more cost-effective solution than full window replacement.
Comparative Analysis of Glass Repair Methods
Evaluating different repair approaches based on their effectiveness and suitability.
Choosing the right repair method depends on the nature of the crack, the type of glass, and your desired outcome. Here's a comparative overview:
| Repair Method | Suitability | Durability/Effectiveness | Aesthetic Outcome | Ease of Application |
|---|---|---|---|---|
| Two-Part Epoxy Resin | Small to medium cracks in single-pane windows, tabletops, decorative items. | High; creates a strong, long-lasting bond, prevents crack spread. | Good; dries clear, can be nearly invisible if applied well. | Moderate; requires careful mixing and precise application. |
| Specialized Glass Adhesive (e.g., Loctite Glass Glue) | Small cracks, chips, bonding broken glass pieces. | High; strong, waterproof, often dishwasher-safe. | Excellent; dries crystal clear for a seamless repair. | Easy; direct application, rapid bonding. |
| UV Curing Resin (Windshield Repair Kits) | Small chips and star cracks (up to 1 inch) in windshields; adaptable for some household glass. | Good; strong penetration, fills voids, prevents spread. | Good; can significantly reduce crack visibility. | Moderate; requires precise injection and UV light exposure. |
| Clear Tape/Repair Film | Temporary fix for any crack; emergency sealing. | Low; only provides temporary stabilization. | Poor; crack remains visible, tape is noticeable. | Very Easy; simple application. |
| Clear Nail Polish | Very fine, small stress cracks; temporary prevention of spread. | Low; weak bond, can yellow/chip over time. | Fair; can be somewhat visible, not fully clear. | Easy; simple brush application. |
For most household glass items with minor cracks, two-part epoxy or specialized glass adhesives offer the best balance of effectiveness, aesthetics, and DIY feasibility. The following radar chart provides a visual comparison of these methods across key performance indicators.
Evaluating Glass Repair Solution Effectiveness
A visual comparison of common DIY glass repair methods.
This radar chart illustrates the perceived effectiveness of different glass repair solutions across several critical attributes: ease of application, aesthetic outcome, durability, cost-effectiveness, and crack prevention capability. The values are relative and reflect typical user experiences and material properties. Higher values indicate better performance in that category.
Visualizing Glass Repair: A Practical Demonstration
Observe the crack repair process in action.
To further understand the practical application of glass repair techniques, particularly for cracks, watching a demonstration can be highly beneficial. The video below illustrates how professional tools and resin are used to repair a crack, providing insights into the precision and methods involved.
This video, titled "Crack Repair by Glass Mechanix," showcases a specialized approach to repairing cracks, typically seen in automotive glass repair. While household glass may not always require such advanced tools, the fundamental principles of cleaning, applying resin, and curing remain relevant. It highlights the importance of filling the crack completely to restore structural integrity and minimize visibility.
Preventing Future Cracks and Maintaining Glass
Tips for extending the life of your glass items.
Once you've repaired a crack, or even to prevent them from occurring in the first place, proper care and maintenance of glass are essential.
- Handle with Care: Avoid setting down glass items too heavily or slamming windows shut, as sudden impacts or stress can cause cracks.
- Temperature Management: Be mindful of extreme temperature swings, especially for windows. Rapid heating or cooling can induce stress cracks.
- Regular Cleaning: Keep glass surfaces clean to easily spot small dings or cracks before they worsen. Use non-abrasive cleaners and soft cloths.
- Inspect Periodically: Routinely check windows and glass items for any small defects. Early detection allows for easier and more effective repair.
- Seal and Caulk: For windows, regularly inspect seals and caulking around the frame. Reapply caulk if cracked or damaged to prevent air leaks and provide stability.
Frequently Asked Questions About Cracked Glass Repair
Can I repair a large crack in glass?
Is glass repair permanent?
Can I fix a cracked double-pane window?
What is the best glue for cracked glass?
Will a crack in glass spread?
Conclusion: Restoring Integrity and Clarity
Fixing cracked glass is often a feasible and cost-effective alternative to immediate replacement, particularly for smaller damages in household items or single-pane windows. By understanding the nature of the crack, choosing the appropriate adhesive like a two-part epoxy or a specialized glass glue, and diligently following the preparation and application steps, you can achieve a durable and aesthetically pleasing repair. While temporary fixes like tape or nail polish offer quick relief, they are not long-term solutions. Always prioritize safety by wearing protective gear and know when to enlist the expertise of a professional for larger, more complex, or safety-critical glass repairs. With careful attention and the right materials, you can often restore the clarity and extend the life of your cracked glass items.
Recommended Further Exploration
- What are the costs and considerations for professional glass window replacement?
- Explore the different types of glass and how their properties affect repair methods.
- Discover advanced techniques for preventing glass cracks and maintaining window integrity.
- Learn about the specific methods and kits used for repairing automotive windshield cracks.
