
Deploying a Simple Flask Application on CentOS: Python Code and DNS Configuration
A Comprehensive Guide to Getting Your Flask App Live on CentOS
Key Takeaways
- Comprehensive Setup: From system preparation to DNS configuration, master each step for a successful deployment.
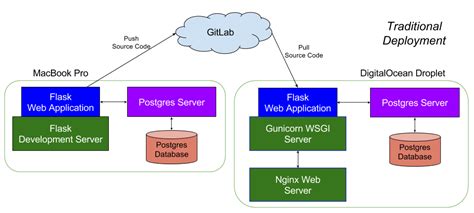
- Use of Gunicorn and Nginx: Implement Gunicorn as the WSGI server and Nginx as a reverse proxy for optimal performance.
- Secure Deployment: Enhance security with SSL certificates using Let's Encrypt.
Introduction
Deploying a Flask application on CentOS involves several critical steps, including setting up the server environment, configuring the Flask application, deploying it with a WSGI server like Gunicorn, setting up a reverse proxy with Nginx, and configuring DNS settings to make your application accessible via a custom domain. This guide provides a step-by-step approach to achieve a secure and efficient deployment.
Prerequisites
Before You Begin
-
A CentOS 7 or CentOS 8 server instance.
-
A registered domain name with access to DNS settings.
-
Root or sudo privileges on the server.
-
Basic knowledge of the Linux command line.
Step 1: Prepare the CentOS Environment
1.1. Update the System
Ensure that your server packages are up to date.
sudo yum update -y1.2. Install Required Packages
Install Python, pip, and other necessary packages.
sudo yum install -y python3 python3-pip nginx1.3. Install EPEL Repository
The Extra Packages for Enterprise Linux (EPEL) repository provides additional packages.
sudo yum install -y epel-releaseStep 2: Set Up Python Environment
2.1. Install Virtualenv
Virtual environments help manage dependencies for your project.
sudo pip3 install virtualenv2.2. Create Project Directory
Create and navigate to your project directory.
mkdir ~/myflaskapp
cd ~/myflaskapp
2.3. Create and Activate Virtual Environment
Create a virtual environment named venv and activate it.
python3 -m venv venv
source venv/bin/activate
Step 3: Develop the Flask Application
3.1. Install Flask and Gunicorn
Within the virtual environment, install Flask and Gunicorn.
pip install flask gunicorn3.2. Create the Flask App
Create a file named app.py with the following content:
from flask import Flask

app = Flask(__name__)

@app.route("/")
def home():
    return "Hello, CentOS!"

if __name__ == "__main__":
    app.run(host="0.0.0.0", port=5000)
3.3. Test the Flask Application
Run the Flask app locally to ensure it's working.
python app.pyVisit http://your_server_ip:5000 in your browser. You should see "Hello, CentOS!".
Press Ctrl+C to stop the server.
Step 4: Configure Gunicorn as the WSGI Server
4.1. Test Gunicorn
Run Gunicorn to serve your Flask app.
gunicorn --bind 0.0.0.0:8000 app:appVisit http://your_server_ip:8000 to confirm it's working. Press Ctrl+C to stop.
4.2. Create a Systemd Service for Gunicorn
Creating a systemd service allows Gunicorn to run in the background and start on boot.
sudo nano /etc/systemd/system/myflaskapp.serviceAdd the following content to the service file:
[Unit]
Description=Gunicorn instance to serve myflaskapp
After=network.target

[Service]
User=your_username
Group=nginx
WorkingDirectory=/home/your_username/myflaskapp
Environment="PATH=/home/your_username/myflaskapp/venv/bin"
ExecStart=/home/your_username/myflaskapp/venv/bin/gunicorn --workers 3 --bind unix:myflaskapp.sock -m 007 app:app

[Install]
WantedBy=multi-user.target
Replace your_username with your actual system username.
Start and enable the Gunicorn service:
sudo systemctl start myflaskapp
sudo systemctl enable myflaskapp
Check the service status:
sudo systemctl status myflaskappStep 5: Set Up Nginx as a Reverse Proxy
5.1. Configure Nginx
Remove the default Nginx configuration and create a new one for your Flask app.
sudo rm /etc/nginx/nginx.conf
sudo nano /etc/nginx/nginx.conf
Add the following content to the Nginx configuration:
user nginx;
worker_processes auto;
error_log /var/log/nginx/error.log;
pid /run/nginx.pid;

events {
    worker_connections 1024;
}

http {
    include /etc/nginx/mime.types;
    default_type application/octet-stream;

    sendfile on;
    keepalive_timeout 65;

    upstream myflaskapp {
        server unix:/home/your_username/myflaskapp/myflaskapp.sock;
    }

    server {
        listen 80;
        server_name your_domain.com www.your_domain.com;

        location / {
            proxy_pass http://myflaskapp;
            proxy_set_header Host $host;
            proxy_set_header X-Real-IP $remote_addr;
            proxy_set_header X-Forwarded-For $proxy_add_x_forwarded_for;
            proxy_set_header X-Forwarded-Proto $scheme;
        }
    }
}
Replace your_username with your actual system username and your_domain.com with your registered domain.
5.2. Test and Restart Nginx
Test the Nginx configuration for syntax errors.
sudo nginx -tIf the test is successful, restart Nginx:
sudo systemctl restart nginx
sudo systemctl enable nginx
5.3. Adjust Firewall Settings
Allow HTTP and HTTPS traffic through the firewall.
sudo firewall-cmd --permanent --add-service=http
sudo firewall-cmd --permanent --add-service=https
sudo firewall-cmd --reload
Step 6: Configure DNS Settings
6.1. Log In to Your Domain Registrar
Access the DNS management section for your domain through your registrar's control panel.
6.2. Create A Records
Add A records to point your domain and subdomains to your CentOS server's IP address.
| Type | Host | Points to | TTL |
|---|---|---|---|
| A | @ | your_server_ip | 3600 |
| A | www | your_server_ip | 3600 |
Replace your_server_ip with your actual server's IP address.
6.3. Wait for DNS Propagation
DNS changes may take up to 24 hours to propagate, but they usually update much faster.
Step 7: Secure Your Application with SSL
7.1. Install Certbot
Certbot automates the process of obtaining and installing SSL certificates.
sudo yum install -y certbot python3-certbot-nginx7.2. Obtain and Install SSL Certificate
Run Certbot to obtain and install the SSL certificate for your domain.
sudo certbot --nginx -d your_domain.com -d www.your_domain.comFollow the prompts to complete the installation, including agreeing to the terms of service and choosing whether to redirect HTTP traffic to HTTPS.
7.3. Verify SSL Installation
Visit https://your_domain.com to ensure that your site is secure.
7.4. Automate Certificate Renewal
Certbot automatically renews certificates before they expire.
sudo crontab -eAdd the following line to schedule daily checks:
0 0 * * * certbot renew --quietConclusion
By following this comprehensive guide, you've successfully deployed a simple Flask application on CentOS using Gunicorn as the WSGI server and Nginx as a reverse proxy. Additionally, you've configured DNS settings to make your application accessible via a custom domain and secured your site with an SSL certificate. This setup ensures that your Flask application is robust, scalable, and secure, ready to serve traffic efficiently.
References
Last updated January 15, 2025