
Restoring Ride Stability: A Guide to Front Lower Shock Mount Repair
Comprehensive Solutions for a Critical Suspension Component
A damaged or broken front lower shock mount can severely compromise your vehicle's handling, ride comfort, and safety. This essential component connects your shock absorber or strut to the vehicle's axle or control arm, playing a crucial role in damping vibrations and maintaining tire contact with the road. Addressing issues with these mounts promptly is vital for preventing further damage and ensuring a smooth, controlled driving experience.
Key Insights into Front Lower Shock Mount Repair
- Diverse Repair Approaches: The method for repairing a front lower shock mount varies significantly based on the type of damage and the vehicle's design, ranging from simple bolt replacements to complex welding or bracket fabrication.
- Importance of Structural Integrity: For severe damage, especially involving rust or fractured mounting points, professional welding or replacement of the entire affected component (e.g., control arm, axle housing) is often necessary to restore structural integrity and safety.
- DIY vs. Professional Repair: While some minor repairs might be feasible for experienced DIYers, the high tension in suspension components and the need for specialized tools often make professional repair the safer and more reliable option.
Understanding the Front Lower Shock Mount
The Foundation of Your Vehicle's Suspension
The front lower shock mount is a critical part of your vehicle's suspension system. In vehicles equipped with traditional shock absorbers, it's the point where the lower end of the shock connects to the axle or a control arm. For vehicles using MacPherson struts, the strut assembly (which includes the shock absorber and coil spring) has its lower end connected to the steering knuckle or lower control arm via a mounting point that performs a similar function.
Its primary role is to provide a secure anchor for the shock absorber, allowing it to control suspension movement, absorb road impacts, and maintain optimal tire contact with the road surface. When this mount is damaged, the shock absorber cannot function correctly, leading to a range of performance and safety issues.
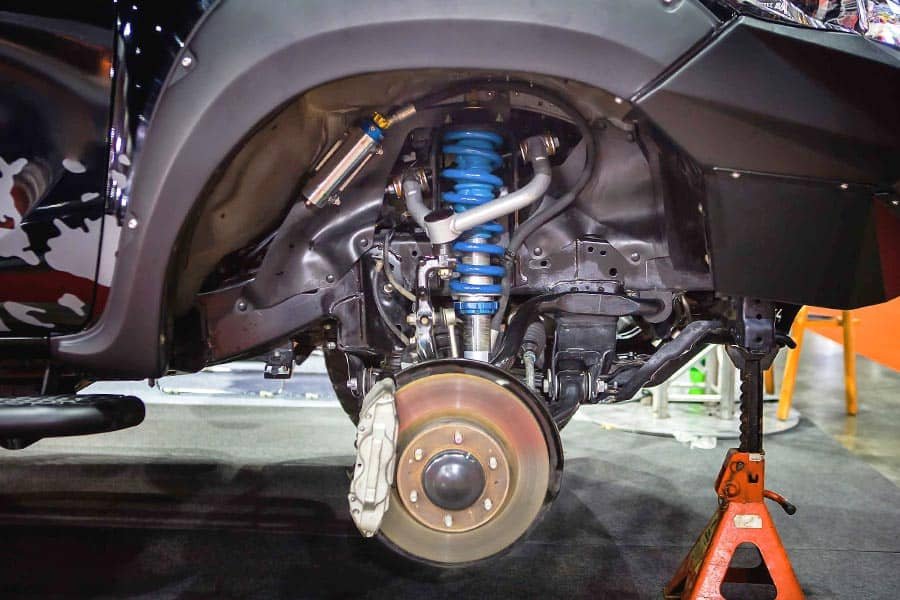
Anatomy of a vehicle's suspension, showing the interplay of various components.
Common Causes of Damage
Front lower shock mounts are subjected to significant stress from road irregularities, impacts, and the continuous motion of the suspension. Common causes of damage include:
- Corrosion and Rust: Especially in regions with harsh winters or high humidity, rust can severely weaken metal mounting points, leading to fractures or complete detachment. This is a common issue for many older vehicles.
- Impact Damage: Hitting potholes, curbs, or other road debris can subject the mount to sudden, severe forces, causing bending, cracking, or breaking of bolts and brackets.
- Fatigue and Wear: Over time, repeated stress cycles can lead to material fatigue, causing the mount to weaken and eventually fail. This can manifest as rounded-out holes or elongated bolt passages, leading to clunking noises.
- Improper Installation or Torque: If a shock or strut was previously installed incorrectly, with bolts overtightened or undertightened, it can lead to premature failure of the mount or bolts.
- Manufacturing Defects: Although less common, a manufacturing defect in the mount itself can lead to early failure.
Symptoms of a Damaged Front Lower Shock Mount
Recognizing the Warning Signs
Identifying a damaged front lower shock mount early can prevent more extensive and costly repairs. Pay attention to these symptoms:
- Loud Clunking or Banging Noises: One of the most common indicators is a distinct clunking or banging sound, especially when going over bumps, potholes, or rough terrain. This often signifies that the shock is loose and moving within an ovaled or broken mount.
- Reduced Ride Comfort: The vehicle may feel excessively bouncy or harsh, as the damaged mount prevents the shock from properly damping suspension movements.
- Poor Handling and Stability: A compromised shock mount can lead to a noticeable decrease in steering precision, vehicle stability, and increased body roll during turns. The car might feel like it's "wandering" or difficult to keep in a straight line.
- Uneven Tire Wear: While many suspension issues can cause this, a damaged shock mount can contribute to uneven tire wear patterns due to inconsistent tire contact with the road.
- Visible Damage: In some cases, a visual inspection can reveal a broken, bent, or severely rusted mount. You might see a disconnected shock, a missing bolt, or a visibly cracked bracket.
Repairing Your Front Lower Shock Mount
Approaches to Restoration
The repair process for a front lower shock mount is highly dependent on the type and extent of the damage. It can range from a simple bolt replacement to complex fabrication and welding. Safety is paramount, and due to the high energy stored in suspension springs, proper tools and precautions are essential. If you are unsure, it is always recommended to seek professional assistance.
Minor Damage: Bolt or Bushing Replacement
If the issue is limited to a broken or stripped bolt, or worn bushings within the shock eyelet, these can often be replaced directly. This typically involves:
- Removing the old, damaged bolt or stud. This might require drilling out the old stud, especially if it's seized or broken flush.
- Inserting a new, hardened bolt that fits the lower bushing of the shock. Sometimes, a new bolt and nut combination is used instead of a stud.
- Ensuring proper torque of the new bolt to prevent future issues.
For vehicles where the original stud is pressed into a radius arm, replacing it might be challenging due to the hardness of the stud. Some solutions involve using a "Shock Bolt Kit" or a suitable hardened bolt as a replacement.
Moderate Damage: Ovaled Holes or Minor Cracks
When the mounting holes have become "ovaled" or elongated due to wear and tear, or if there are minor cracks in the bracket, more involved repair methods are needed to restore a secure fit:
- Welding and Redrilling: A common and effective solution is to weld the ovaled holes shut with new metal and then redrill them to the correct size. This restores the integrity of the mounting point. Alternatively, a patch plate with a properly sized hole can be welded over the damaged area.
- Adding Washers: For slightly ovaled holes, adding thicker washers can sometimes provide a temporary improvement by increasing the contact surface and reducing movement. However, this is often a temporary fix and not a long-term solution.
This radar chart illustrates the complexity and effectiveness of different front lower shock mount repair methods. It highlights that while simpler solutions are quicker and less expensive, welding and full replacement offer higher durability and safety, reflecting a balance between effort, cost, and long-term reliability.
Severe Damage: Component Replacement or Fabrication
In cases of severe damage, such as a completely severed mount from the axle housing or a heavily rusted and deteriorated bracket, simply welding may not be sufficient or safe. This often requires:
- Replacement of the Component: If the shock mount is integrated into a larger component like the control arm or axle housing, replacing that entire component might be the most reliable, albeit more expensive, solution. For instance, a "quick-strut" assembly includes the strut, spring, and mount, simplifying replacement.
- Welding New Brackets/Kits: For rusted-out frame-mounted shock towers or brackets, DIY repair kits are available that involve cutting away the rusted section and welding a new bracket in its place. This requires significant welding skill and ensuring the new bracket is perfectly aligned. For example, some Ford models have aftermarket repair kits for rusted lower shock mounts on the radius arm.
- Fabrication: In custom or older vehicles where parts are unavailable, a custom bracket might need to be fabricated and welded into place by a skilled professional.
When dealing with a completely broken-off lower shock mount from an axle housing due to rust, a critical assessment of the remaining metal is necessary. A welder must verify if there's enough "meat" left on the axle housing to weld a new bracket safely. If not, the repair might be impractical or lead to further issues.
This video demonstrates a rusted shock mount repair, providing a visual guide on addressing severe corrosion and restoring the structural integrity of the mounting point. It highlights practical steps and considerations for a durable fix.
Considerations for Repair vs. Replacement
Making an Informed Decision
Deciding whether to repair or replace a shock mount depends on several factors:
| Repair Strategy | Pros | Cons | Best For |
|---|---|---|---|
| Bolt/Bushing Replacement | Cost-effective, relatively quick, minimal tools required. | Only addresses minor issues (e.g., seized/broken bolt, worn bushing). | Isolated bolt or bushing failure, intact mounting bracket. |
| Welding/Redrilling Holes | Restores original hole size, durable if done correctly. | Requires welding skills and equipment, risk of weakening surrounding metal if not executed properly. | Ovaled holes, minor cracks in a structurally sound bracket. |
| Bracket/Kit Replacement (Weld-in) | Strong, often provides a permanent fix for rusted areas. | Requires advanced welding skills, precise alignment crucial, can be labor-intensive. | Significantly rusted or fractured standalone brackets. |
| Component Replacement (e.g., Control Arm/Strut Assembly) | Guaranteed new components, often simpler labor for overall assembly. | Higher cost, may replace otherwise good parts, can require wheel alignment. | Integrated mount damage, extensive rust beyond repair, overall suspension overhaul. |
DIY vs. Professional
For minor issues like a simple bolt replacement, a mechanically inclined DIYer with proper tools and safety knowledge might attempt the repair. However, for more complex repairs involving welding or extensive component replacement, professional mechanics or welders are highly recommended. They have the expertise, specialized equipment (like spring compressors for struts), and safety protocols to handle these tasks correctly and prevent serious injury or further damage.
Cost-wise, replacing a single strut mount typically ranges from $120 to $400, while replacing the whole strut assembly on both sides can be $400 to $1000 or more, depending on the vehicle and labor rates. These costs underscore the importance of proper diagnosis and choosing the most effective repair method.
Maintaining Your Shock Mounts
Extending Component Lifespan
While shock mounts are robust, some maintenance practices can help extend their lifespan:
- Regular Inspections: Periodically inspect your shock mounts for signs of rust, cracks, or looseness, especially if you drive on rough roads or in corrosive environments.
- Address Rust Promptly: If surface rust appears, address it with rust converters and protective coatings to prevent it from spreading and compromising structural integrity.
- Avoid Impacts: Drive carefully over potholes and speed bumps to minimize sudden, severe stress on suspension components.
- Professional Installation: When replacing shocks or struts, ensure they are installed correctly by a qualified technician, with all bolts torqued to manufacturer specifications.
- Address Related Suspension Issues: Timely repair of other suspension components, such as worn control arm bushings or ball joints, can reduce undue stress on shock mounts.
Frequently Asked Questions
What are the immediate dangers of a broken front lower shock mount?
Can I drive my car with a broken front lower shock mount?
Is it common for shock mounts to break due to rust?
Do I need special tools to replace a front lower shock mount?
How much does it cost to fix a front lower shock mount?
Conclusion
Repairing a front lower shock mount is crucial for restoring your vehicle's stability, ride comfort, and overall safety. From simple bolt replacements to intricate welding or complete component changes, the appropriate repair method depends on the specific damage and vehicle design. While minor fixes might be within the scope of a skilled DIYer, the inherent dangers of working with suspension components, especially coiled springs, often necessitate professional intervention. Regular inspection and prompt attention to warning signs can prevent extensive damage and ensure a smooth, safe driving experience for miles to come.
Recommended Further Exploration
- What are the common symptoms of failing strut mounts and how do they impact vehicle performance?
- What essential safety precautions should be taken when performing DIY suspension repairs?
- What factors influence the total cost of a complete car suspension system replacement?
- What are the best practices for maintaining automotive suspension components to extend their lifespan?
References
 amazon.com
amazon.com
Last updated May 21, 2025