
Unlocking the Secrets of Realistic Fur Painting
Discover essential strategies to balance contrast and light for lifelike fur textures
Key Takeaways
- Layering Techniques: Build depth using base colors, glazes, and progressive layering.
- Light and Shadow Dynamics: Use chiaroscuro and controlled light direction to define volume.
- Texture and Color Contrast: Vary brushstrokes and color temperature to enhance realism.
Understanding the Fundamental Elements
Balancing contrast and light in fur paintings is essential for capturing depth, texture, and realism. This process involves understanding how light interacts with fur, implementing diverse painting techniques, and continuously assessing your work’s overall harmony. The interplay between warm and cool tones, highlights and shadows, and broad and fine brushstrokes creates an impression of life in every hair and strand.
Light and Shadow Dynamics
The cornerstone of realistic fur painting lies in mastering the interplay between light and shadows. Observing reference photos can provide a clear understanding of how light falls on fur. Key principles include:
Chiaroscuro Technique
Chiaroscuro is a powerful method where stark contrasts are established between the lightest highlights and the deepest shadows. This technique is especially effective in fur paintings, as it enhances the perception of volume and allows individual strands of fur to capture a three-dimensional feel. By positioning the starkly illuminated areas adjacent to deep shadows, every layer of fur is accentuated, creating a dynamic and realistic texture.
Ambient and Direct Lighting
Ambient light, although subtle, plays a crucial role in defining the overall mood of the painting. Coupling ambient light with a clear primary light source helps in forming gradient transitions from high-intensity highlights to soft shadows. This gradation is critical for ensuring that the fur looks natural, avoiding abrupt transitions that may lead to a flattened or artificial appearance.
Layering and Glazing Techniques
One of the most effective strategies to render realistic fur is through layering. The painting process may start with large areas of light and dark tones, gradually building up the texture and dimensionality.
Base Coats and Underpainting
Begin your composition by establishing a base coat, often in a darker shade that corresponds to the overall tone of the fur. This foundation sets the stage for later layers, as it helps artists see both the larger areas of contrast and the subsequent layers of color. The underpainting technique involves sketching the broad light and dark areas, ensuring that each section flows organically into the next.
Progressive Layering
Progressively applying layers allows each subsequent coat to build upon the previous one, thereby deepening the overall effect. Start with a mid-tone base, then gradually incorporate lighter colors where the light naturally falls on the fur. This method not only builds the texture but also integrates varying degrees of opacity with glazing, adding subtle complexity to the painting.
Glazing for Depth and Luminosity
Glazing involves applying thin, transparent layers of color, which enrich the details without overwhelming the underlying textures. This technique is particularly useful for achieving a sense of luminosity and depth, making the fur appear almost tangible. It creates a rich interplay between the depth of the base layer and the ethereal quality of light, often bringing out details that might otherwise be overlooked.
Techniques to Enhance Fur Texture
Creating a realistic portrayal of fur extends beyond establishing light and dark areas. It involves nuanced variations in brushstrokes, color choices, and strategic application methods to mimic the natural characteristics of fur.
Texture Variations and Brushwork
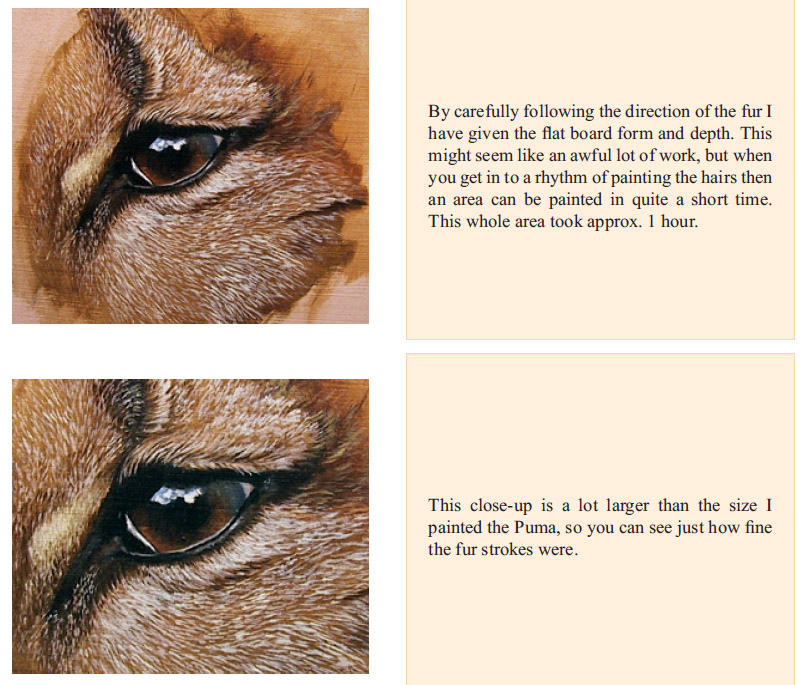
Not all fur is created equal; varying textures require different approaches. For example, short fur might need a series of gentle, overlapping brushstrokes, while longer fur may benefit from sharper, more defined strokes to highlight individual hairs. Experimenting with brush pressure, stroke direction, and the thickness of application can result in varied textures that contribute to overall realism.
Fine vs. Broad Brushstrokes
Employ fine brushstrokes for detailed work—these can capture delicate highlights where light catches the tips of fur. Conversely, broader strokes are ideal for softer areas where the fur blends into the background or for creating softer shadow transitions. Striking a balance between these two approaches ensures a cohesive structure throughout the painting.
Textural Contrast
Using thick, impasto applications in certain areas can add a tactile quality to bright highlights, while thin, diluted strokes in shadowed areas create a subtle, yet defined, outline of fur texture. Varying thickness not only accentuates the diversity of the fur but also works to integrate the contrasting elements harmoniously.
Color Contrasts and Temperature
A significant aspect of balancing contrast in fur painting is the strategic use of color. Artists often choose warm colors for highlights to mimic the warmth of natural light, while cooler hues in the shadows foster depth and dimensionality.
Warm and Cool Tone Dichotomy
By employing warm tones such as oranges, reds, or yellows on the illuminated areas, and cooler tones like blues, greens, or purples in the shadowed portions, you enhance the sense of realism. This temperature contrast not only separates the differing regions but also evokes a dynamic visual tension that signals depth to the viewer.
Midtones: The Crucial Bridge
Midtones are often the bridge between the extremes of light and dark. They smooth out transitions and help the eyes adjust to the varying intensities within the painting. Not neglecting midtones is essential; their inclusion prevents the painting from appearing overly stark or overly blended, maintaining a consistent gradient that mimics natural fur.
Applying a Structured Approach with a Table
Implementing a structured approach to painting fur involves methodically combining the techniques of contrast, light, texture, and color. The table below summarizes various techniques and their intended effects:
| Technique | Description | Intended Effect |
|---|---|---|
| Base Underpainting | Establishing large swaths of light and dark tones as the foundation | Sets a framework for depth and contrast |
| Layering | Applying successive layers of paint from dark to light | Creates overlapping textures for a realistic fur impression |
| Glazing | Using thin, transparent layers to modify color and luminosity | Adds richness, depth, and subtle gradation |
| Chiaroscuro | Utilizing strong light-dark contrasts | Enhances volume and focuses the viewer’s attention |
| Brushwork Variation | Employing fine and broad strokes in different areas | Accentuates details and soft transitions that replicate natural fur |
| Color Temperature | Mixing warm highlights with cool shadows | Creates dynamic tension and real-life vibrancy in the fur |
Real-World Application: Step-by-Step Guide
To effectively balance contrast and light when painting fur, consider the following step-by-step process which consolidates the techniques discussed:
Step 1: Preparation and Observation
Begin by studying high-quality reference images that showcase the fur texture and light dynamics. Not only does this observation hone your eye for detail, but it also helps identify the dominant light source and structural patterns in the fur.
Gathering Tools and Materials
Ensure you have an appropriate set of brushes, a palette of warm and cool tones, and a range of opacities in your paints. Organize your materials according to the painting phases to streamline the process.
Step 2: Establishing the Underpainting
Apply a broad underpainting that outlines the major light and dark areas. This step anchors the painting, providing a clear demarcation of where highlights will fall and shadows will recede. Use large brushes and diluted paint for a soft, even background.
Block In Major Shapes
Focus on blocking in the shapes of the animal or subject in a composition that suggests the fur’s natural flow. This initial stage is critical for maintaining consistency in the light's direction and intensity.
Step 3: Building Layers and Depth
With the underpainting in place, start applying successive layers of paint. Work gradually, targeting the fur's individual components:
- Midtone Layers: Apply a base midtone that will serve as the framework for both the highlights and deeper shadows.
- Highlights: Introduce warm color highlights where the fur catches the light, ensuring these areas are noticeably brighter than their surroundings.
- Glazing: Use glazing techniques to add transparent layers which incrementally shift the deeper hues and give the painting a sense of luminosity.
Detailing the Texture
Once the primary layers are established, focus on the fine details by incorporating varied brushwork to simulate individual hairs. This step may involve switching to a finer brush to add precise strokes and textural highlights, creating a tactile, three-dimensional look.
Step 4: Final Adjustments and Harmonization
The final stage involves stepping back from your work and reviewing the overall effect. Adjust where necessary to ensure that there is a smooth transition between light and shadow, and that the warm-cool tone balance is maintained.
Emphasize Focal Points
Use sharper contrasts in focal areas to guide the viewer’s eye. For example, emphasize the face, eyes, or bold highlights along the fur’s edges. Simultaneously, ensure that the gentle gradation in less-critical areas does not distract from the main subject.
Additional Tips and Considerations
Beyond the technical steps, consider the following to elevate your fur painting’s overall impact:
Continuous Review and Adaptation
Engage in consistent self-assessment and step back frequently during the process. This allows you to view your work as a whole, ensuring that the highlighted areas blend harmoniously with the shadows.
Make Incremental Changes
Instead of making drastic changes, adjust in small increments. This methodical process helps in retaining the depth and subtle transitions that are key to a realistic portrayal of fur texture.
Emotional and Visual Impact
Remember that your painting is not only a technical portrayal of fur but also a piece of art that evokes emotion. Balancing contrast and light carefully creates an atmosphere that resonates with the viewer, often invoking a sense of realism that draws them into the scene.
Experiment Beyond Conventions
While traditional methods provide a solid foundation, don’t hesitate to experiment with unconventional techniques such as combining impasto with delicate glazing. This fusion may yield unique effects that stand out in contemporary art while adhering to classical principles of light and shadow.
Practical Application: Case Studies in Fur Painting Techniques
Artists often share their experiences and case studies which highlight the challenges and triumphs of balancing light and contrast in fur paintings. Consider exploring the following aspects commonly discussed in artist communities and tutorials:
Case Study: The Lion’s Mane
In paintings of a lion's mane, the priority is to capture the dense interplay of shadows and light beamed through thick fur. Most artists start with a subdued dark base, applying progressive layers to carve out defined ridges and subtle highlights. The concomitant use of warm tones in illuminated strands against cool, deep shadows lends a majestic quality that is both realistic and dynamic.
Case Study: Domestic Animal Fur
In domestic scenes, such as depicting a dog’s fur or a cat’s coat, the contrast is more delicate. The interplay of ambient light in a cozy setting requires even more careful treatment of midtones and softer transitions. Here, layering and gentle glazing techniques meld seamlessly to offer a warm, inviting appeal. The focus is often on conveying the softness and tactile warmth of the fur while still retaining clear textural variety.
References
For additional insights and detailed tutorials, you may explore the following resources which provide expert advice on painting realistic fur through effective contrast and light techniques:
- How to Paint Fur - Paws by Zann
- How to Paint Fur with Ambient Light - Monika Zagrobelna
- 7 Tips for High-Contrast Paintings - Draw Paint Academy
- Tips for Painting Fur - Craftsy
- Creating Contrast in Chiaroscuro - Realistic Acrylic
Recommended Queries for Further Exploration
Expand your understanding and reading on the subject with these related queries:
Last updated March 24, 2025