
Comprehensive Guide to Configuring Static IP in Lima Using socket_vmnet Network Mode
Configuring a static IP address in Lima using the socket_vmnet network mode provides a stable and consistent network environment for your virtual machines (VMs). This guide offers a step-by-step approach to achieve this configuration, ensuring high performance and reliable connectivity.
Prerequisites
Before beginning the configuration, ensure the following prerequisites are met:
- Lima Version: Ensure Lima is version
v0.12.0or higher. - macOS Version: macOS 10.15 (Catalina) or later is required.
- Administrator Privileges: Administrative access is necessary for installing and configuring system components.
- Developer Tools: Xcode Command Line Tools should be installed. You can install them using:
bash

      xcode-select --install
Installing socket_vmnet
The socket_vmnet tool is essential for enabling advanced network configurations in Lima. You can install it using Homebrew or by building from the source.
Method 1: Installing via Homebrew
Homebrew simplifies the installation process:
brew install socket_vmnet
This command installs the socket_vmnet binary and its dependencies, making it readily available on your system.
Method 2: Building from Source
If you prefer building from the source for more control or the latest features, follow these steps:
git clone https://github.com/lima-vm/socket_vmnet.git
cd socket_vmnet
make
sudo make PREFIX=/opt/socket_vmnet install.bin
Important: Ensure that socket_vmnet is installed in a secure directory such as /opt/socket_vmnet to prevent security vulnerabilities.
For more details, refer to the socket_vmnet GitHub Repository.
Configuring sudoers File
To allow Lima to run socket_vmnet with the necessary privileges without prompting for a password, you need to configure the sudoers file.
limactl sudoers | sudo tee /etc/sudoers.d/lima
sudo install -o root /etc/sudoers.d/lima /etc/sudoers.d/lima
This configuration ensures that Lima can start and stop the socket_vmnet daemon seamlessly.
Adding socket_vmnet to PATH
To make the socket_vmnet binary accessible from any directory, add it to your system's PATH:
echo 'export PATH="/opt/socket_vmnet/bin:$PATH"' >> ~/.zshrc
source ~/.zshrc
This ensures that the socket_vmnet command can be executed without specifying its full path.
Configuring Lima's Network Settings
Lima uses a networks.yaml file to define network configurations. This file specifies how virtual machines connect to networks, including static IP assignments.
Creating or Editing networks.yaml
The configuration file is typically located at ~/.lima/_config/networks.yaml. If it doesn't exist, create it:
mkdir -p ~/.lima/_config
vim ~/.lima/_config/networks.yaml
Add the following configuration to define the socket_vmnet network:
networks:
  - lima: shared
    mode: socket_vmnet
    gateway: 192.168.105.1
    netmask: 255.255.255.0
    dhcp:
      start: 192.168.105.2
      end: 192.168.105.100
  - lima: bridged
    mode: bridged
    interface: en0
  - lima: host
    mode: host
    gateway: 192.168.106.1
    dhcpEnd: 192.168.106.254
    netmask: 255.255.255.0
sharedmode utilizes NAT to share the host's network.bridgedmode connects the VM directly to the host's physical network interface.hostmode creates a host-only network for private communication between the host and VM.
Defining DHCP Range for Static IPs
To reserve IPs for static assignment, configure the DHCP range to exclude the desired static IPs. For example, setting dhcpEnd to 192.168.105.100 reserves 192.168.105.101 to 192.168.105.254 for static assignments.
networks:
  shared:
    mode: shared
    gateway: 192.168.105.1
    dhcpEnd: 192.168.105.100
    netmask: 255.255.255.0
Save and exit the editor after making these changes.
Starting the Lima Instance with socket_vmnet
With the network configurations in place, start the Lima instance using the defined network mode:
limactl start --name=default --network=lima:shared
This command initiates a Lima instance named default using the shared network configuration defined in networks.yaml.
Assigning a Static IP to the VM
To assign a static IP address to your VM, follow these steps:
Step 1: Determine the VM's MAC Address
Each VM must have a unique MAC address. You can specify this in the Lima configuration or during VM startup:
limactl start --name=default --network=lima:shared --device virtio-net-pci,netdev=net0,mac=de:ad:be:ef:00:01
Ensure that the MAC address does not conflict with other devices on the network.
Step 2: Reserve the IP Address
Reserve a specific IP address for the VM by creating a bootptab file:
%%

hostname hwtype hwaddr ipaddr bootfile

tmp-vm01 1 de:ad:be:ef:00:01 192.168.105.100
This configuration binds the MAC address de:ad:be:ef:00:01 to the IP address 192.168.105.100.
Reload the DHCP daemon to apply the changes:
sudo /bin/launchctl kickstart -kp system/com.apple.bootpd
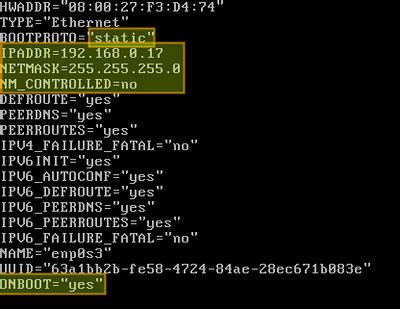
Step 3: Configure the VM's Network Interface
Within the VM, set the network interface to use the static IP address by editing the network configuration files. For a Linux VM, modify /etc/sysconfig/network-scripts/ifcfg-eth0:
DEVICE=eth0
BOOTPROTO=static
HWADDR=de:ad:be:ef:00:01
IPV6INIT=yes
NM_CONTROLLED=yes
ONBOOT=yes
TYPE=Ethernet
UUID=7a47775a-8bca-4daf-80b4-965da12756a8
IPADDR=192.168.105.100
NETMASK=255.255.255.0
GATEWAY=192.168.105.1
After saving the configuration, restart the network service:
sudo service network restart
Verifying the Configuration
After setting up the static IP, verify the configuration to ensure everything is functioning correctly:
Check the Assigned IP Address
Inside the VM, run the following command to verify the IP address:
ip addr
Ensure that the static IP 192.168.105.100 is correctly assigned.
Test Network Connectivity
From within the VM, test connectivity to an external host:
ping baidu.com
If DNS resolution fails, update the DNS settings by editing /etc/resolv.conf:
nameserver 8.8.8.8
nameserver 8.8.4.4
Then, restart the network service again:
sudo service network restart
Troubleshooting
If you encounter issues during the configuration, refer to the following troubleshooting steps:
IP Address Not Assigned
- Verify that the MAC address in the VM configuration matches the one in the
bootptabfile. - Ensure that
socket_vmnetdaemon is running:
sudo /opt/socket_vmnet/bin/socket_vmnet --vmnet-gateway=192.168.105.1 /var/run/socket_vmnet
Connectivity Issues
- Check firewall settings to ensure that
socket_vmnetand DHCP services are not blocked:
sudo /usr/libexec/ApplicationFirewall/socketfilterfw --remove /usr/libexec/bootpd
sudo /usr/libexec/ApplicationFirewall/socketfilterfw --add /usr/libexec/bootpd
sudo /usr/libexec/ApplicationFirewall/socketfilterfw --unblock /usr/libexec/bootpd
networks.yaml is correctly set up.socket_vmnet located typically at /var/log/socket_vmnet for any error messages.Common Issues and Solutions
- VM Cannot Obtain Static IP:
- Ensure the static IP is outside the DHCP range defined in
networks.yaml. - Double-check the MAC address and IP assignment in both Lima and the VM's network configuration.
- Ensure the static IP is outside the DHCP range defined in
- Host Unable to Access VM:
- Confirm that
socket_vmnetis running and properly configured. - Check firewall rules on the host to allow traffic to the VM's IP.
- Confirm that
- socket_vmnet Installation Path Issues:
- Verify that
socket_vmnetis installed in a secure directory like/opt/socket_vmnetand not in user-writable locations such as/usr/local/bin.
- Verify that
- Multiple VMs Conflict:
-
Assign unique MAC addresses and static IPs to each VM to prevent network conflicts.
-
Advanced Configuration
Using Multiple Network Modes
Lima supports various network modes simultaneously, allowing for versatile network setups:
networks:
  - lima: shared
    mode: shared
    gateway: 192.168.105.1
    dhcpEnd: 192.168.105.100
    netmask: 255.255.255.0
  - lima: bridged
    mode: bridged
    interface: en0
  - lima: host
    mode: host
    gateway: 192.168.106.1
    dhcpEnd: 192.168.106.254
    netmask: 255.255.255.0
This configuration allows VMs to connect through NAT, bridge directly to the host's network, and have a host-only network for private communication.
Reserving DHCP Addresses
To reserve specific IP addresses for certain VMs while allowing DHCP to assign others, adjust the DHCP range accordingly:
networks:
  shared:
    mode: shared
    gateway: 192.168.105.1
    dhcpEnd: 192.168.105.200
    netmask: 255.255.255.0
This setup permits DHCP to assign IPs up to 192.168.105.200, leaving 192.168.105.201 to 192.168.105.254 for static assignments.
Finalizing and Testing the Setup
Starting the VM
Start your Lima VM with the configured network settings:
limactl start --name=default
Ensure that the VM boots up without network issues and acquires the static IP address as configured.
Accessing the VM
From the host machine, you can access the VM using the assigned static IP:
ssh user@192.168.105.100
Replace user with the appropriate username for your VM.
Additional Resources
For more detailed information and advanced configurations, refer to the following resources:
Conclusion
Configuring a static IP address in Lima using the socket_vmnet network mode enhances the stability and reliability of your virtual machine's network setup. By following this comprehensive guide, you can ensure that your VMs maintain consistent connectivity, facilitating seamless development, testing, and deployment workflows.
For any further assistance, consult the official documentation or seek support from the Lima and socket_vmnet communities through their respective GitHub repositories.
Last updated January 7, 2025