Chat
Ask me anything
Ithy Logo

Comprehensive Guide to Building a Simple Calculator App

To create Basic Calculator App /> Android App Development

Key Takeaways

  • Choose the appropriate platform for your calculator app: Web, Android, iOS, or Desktop.
  • Leverage HTML, CSS, and JavaScript for a versatile web-based calculator.
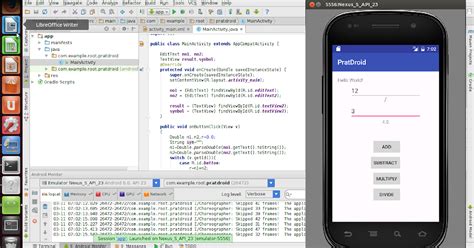
  • Utilize integrated development environments (IDEs) like Android Studio for mobile applications.
  • Enhance functionality with additional features such as scientific calculations and history logs.
  • Ensure cross-platform compatibility and user-friendly interfaces for optimal user experience.

Introduction

Creating a simple calculator app is an excellent project for both beginners and experienced developers. It allows you to understand the fundamentals of user interface design, event handling, and basic arithmetic operations. Depending on your target audience and platform preferences, you can develop a calculator app for the web, mobile devices, or desktop environments. This guide provides comprehensive instructions for building a web-based calculator using HTML, CSS, and JavaScript, along with insights into other platforms such as Android, iOS, and Python for desktop applications.

Building a Web-Based Calculator

1. Setting Up the Project Structure

Begin by creating the basic structure of your web-based calculator. You will need three main files:

  • index.html – Contains the HTML structure.
  • styles.css – Defines the styling for the calculator.
  • script.js – Implements the calculator's functionality using JavaScript.

2. Creating the HTML Structure

Start by designing the layout of the calculator using HTML. Below is a sample structure:

<!DOCTYPE html>
<html lang="vi">


    Máy Tính Đơn Giản


3. Styling with CSS

Enhance the appearance of your calculator with CSS. Below is a sample styles.css:

* {
    box-sizing: border-box;
}

body {
    background-color: #f4f4f4;
    display: flex;
    justify-content: center;
    align-items: center;
    height: 100vh;
    margin: 0;
    font-family: 'Segoe UI', Tahoma, Geneva, Verdana, sans-serif;
}

.calculator {
    border: 1px solid #888;
    border-radius: 10px;
    padding: 20px;
    background-color: #fff;
    box-shadow: 0px 0px 10px #aaa;
}

.calculator-screen {
    width: 100%;
    height: 60px;
    border: none;
    background-color: #252525;
    color: #fff;
    text-align: right;
    padding: 10px;
    font-size: 2em;
    border-radius: 5px;
    margin-bottom: 10px;
}

.calculator-keys button {
    height: 60px;
    width: 60px;
    margin: 5px;
    font-size: 1.5em;
    border: none;
    border-radius: 5px;
    cursor: pointer;
    transition: background-color 0.2s;
}

.calculator-keys button:hover {
    background-color: #ddd;
}

.operator {
    background-color: #fe9241;
    color: #fff;
}

.equal-sign {
    background-color: #4caf50;
    color: #fff;
    height: 130px;
}

.all-clear {
    background-color: #f44336;
    color: #fff;
}

.decimal {
    background-color: #bbb;
}

button {
    outline: none;
}

4. Implementing Functionality with JavaScript

Add interactivity to your calculator using JavaScript. Below is a sample script.js:

const calculator = {
    displayValue: '0',
    firstOperand: null,
    waitingForSecondOperand: false,
    operator: null,
};

function inputDigit(digit) {
    const { displayValue, waitingForSecondOperand } = calculator;
    if (waitingForSecondOperand === true) {
        calculator.displayValue = digit;
        calculator.waitingForSecondOperand = false;
    } else {
        calculator.displayValue = displayValue === '0' ? digit : displayValue + digit;
    }
}

function inputDecimal(dot) {
    if (calculator.waitingForSecondOperand === true) return;
    if (!calculator.displayValue.includes(dot)) {
        calculator.displayValue += dot;
    }
}

function handleOperator(nextOperator) {
    const { firstOperand, displayValue, operator } = calculator
    const inputValue = parseFloat(displayValue);

    if (operator && calculator.waitingForSecondOperand)  {
        calculator.operator = nextOperator;
        return;
    }

    if (firstOperand == null && !isNaN(inputValue)) {
        calculator.firstOperand = inputValue;
    } else if (operator) {
        const currentValue = firstOperand || 0;
        const result = performCalculation[operator](currentValue, inputValue);
        calculator.displayValue = String(result);
        calculator.firstOperand = result;
    }

    calculator.waitingForSecondOperand = true;
    calculator.operator = nextOperator;
}

const performCalculation = {
    '/': (firstOperand, secondOperand) => firstOperand / secondOperand,
    '*': (firstOperand, secondOperand) => firstOperand * secondOperand,
    '+': (firstOperand, secondOperand) => firstOperand + secondOperand,
    '-': (firstOperand, secondOperand) => firstOperand - secondOperand,
    '=': (firstOperand, secondOperand) => secondOperand
};

function resetCalculator() {
    calculator.displayValue = '0';
    calculator.firstOperand = null;
    calculator.waitingForSecondOperand = false;
    calculator.operator = null;
}

function updateDisplay() {
    const display = document.querySelector('.calculator-screen');
    display.value = calculator.displayValue;
}

updateDisplay();

const keys = document.querySelector('.calculator-keys');
keys.addEventListener('click', event => {
    const { target } = event;
    if (!target.matches('button')) {
        return;
    }

    if (target.classList.contains('operator')) {
        handleOperator(target.value);
        updateDisplay();
        return;
    }

    if (target.classList.contains('decimal')) {
        inputDecimal(target.value);
        updateDisplay();
        return;
    }

    if (target.classList.contains('all-clear')) {
        resetCalculator();
        updateDisplay();
        return;
    }

    inputDigit(target.value);
    updateDisplay();
});

5. Running the Web Application

After setting up the index.html, styles.css, and script.js files, open the index.html file in your preferred web browser. You should see a fully functional simple calculator capable of performing basic arithmetic operations like addition, subtraction, multiplication, and division.

6. Enhancing Functionality

To further improve your calculator, consider implementing the following features:

  • Scientific Calculations: Integrate functions for square roots, exponents, logarithms, and trigonometric operations.
  • Responsive Design: Utilize frameworks like Bootstrap or Tailwind CSS to make your calculator adaptable to various screen sizes.
  • Calculation History: Implement a feature to log previous calculations, allowing users to review their computation history.
  • Input Validation: Enhance error handling to manage invalid inputs and edge cases effectively.
  • Keyboard Support: Allow users to interact with the calculator using their keyboard for a more seamless experience.

Developing Mobile Calculator Apps

1. Android Calculator App with Java

If you prefer developing a mobile calculator app for Android devices, you can use Android Studio with Java. Follow these steps:

  1. Set Up Android Studio: Download and install Android Studio from the official website.
  2. Create a New Project: Start a new project with an empty activity.
  3. Design the UI: Use LinearLayout and weight properties to ensure the calculator adapts to different screen sizes.
  4. Implement Functionality: Utilize Java or incorporate a JavaScript engine like Rhino Script Engine to handle mathematical operations.
  5. Test and Deploy: Test your app on various devices and deploy it to the Google Play Store.

For more detailed instructions, refer to Android development tutorials available on the official Android documentation.

2. iOS Calculator App with Swift

To develop an iOS calculator app, you can use Xcode with Swift:

  1. Install Xcode: Download and install Xcode from the Mac App Store.
  2. Create a New Project: Start a new project with a single view application.
  3. Design the Interface: Utilize Interface Builder to layout buttons and display screens.
  4. Code the Functionality: Implement the logic for basic arithmetic operations using Swift.
  5. Test and Publish: Test your app on different iOS devices and publish it to the App Store.

Refer to Apple's Swift documentation for comprehensive guidance.

Creating a Desktop Calculator with Python

1. Building with Tkinter

For desktop environments, Python offers the Tkinter library to create GUI applications. Here's how to build a simple calculator:

import tkinter as tk

class Calculator:
    def __init__(self, root):
        self.root = root
        self.root.title("Simple Calculator")
        
        # Create entry field
        self.display = tk.Entry(root, width=30, justify='right')
        self.display.grid(row=0, column=0, columnspan=4, padx=5, pady=5)

        # Button texts
        buttons = [
            '7', '8', '9', '/',
            '4', '5', '6', '*',
            '1', '2', '3', '-',
            '0', '.', '=', '+'
        ]

        # Create and place buttons
        row = 1
        col = 0
        for button in buttons:
            cmd = lambda x=button: self.click(x)
            tk.Button(root, text=button, width=7, command=cmd).grid(row=row, column=col, padx=2, pady=2)
            col += 1
            if col > 3:
                col = 0
                row += 1

        # Clear button
        tk.Button(root, text='C', width=7, command=self.clear).grid(row=row, column=col, padx=2, pady=2)

    def click(self, key):
        if key == '=':
            try:
                result = eval(self.display.get())
                self.display.delete(0, tk.END)
                self.display.insert(tk.END, str(result))
            except:
                self.display.delete(0, tk.END)
                self.display.insert(tk.END, "Error")
        else:
            self.display.insert(tk.END, key)

    def clear(self):
        self.display.delete(0, tk.END)

# Create and run the app
root = tk.Tk()
calculator = Calculator(root)
root.mainloop()

This Python script creates a simple calculator with the following features:

  • Basic arithmetic operations: addition, subtraction, multiplication, and division.
  • Decimal point support for floating-point calculations.
  • Clear function to reset the display.
  • Error handling for invalid expressions.
  • Graphical user interface (GUI) built with Tkinter.

2. Running the Python Calculator

  1. Ensure Python is installed on your system. You can download it from the official Python website.
  2. Copy the provided Python code into a file named calculator.py.
  3. Open your terminal or command prompt, navigate to the directory containing calculator.py, and run the script using the command:
python calculator.py

The calculator window will appear, allowing you to perform basic arithmetic operations.

Expanding Your Calculator App

1. Adding Advanced Features

Enhance your calculator with advanced functionalities to make it more versatile:

  • Memory Functions: Implement memory storage features like MC (Memory Clear), MR (Memory Recall), M+ (Memory Add), and M- (Memory Subtract).
  • Scientific Operations: Include operations such as square roots, exponents, logarithms, and trigonometric functions.
  • History Log: Keep a record of previous calculations that users can review.
  • Theming: Allow users to switch between different themes or color schemes for a personalized experience.

2. Enhancing User Interface

A visually appealing and intuitive user interface improves user experience. Consider the following enhancements:

  • Responsive Design: Ensure your calculator adapts to various screen sizes and devices.
  • Animations: Add subtle animations for button presses and screen updates to make interactions more engaging.
  • Accessibility: Implement features like keyboard navigation and screen reader support to make your calculator accessible to all users.

3. Cross-Platform Compatibility

To reach a broader audience, consider developing your calculator app for multiple platforms:

  • Web Applications: Accessible from any device with a web browser.
  • Mobile Apps: Available on Android and iOS devices through respective app stores. Tools like React Native or Flutter can help in building cross-platform mobile apps.
  • Desktop Applications: Available for Windows, macOS, and Linux using frameworks like Electron for JavaScript-based apps or Python with Tkinter.

Deploying and Sharing Your Calculator App

1. Hosting a Web-Based Calculator

To make your web-based calculator accessible to everyone, host it on a web server. You can use platforms like:

  • GitHub Pages – Free hosting for static websites.
  • Netlify – Offers free and paid plans with continuous deployment.
  • Heroku – Suitable for deploying dynamic web applications.

Once hosted, share the URL with users or embed the calculator on your existing website.

2. Publishing Mobile Apps

To reach users on mobile devices, publish your calculator app to app stores:

Ensure your app complies with the respective store guidelines and consider user reviews and feedback for continuous improvement.

3. Sharing Desktop Applications

If you've developed a desktop calculator, distribute it through:

Provide clear installation instructions and ensure your application is compatible with major operating systems.

Conclusion

Developing a simple calculator app is a rewarding project that reinforces your understanding of programming fundamentals and user interface design. Whether you choose to build a web-based calculator with HTML, CSS, and JavaScript, a mobile app for Android or iOS, or a desktop application with Python, the core principles remain consistent. By following the comprehensive guidelines outlined above, you can create a functional and user-friendly calculator app tailored to your target platform. Additionally, enhancing your app with advanced features and optimizing the user interface will elevate the overall user experience, making your calculator a valuable tool for users across various devices.

For further learning and to explore advanced topics, consider delving into:

reactjs.org
React
udemy.com
Udemy
kivy.org
Kivy

Embark on this project to sharpen your programming skills and create a practical tool that can be further expanded and customized to meet diverse needs.


Last updated January 9, 2025
Ask Ithy AI
Download Article
Delete Article