
Unlock Enhanced Precision: Integrating a 60 kHz WWVB Receiver into Your Heathkit Clock
A comprehensive guide to modernizing your vintage Heathkit "Most Accurate Clock" with WWVB time synchronization.
The Heathkit Most Accurate Clock, particularly models like the GC-1000, holds a special place in the history of timekeeping technology. Originally engineered to synchronize with High Frequency (HF) time signals from WWV and WWVH, these clocks can be upgraded to receive the 60 kHz Very Low Frequency (VLF) signals from WWVB for potentially improved accuracy and reliability in many regions. This guide explores the considerations and methods for such a modification.
Key Insights: Upgrading Your Heathkit
- Understand the Core Difference: Your Heathkit clock was designed for HF signals (5, 10, 15 MHz from WWV/WWVH), while WWVB transmits a distinct 60 kHz signal requiring different reception and decoding technology.
- Modification is Essential: A direct "plug-and-play" addition of a 60 kHz receiver is not feasible. The project involves integrating a dedicated WWVB receiver module and interfacing it with your clock's existing circuitry or logic.
- Multiple Approaches Exist: Options range from feeding a processed signal from the WWVB module into the clock's timing system to more comprehensive overhauls using modern microcontrollers to manage time decoding and display.
Bridging the Signal Gap: WWV/WWVH vs. WWVB
To successfully modify your Heathkit clock, it's crucial to understand the fundamental differences between the time signals it was designed for and the WWVB signal you intend to add.
The Original Heathkit Design: Tuned to HF Signals
Heathkit's "Most Accurate Clock" models, such as the GC-1000, typically incorporate a multi-channel HF receiver. This receiver is designed to pick up time signals broadcast by NIST stations WWV (Fort Collins, Colorado) and WWVH (Kauai, Hawaii) on frequencies like 5 MHz, 10 MHz, and 15 MHz. The clock's internal logic, often managed by microprocessors like the Motorola 3870 or an 87C52 (as seen in some variants or related models like the GCW-1001), decodes the Binary Coded Decimal (BCD) time information transmitted on these HF signals. The clock then uses this information to discipline its internal crystal oscillator, aiming for high accuracy. Some models used specific AM receiver ICs like the Philips TDA1072A.
The 60 kHz WWVB Signal: A Different Standard
WWVB, also operated by NIST from Fort Collins, Colorado, broadcasts a time signal on a much lower frequency: 60 kHz (VLF). This signal has different characteristics and modulation:
- Frequency: 60 kHz, which requires a VLF receiver and a specialized antenna (typically a ferrite rod).
- Modulation: Amplitude Modulation (AM), where the carrier power is varied to encode time information. The data is sent at a rate of 1 bit per second using pulse-width modulation.
- Decoding: Requires dedicated circuitry or software to interpret the specific WWVB time code format.
Because of these differences, the Heathkit's original HF receiver and decoding logic are incompatible with the 60 kHz WWVB signal.
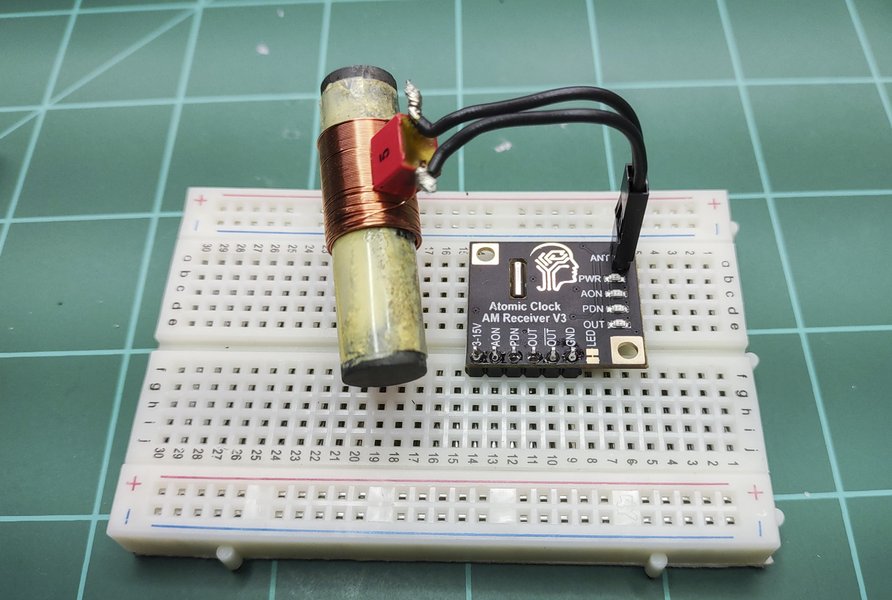
A typical 60 kHz WWVB receiver module (like the CANADUINO) with its ferrite rod antenna, essential for capturing the VLF time signal.
Comparing Modification Approaches
Adding a 60 kHz WWVB receiver to your Heathkit clock involves careful consideration of technical complexity, cost, and desired outcome. The radar chart below offers a comparative overview of different modification strategies, assessing them across factors like preservation of originality, required technical skill, approximate cost, time investment, and potential accuracy improvement. Note that these are general estimations.
This chart illustrates that while simpler integrations like feeding a Pulse-Per-Second (PPS) signal might preserve more originality and be less costly, more involved approaches like Microcontroller (MCU) integration generally require higher technical skills and time but can offer a greater boost in accuracy and functionality.
Pathways to Integration: Adding WWVB Capability
Several strategies can be employed to integrate a 60 kHz WWVB receiver. The choice depends on your electronics expertise, desired level of integration, and how much of the original clock functionality you wish to preserve or bypass.
Option 1: Interfacing a Standalone WWVB Receiver Module
This approach involves using a commercially available WWVB receiver module and interfacing its output with the Heathkit clock's existing timing circuitry.
Selecting a WWVB Module
Numerous WWVB receiver modules are available, such as those from CanAduino or universal-solder.com. Look for modules that include a ferrite rod antenna tuned to 60 kHz and provide a clear digital output (e.g., a demodulated time code stream or a Pulse-Per-Second (PPS) signal). Ensure the module's logic levels (typically 3.3V or 5V) are compatible with your clock's circuitry or can be adapted with level shifters.
Powering and Antenna Placement
The WWVB module will require a stable DC power source, often 3.3V or 5V. This can sometimes be derived from the Heathkit clock's internal power supply, but care must be taken to avoid introducing noise. Proper placement of the ferrite antenna is critical for good reception: near a window, away from metallic objects and sources of electromagnetic interference.
Signal Integration
This is the most complex part of this approach.
- PPS Signal: Some WWVB modules can output a 1 PPS signal synchronized to UTC. If your Heathkit clock has an accessible input for an external 1 PPS signal to discipline its oscillator, this might be a viable route. It would require understanding the clock's schematic to identify such a point.
- Direct Data Feed (Complex): Feeding the raw demodulated time code from the WWVB module directly into the Heathkit's original microprocessor is generally not feasible without significant firmware modifications, as the original firmware expects WWV/WWVH data format.
- External Decoding: You might need an intermediate circuit (perhaps involving a simple microcontroller) to decode the WWVB time data and then present it to the Heathkit clock in a format its display or setting mechanism can understand, or to generate control signals for the clock's original time-setting inputs.
Option 2: Modern Microcontroller (MCU) Integration
A popular and flexible approach among hobbyists is to use a modern microcontroller (like an Arduino, ESP8266, or Raspberry Pi Pico) as the new "brains" for timekeeping.
- The MCU connects to the WWVB receiver module and handles the decoding of the 60 kHz time signal.
- The MCU then directly drives the Heathkit clock's display segments or sends appropriate signals to the clock's display driver ICs.
- This method can bypass much of the original Heathkit's receiving and decoding logic, effectively turning the vintage clock into a display unit for a modern timekeeping system.
- This approach allows for added features like automatic Daylight Saving Time adjustment, display of date, or even fetching time via NTP (Network Time Protocol) as a fallback if WWVB reception is poor. Some enthusiasts have even added GPS modules for an alternative time source.
Visualizing the Modification: System Components
The mindmap below illustrates the key components and relationships involved in modifying your Heathkit clock to receive 60 kHz WWVB signals. It highlights the original system, the new WWVB reception elements, the challenges, and the potential integration strategies.
(e.g., Motorola 3870, 87C52)"] id1d["Internal Oscillator"] id2["60kHz WWVB System"] id2a["WWVB Signal (60kHz VLF)"] id2b["WWVB Receiver Module
(e.g., CanAduino)"] id2c["Ferrite Rod Antenna"] id2d["Demodulator & Decoder IC"] id3["Integration Challenges"] id3a["Frequency Mismatch"] id3b["Signal Protocol Differences"] id3c["Firmware Incompatibility"] id3d["Antenna Placement & Noise"] id4["Modification Approaches"] id4a["External WWVB Module"] id4aa["PPS Signal Interface"] id4ab["Custom Decoder Circuit"] id4b["Microcontroller Solution"] id4ba["Arduino / ESP8266"] id4bb["Decodes WWVB Signal"] id4bc["Drives Clock Display"] id4c["Power Supply for Module"] id4d["Physical Mounting"] id5["Required Skills & Resources"] id5a["Electronics Knowledge"] id5b["Soldering Skills"] id5c["Reading Schematics"] id5d["Programming (for MCU approach)"] id5e["Patience!"]
Step-by-Step Considerations for the Modification
Embarking on this project requires careful planning and execution.
1. Gather Components and Tools
- WWVB Receiver Module: Select a suitable 60 kHz module with antenna (e.g., CanAduino WWVB/MSF/JJY60, EverSet ES100).
- Your Heathkit Clock: Identify the specific model (e.g., GC-1000).
- Microcontroller (Optional but Recommended): Arduino, ESP8266, etc., if taking the MCU integration route.
- Supporting Components: Wires, breadboard for prototyping, resistors, capacitors, logic level shifters if needed.
- Tools: Soldering iron, solder, wire strippers/cutters, multimeter, oscilloscope (very helpful), power supply.
2. Understand Your Heathkit Clock's Internals
Obtain the service manual and schematics for your specific Heathkit model. This is crucial for identifying:
- Power supply points (for tapping power for the new module, if safe).
- Test points for existing clock signals.
- Inputs to the display drivers or main processor.
- The architecture of the existing receiver and time-setting logic. For example, the GC-1000 is known to use specific microprocessors and receiver ICs like the Philips TDA1072A.
3. Assemble and Test the WWVB Module
Before integrating, assemble your WWVB receiver module according to its instructions. Test it independently (e.g., with an Arduino and a simple sketch) to confirm it's receiving and decoding the WWVB signal correctly. Monitor its output (e.g., serial data or PPS signal).
4. Physical Installation and Wiring
- Mounting: Find a suitable location for the WWVB module and its antenna within or near the Heathkit clock's enclosure. Ensure the antenna is oriented for optimal reception and kept away from interference sources.
- Power: Connect the module to a clean power source. Avoid drawing too much current from the clock's internal supply if it's not designed for extra load. An independent supply for the module might be safer.
- Signal Wiring: Carefully connect the output of the WWVB module (or your intermediary MCU) to the chosen interface points on the Heathkit clock's board. This might involve soldering to specific pins or test pads. Double-check all connections before powering up.
5. Firmware/Logic Adaptation (If Applicable)
If you are using an MCU, you'll need to write or adapt firmware to:
- Read and parse the time data from the WWVB module.
- Implement any desired logic (e.g., time zone offsets, DST handling).
- Output signals to control the Heathkit's display.
6. Testing and Calibration
- Initial Power-Up: After integration, power up the system cautiously. Check for any signs of malfunction (e.g., smoke, overheating).
- Synchronization Check: Observe if the clock attempts to synchronize and eventually displays the correct time. This may take several minutes for WWVB.
- Troubleshooting: If issues arise, use your multimeter and oscilloscope to trace signals and diagnose problems. Weak signal? Reorient the antenna. Incorrect display? Check your MCU code or interface logic.
- Long-Term Observation: Once working, monitor the clock's accuracy over several days.
Understanding the WWVB Time Signal
The video below provides an overview of the NIST 60 kHz WWVB time signal, which can be helpful in understanding how these radio-controlled clocks work and the nature of the signal your new receiver will be trying to capture.
An overview of the NIST 60kHz WWVB time signal transmission.
Key Signal Differences: WWV/WWVH vs. WWVB
The following table summarizes the primary distinctions between the HF signals your Heathkit clock was originally designed for and the VLF WWVB signal you might be adding.
| Feature | WWV / WWVH | WWVB |
|---|---|---|
| Operating Frequency | High Frequency (HF): 2.5, 5, 10, 15, 20, 25 MHz | Very Low Frequency (VLF): 60 kHz |
| Broadcast Locations | WWV: Fort Collins, CO WWVH: Kauai, HI |
Fort Collins, CO |
| Modulation Type | Amplitude Modulation (AM) with various audio tones, voice announcements, and BCD time code on a 100 Hz subcarrier. | Amplitude Modulation (AM) with a time code transmitted by shifting carrier power, encoding 1 bit per second (pulse-width modulation). |
| Typical Antenna Type | External wire antennas, dipoles. Built-in ferrite antennas for some portable HF receivers. | Internal or external tuned ferrite rod antenna. |
| Primary Use in Clock | Original design basis for Heathkit GC-1000 and similar models. | Target for modification to potentially improve reception and accuracy in many modern "atomic" clocks. |
| Signal Propagation | Subject to ionospheric variations, affecting long-distance reception (skywave). | More stable groundwave propagation, though susceptible to local VLF noise. |
Frequently Asked Questions (FAQ)
Conclusion
Adding a 60 kHz WWVB receiver to a Heathkit Most Accurate Clock is a rewarding project for electronics enthusiasts looking to blend vintage charm with modern precision. While it's not a trivial undertaking and requires a good understanding of electronics and careful execution, the result can be a significantly enhanced timepiece. The most flexible and often successful approach involves using a modern microcontroller to bridge the gap between the WWVB receiver module and the Heathkit's display, offering a robust solution for reliable timekeeping. Careful planning, access to schematics, and patience are key to a successful modification.
Recommended Further Exploration
- How can I troubleshoot WWVB signal reception issues for my radio-controlled clock?
- What are the pros and cons of using an Arduino versus an ESP8266 for decoding WWVB time signals?
- What are the best practices for interfacing vintage clock displays, like those in Heathkit clocks, with modern microcontrollers?
- Are there alternative time synchronization methods, such as GPS or NTP, suitable for vintage electronics projects if radio reception is poor?
Referenced Search Results
 bigdanzblog.wordpress.com

 wa2mze.wordpress.com