
Mastering Window Installation: A Comprehensive DIY Guide
Transform Your Home with Confidence and Precision
- Precise Measurement is Paramount: The most critical step in window installation is accurately measuring the existing opening to ensure the new window fits perfectly, preventing costly errors and ensuring proper sealing.
- Understanding Window Types: Differentiate between "new construction" and "replacement" (or "remodel") windows, as their installation methods and required tools vary significantly based on whether you're working with a rough opening or an existing frame.
- Waterproofing and Sealing are Key: Proper flashing, caulking, and insulation are essential to prevent water damage, drafts, and energy loss, ensuring your new window is not only aesthetically pleasing but also highly functional and efficient.
Installing a new window can significantly enhance your home's appearance, energy efficiency, and overall comfort. Whether you're undertaking a new construction project or replacing an old, drafty unit, understanding the process is key to a successful outcome. This comprehensive guide will walk you through the essential steps, considerations, and techniques for installing a new window, ensuring a professional and long-lasting result.
Understanding Window Types: New Construction vs. Replacement
Before you begin, it's crucial to identify the type of window installation you're performing, as this will dictate the specific methods and materials required. There are primarily two types: new construction windows and replacement (or remodel) windows.
New Construction Windows
New construction windows are designed for homes where the wall framing is exposed, or when the siding and exterior trim have been completely removed. These windows typically come with a "nailing flange" or "fin" around their perimeter. This flange is fastened directly to the rough opening's sheathing, providing a secure attachment point and acting as part of the weather barrier. Installing new construction windows usually involves a more extensive process, including detailed flashing to integrate with the building's weather-resistant barrier (WRB).
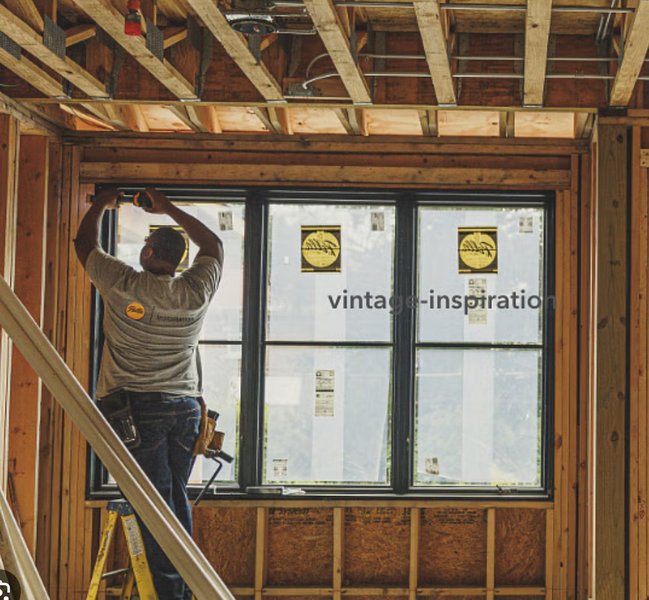
An example of a new construction window being installed with its nailing flange visible.
Replacement (Remodel/Insert) Windows
Replacement windows, often called "pocket windows" or "insert windows," are designed to fit within an existing window frame, allowing you to replace the old sashes and frame without disturbing the surrounding wall structure or exterior siding. They are typically smaller than new construction windows to accommodate the existing finished opening. This method is generally faster and less disruptive, making it a popular choice for homeowners looking to upgrade their windows without extensive renovation.
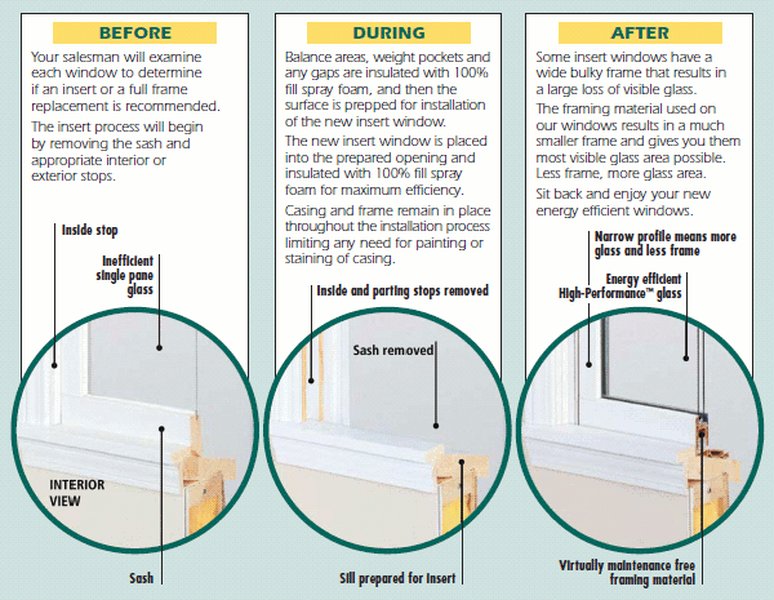
Illustrative diagram of a replacement window being inserted into an existing frame.
Essential Preparations Before Installation
Regardless of the window type, meticulous preparation is crucial for a smooth and successful installation. This includes accurate measurements, gathering the right tools, and inspecting the opening.
Accurate Measurement: The Foundation of Success
The single most important step is precise measurement. For replacement windows, measure the inside width of the old window frame (jamb to jamb) at the top, middle, and bottom. Take the smallest of these measurements. Do the same for the height. If the frame is out of square by more than 1/4 inch, adjustments to the frame or a full-frame replacement might be necessary. For new construction, measure the rough opening carefully.
Also, determine the slope of the existing sill using an angle-measuring tool, as some replacement windows offer a choice of sill angles to ensure a tight fit and proper drainage.
Gathering Your Toolkit
Having the right tools and materials on hand will streamline the process and prevent unnecessary delays. Here’s a general list:
- Measuring tape, level, and plumb bob (or laser level)
- Utility knife, pry bar, and hammer
- Drill, screws, and shims
- Caulking gun and exterior-grade caulk (silicone or polyurethane)
- Low-expansion spray foam insulation
- Flashing tape (self-adhering preferred)
- Safety glasses and gloves
- Drop cloths to protect interior and exterior surfaces
- Wood filler (for existing frames)
- New trim pieces (if needed)
Inspecting the Opening
Once the old window is removed (for replacement projects), inspect the opening for any damage, rot, or structural issues. Any damaged wood should be removed and replaced with new, solid wood to ensure a stable base for the new window. Clean the opening thoroughly, removing all debris, loose nails, and dust.
Step-by-Step Window Installation Process
The installation process varies slightly depending on whether you're installing a new construction or replacement window. Below are the general steps.
Removing the Old Window (for Replacements)
For replacement projects, you'll need to carefully remove the old window components. This typically involves:
- Remove storm windows (if present).
- Score the paint or caulk around the interior stop pieces with a utility knife to minimize chipping.
- Gently pry off the interior stop pieces.
- Remove the lower sash by pulling it forward and out.
- Slide the upper sash down and pry it out in the same manner.
- Remove any sash weights or springs and existing jamb liners.
- Clean the window sill and frame, removing any debris or old caulk.
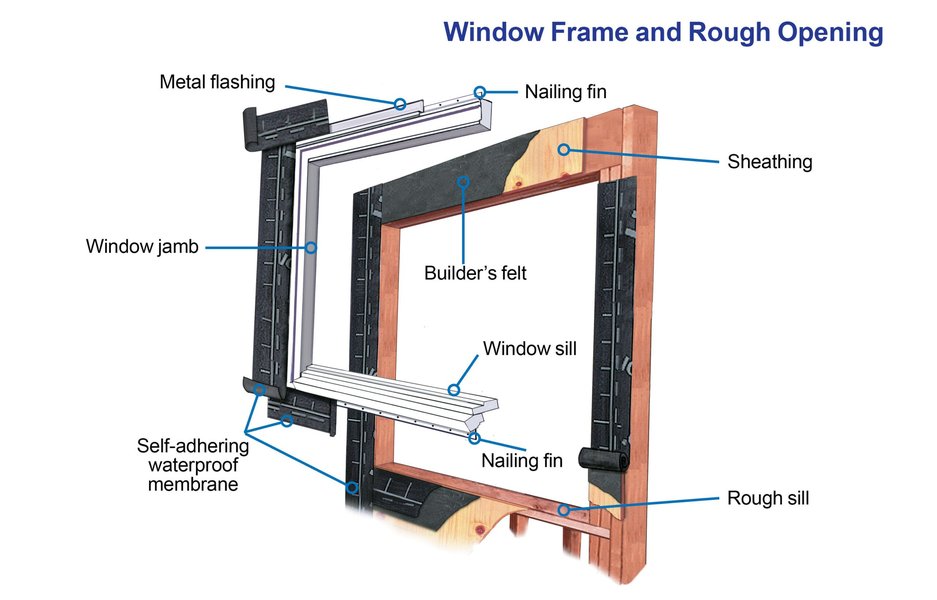
Diagram illustrating the removal of old window components for replacement.
Preparing the Opening and Flashing
This is a critical step for waterproofing and preventing future issues like rot and mold. Proper flashing directs water away from the wall structure.
An intricate diagram showcasing proper window flashing techniques to ensure a watertight seal.
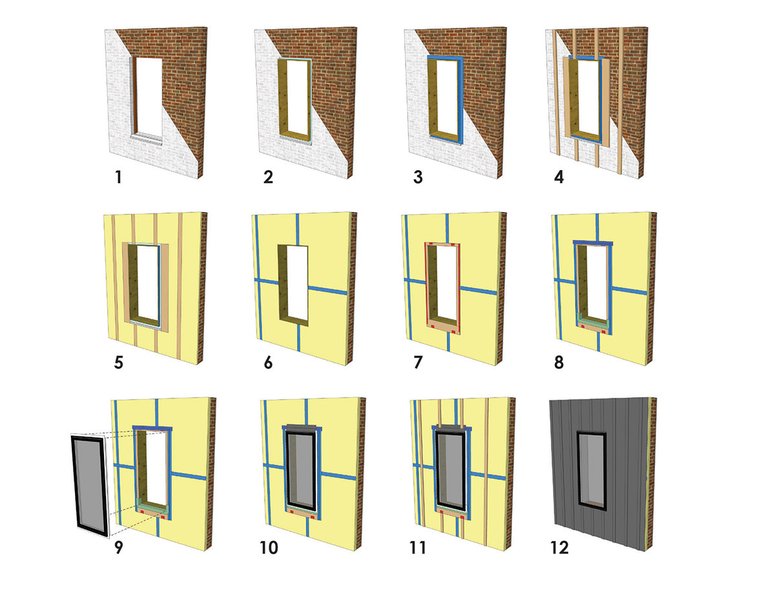
- Slope the Sill (if not already sloped): For new construction, ensure the rough opening sill is sloped to allow water drainage. This can be achieved by installing a beveled piece of weather-resistant siding.
- Install Sill Pan Flashing: Apply a continuous piece of flashing tape, extending beyond the rough opening on both sides, over the sill. This creates a pan to direct any water that gets past the window to the outside.
- Apply Side Flashing: For new construction windows, apply vertical strips of flashing tape up the sides of the rough opening, overlapping the sill flashing. For replacement windows, apply a continuous bead of caulk along the sill and up the sides of the existing frame.
- Seal the Opening (New Construction): Ensure the weather-resistant barrier (house wrap) is properly integrated, overlapping the window's nailing flange.
Setting the New Window
Carefully lift the new window into the prepared opening. This is often a two-person job, especially for larger windows.
- Dry-Fit and Adjust: Before securing, dry-fit the window into the opening to ensure it fits snugly. There should be a small, consistent gap around the frame for shimming and insulation.
- Position and Shim: Set the bottom of the window onto the sill. For replacement windows, press it tight against the exterior casings or blind stops. For new construction, the nailing flange should sit flush against the exterior sheathing. Use shims at the bottom, sides, and top to ensure the window is plumb, square, and level. This is crucial for proper operation and drainage. \[ \text{Level} = \text{horizontal alignment} \] \[ \text{Plumb} = \text{vertical alignment} \] \[ \text{Square} = \text{right angles at corners} \]
- Secure the Window: Once the window is plumb, square, and level, drive screws through the pre-drilled holes in the jambs (or through the nailing flange for new construction) into the framing. Start with a couple of screws loosely to allow for final adjustments, then tighten them once satisfied with the window's operation (opening, closing, and locking smoothly).
Insulating and Sealing
Proper insulation and sealing prevent drafts, moisture intrusion, and energy loss.
- Insulate Gaps: Fill the gaps between the window frame and the rough opening with low-expansion spray foam insulation or loose fiberglass insulation. Be careful not to over-expand the foam, as it can bow the window frame.
- Apply Caulk: Apply a continuous bead of exterior-grade caulk around the exterior perimeter of the window frame, sealing any gaps between the window and the house wrap or siding. For new construction, apply caulk under the nailing flange before securing.
- Install Top Flashing (New Construction): Apply flashing tape over the top nailing flange, overlapping the side flashing.
Finishing Touches
- Trim Shims: Trim any excess shims that protrude from the frame using a utility knife or handsaw.
- Reinstall/Add Interior Trim: Replace the interior stop pieces and any other trim you removed. If installing new trim, cut and fasten it securely. For vinyl windows, specific trim or jamb extensions may be required.
- Prime and Paint: Prime and paint the interior and exterior trim to match your home's aesthetic.
- Test Operation: Ensure the window opens, closes, and locks smoothly.
Key Considerations for Successful Installation
Beyond the step-by-step process, several factors can impact the success and longevity of your window installation.
Professional vs. DIY Installation
While DIY window installation can save significantly on labor costs, it comes with a learning curve. Mistakes can be costly, leading to issues like drafts, water leaks, and compromised energy efficiency. Professional installers offer expertise, specialized tools, and often warranties on their work. Consider your skill level, the complexity of the project, and the number of windows before deciding on DIY or professional installation.
Energy Efficiency and Long-Term Value
New windows can drastically improve your home's energy efficiency by reducing air leaks and improving insulation. Properly installed windows contribute to lower heating and cooling costs and enhance indoor comfort. They also add significant resale value to your property.
Manufacturer's Instructions
Always refer to the specific installation instructions provided by your window manufacturer. These documents contain critical details unique to your window model and are essential for ensuring proper installation and maintaining your warranty.
Understanding Installation Nuances: A Radar Chart Analysis
Window installation, while seemingly straightforward, involves a balance of various factors. This radar chart visualizes the importance of different aspects in achieving a successful and long-lasting window installation, highlighting areas where attention to detail is paramount.
This radar chart illustrates the relative importance and impact of various aspects of window installation. As you can see, "Precise Measurement" and "Proper Flashing & Sealing" consistently rank high, underscoring their critical role in both the DIY process and the long-term performance of your windows. While "Tool & Material Selection" is important, its direct impact on long-term performance is slightly lower compared to the core technical skills like ensuring the window is "Plumb, Square, & Level." Adhering to "Manufacturer Guidelines" and practicing "Safety Practices" are foundational, ensuring both a correct installation and the well-being of the installer.
The Visual Guide: How to Install a Replacement Window
To further aid your understanding, here's a highly relevant video that demonstrates the practical steps of installing a replacement window. This visual guide will complement the textual instructions, providing a clearer perspective on the techniques involved.
This video from Lowe's provides a clear, step-by-step walkthrough of installing a replacement window, from the initial removal of the old window to the final sealing and finishing touches. It visually reinforces the importance of precise measurements, proper shimming for plumb and level installation, and thorough caulking for a watertight seal. Watching this video can help demystify the process and build confidence for those tackling the project for the first time.
Comparative Overview of Window Installation Stages
To summarize the key differences and similarities between new construction and replacement window installations, the following table provides a comparative overview of the main stages involved.
| Stage | New Construction Window Installation | Replacement Window Installation |
|---|---|---|
| Opening Preparation | Requires a "rough opening" in exposed framing; typically involves building or verifying the opening dimensions. | Fits into an "existing finished opening" where the old window was removed; may involve minor repairs to the existing frame. |
| Window Type | Features a "nailing flange" or "fin" for attachment to the exterior sheathing. | Designed to fit within the existing frame, without a nailing flange, often called an "insert" or "pocket" window. |
| Flashing & Waterproofing | Extensive flashing required (sill pan, side flashing, top flashing) integrated with house wrap to prevent water intrusion into the wall cavity. | Caulking along the existing frame, potentially sill pan flashing, focuses on sealing the direct interface between the new window and old frame. |
| Securing Method | Nailing flange is fastened to the exterior sheathing; shims used to plumb and level within the rough opening. | Secured directly to the existing frame using screws; shims used to ensure plumb, square, and level within the old frame. |
| Exterior Impact | Often requires removing siding or trim to expose framing; can be a more disruptive process. | Minimal disruption to exterior siding or trim; typically less invasive. |
| Tools & Materials | Standard carpentry tools, flashing tape, house wrap, sealant. | Standard carpentry tools, caulk, shims, possibly wood filler. |
| Complexity | Generally more complex due to integration with wall system and weather barrier. | Generally less complex as it utilizes the existing structural opening. |
Frequently Asked Questions (FAQ)
Conclusion
Installing a new window, whether for new construction or as a replacement, is a rewarding home improvement project that can significantly enhance your living space. By diligently following each step, paying close attention to measurements, proper flashing, and ensuring the window is plumb, square, and level, you can achieve a professional-quality installation. Remember to always consult the manufacturer's specific instructions for your window model to ensure compliance and maximize the longevity and performance of your investment. With careful preparation and execution, your new windows will provide improved comfort, energy efficiency, and aesthetic appeal for years to come.
Recommended Further Exploration
- Explore best practices for window flashing techniques to ensure maximum water resistance.
- Learn how to troubleshoot common window installation problems like drafts or sticking sashes.
- Discover the long-term benefits of upgrading to energy-efficient windows for your home.
- Gain a deeper understanding of different window types and materials available on the market.