
Elevate Your Night Drive: Installing Projector Headlights on Your 2015 Honda CR-V
A Comprehensive Guide to Enhanced Visibility and Modern Aesthetics
Key Highlights of Projector Headlight Upgrades for Your 2015 Honda CR-V
- Enhanced Light Output: Projector headlights deliver a more focused and controlled beam pattern compared to traditional reflector headlights, significantly improving road illumination and minimizing glare for oncoming drivers.
- Modern Aesthetic Appeal: Upgrading to projector headlights, especially those with LED Daytime Running Lights (DRLs) or "Angel Eye" halos, can dramatically modernize the front-end look of your 2015 Honda CR-V.
- Multiple Upgrade Paths: You can choose between replacing the entire headlight assembly with aftermarket projector units, or, for more advanced users, retrofitting projector lenses into your existing halogen housings.
Upgrading the headlights on your 2015 Honda CR-V to projector-style units is a popular modification for owners seeking both improved visibility and a more contemporary appearance. While many 2015 CR-V models, particularly the EX and EX-L trims, came with standard halogen reflector headlights, the Touring trim often featured factory-installed projector headlights with LED DRLs. This difference in lighting technology means that a significant enhancement in both functionality and aesthetics is achievable through an upgrade.
Understanding Headlight Technologies: Reflector vs. Projector
Before diving into the installation process, it's crucial to understand the fundamental differences between the two primary types of headlight technologies:
Reflector Headlights: The Traditional Approach
Most vehicles, including many trims of the 2015 Honda CR-V, come equipped with reflector-style headlights. These headlights use a mirrored surface (reflector) behind the bulb to bounce and spread light forward. While cost-effective, their light distribution can be more diffuse, leading to scattered light and less precise illumination of the road ahead. This diffuse light can also contribute to glare for other drivers, especially when higher intensity bulbs like LEDs or HIDs are installed in housings not designed for them.
Projector Headlights: Precision and Performance
Projector headlights, on the other hand, utilize a convex lens in front of the light source, often combined with a reflector and a cutoff shield. This design allows for a much more focused and controlled beam pattern. The result is a sharp, defined cutoff line that directs light precisely onto the road without scattering it upwards, thereby reducing glare for oncoming traffic. The focused beam also provides better illumination of the road, improving night-time visibility. Many aftermarket projector headlights for the 2015 CR-V also incorporate aesthetic elements like LED DRLs or "Angel Eye" halo rings, further enhancing the vehicle's appearance.
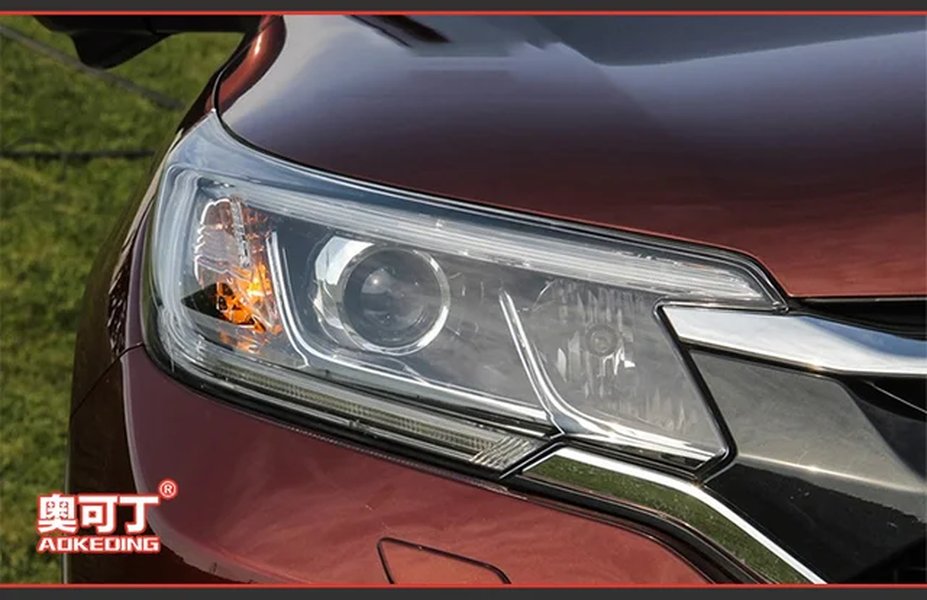
Aftermarket projector headlights for a Honda CR-V with LED DRLs.
Key Considerations Before Your Upgrade
Before proceeding with installing projector headlights on your 2015 Honda CR-V, consider the following factors:
Compatibility and Fitment
It's crucial to ensure that any aftermarket projector headlight assembly or retrofit kit is specifically designed for the 2015 Honda CR-V. While some components might be interchangeable with other CR-V generations, direct fitment for your specific model year is paramount for hassle-free installation and optimal performance. For instance, some headlight assemblies designed for 2015-2016 CR-V models are directly compatible and feature LED DRLs. Be aware that models like the 2012-2014 CR-V might require additional components like 2015 CR-V headlight brackets and potentially a 2015 front grille or bumper for a full "facelift" swap to accommodate the newer headlight design.
Bulb Types and Upgrades
The 2015 Honda CR-V typically uses H11 bulbs for low beams and 9005 bulbs for high beams. When upgrading to projector headlights, you might have the option to use halogen, LED, or HID bulbs. While aftermarket projector headlights often come with halogen bulbs, many users choose to upgrade to LED or HID bulbs for superior brightness and a whiter light output. If opting for LED bulbs, ensure they are compatible with projector housings to avoid glare and achieve the desired beam pattern. For HID kits, be mindful of wattage, as higher wattages can generate excessive heat and potentially damage the headlight assembly over time. Some LED options boast a lifespan of up to 100,000 hours and include features for flicker-free operation and error code prevention.
DOT and SAE Compliance
Always prioritize headlights that are DOT (Department of Transportation) and SAE (Society of Automotive Engineers) approved. These certifications ensure that the headlights meet safety and performance standards, minimizing the risk of blinding other drivers and ensuring legal compliance. Reputable aftermarket brands often highlight these certifications.
Installation Complexity
The installation of projector headlights can range from a relatively straightforward "plug-and-play" replacement of the entire assembly to a more involved "retrofit" process. Plug-and-play options are designed for direct replacement with no cutting or rewiring, while retrofitting involves disassembling your existing headlights to install projector lenses. While DIY installation is possible for some, especially for full assembly replacements, professional installation is recommended for complex retrofits or if you are unfamiliar with automotive wiring and electrical systems.
Choosing Your Projector Headlight Upgrade Path
There are generally two main approaches to installing projector headlights on your 2015 Honda CR-V:
Option 1: Aftermarket Projector Headlight Assemblies
This is the most common and often simplest method. You purchase a complete new headlight assembly that comes pre-built with projector lenses, and often includes integrated LED DRLs or halo rings. These units are designed as direct replacements for your factory headlights. Many online retailers and auto parts stores offer a wide selection of these, featuring various styles (e.g., black housing, chrome housing, clear lens) and designs (e.g., Angel Eye, LED DRL). This option typically involves unbolting the old headlight assembly and installing the new one, often requiring minimal to no wiring modifications beyond connecting existing harnesses.
Advantages:
- Relatively easy installation, often plug-and-play.
- Factory-like fitment and finish.
- Often includes modern aesthetic features like LED DRLs.
- Eliminates the need for complex disassembling and reassembling of original housings.
Disadvantages:
- Can be more expensive than just bulbs.
- Quality can vary significantly between brands.
- Some aftermarket options might not be as bright as high-end OEM or custom retrofits.
This video demonstrates a complete front-end facelift, including a headlight and grille swap, on a 2013 Honda CR-V to achieve the 2015-2016 Touring style, showcasing the visual impact of upgrading to projector headlights with LED DRLs. It provides insights into the physical modifications and component integration required for such an upgrade.
Option 2: Retrofitting Projector Lenses into Existing Housings
This advanced method involves opening your existing halogen headlight housings and physically installing projector lenses and associated components (such as shrouds and sometimes new reflectors) into them. This is a more custom and labor-intensive process, often undertaken by car enthusiasts seeking precise control over the beam pattern and the ability to integrate high-performance HID or LED projectors. It requires specialized tools, a good understanding of automotive lighting, and patience.
Advantages:
- Customization: Allows for highly tailored lighting performance and aesthetic choices.
- Superior Performance: Can achieve very high-quality light output with a sharp cutoff, often surpassing many aftermarket assemblies.
- Retention of OEM housing: Maintains the original housing quality and fit.
Disadvantages:
- Complex and time-consuming installation.
- Requires specialized tools and technical skills (e.g., baking headlights to open them, precise alignment).
- Higher risk of damaging original components if not done correctly.
- May void warranties on headlight components if not performed by certified professionals.
Step-by-Step Installation Overview (for Aftermarket Assemblies)
While specific steps may vary slightly depending on the chosen aftermarket assembly and your CR-V's exact trim, a general outline for replacing headlight assemblies on a 2015 Honda CR-V involves:
- Preparation: Gather necessary tools (socket wrench set, screwdrivers, trim removal tools), ensure the vehicle is off and cool, and disconnect the negative terminal of the battery for safety.
- Bumper Removal (Partial or Full): Accessing the headlight bolts often requires partial or full removal of the front bumper. This typically involves removing clips and screws from the fender wells, grille area, and underneath the bumper. Look for guides or videos specific to your 2015 CR-V for detailed instructions on bumper removal.
- Headlight Removal: Once the bumper provides access, locate and remove the bolts securing the headlight assembly to the vehicle's frame. Carefully disconnect the electrical connectors and pull the old headlight assembly out.
- New Headlight Installation: Connect the electrical harnesses to the new projector headlight assembly. Carefully slide the new assembly into place, ensuring all mounting points align. Secure it with the previously removed bolts.
- Test Functionality: Before reassembling the bumper, reconnect the battery and test all headlight functions (low beams, high beams, DRLs, turn signals) to ensure they are working correctly.
- Bumper Reinstallation: Reattach the front bumper by reversing the removal steps, ensuring all clips and screws are properly secured.
- Aiming: After installation, it is crucial to properly aim your new headlights to prevent blinding oncoming drivers and ensure optimal road illumination. This can often be done with simple hand tools, but for precise aiming, professional assistance or a headlight aiming machine is recommended.
Performance and Feature Comparison of Headlight Options
To further illustrate the advantages of different headlight types, here's a comparison of key performance indicators:
This radar chart illustrates a comparative analysis of different headlight options for your 2015 Honda CR-V based on various performance and practical attributes. Higher scores indicate better performance or lower difficulty/cost. Standard Halogen (Reflector) lights, while inexpensive and easy to install, offer lower brightness and beam focus, potentially leading to more glare. Aftermarket Projector assemblies significantly improve brightness, beam focus, and aesthetic appeal with a moderate installation difficulty and cost. Custom Retrofit with high-performance HID projectors represents the pinnacle of lighting performance and beam precision but comes with the highest cost and installation complexity due to the specialized skills and tools required.
Common Headlight Types and Their Characteristics
When considering replacements or upgrades, understanding the common types of headlights and their characteristics is beneficial:
| Headlight Type | Description | Typical Bulb Types | Pros | Cons |
|---|---|---|---|---|
| Reflector Headlights | Traditional housing using a mirrored surface to reflect light forward. | Halogen (H11, 9005) | Cost-effective, simple design, widely available. | Diffuse light pattern, can cause glare with non-halogen bulbs, less precise illumination. |
| Projector Headlights | Uses a convex lens to focus and project light, creating a sharp cutoff. | Halogen, LED, HID (e.g., H1, H7, D2S) | Focused beam, improved visibility, reduced glare, modern appearance. | More complex design, potentially higher cost. |
| LED Headlights | Utilizes Light Emitting Diodes for illumination. Can be integrated into projector or reflector housings. | Integrated LEDs, LED conversion bulbs (H11, 9005) | Energy-efficient, long lifespan, instant on, bright white light. | Can generate heat (requires good heat dissipation), quality varies significantly, some may not be DOT compliant. |
| HID (Xenon) Headlights | High-Intensity Discharge lights use an arc to produce light. Often found in projector housings. | D2S, D4S, H1, H7 (with ballasts) | Extremely bright, wide and intense light output, distinct blue-white color. | Require ballasts/igniters, slower warm-up time, can produce glare if not properly installed in projector housings, higher cost. |
| DRL (Daytime Running Lights) | Lights that illuminate automatically when the vehicle is running, often low-intensity. | LED strips, low-wattage halogen bulbs | Increases vehicle visibility during daylight hours for safety. | Primarily for visibility, not for night illumination. |
This table provides a concise overview of the various headlight technologies and features relevant to upgrading your 2015 Honda CR-V, helping you make an informed decision based on your priorities for performance, aesthetics, and ease of installation.
Aftermarket Options and Where to Find Them
Numerous online retailers and automotive parts suppliers offer projector headlight assemblies for the 2015 Honda CR-V. Popular sources include:
- eBay: Offers a wide range of headlight assemblies, including OEM replacements and aftermarket options, often with competitive pricing.
- Amazon: Provides various projector headlight assemblies, some with LED DRLs, catering to different budgets.
- Specialized Automotive Parts Websites: Sites like CarParts.com, AutoZone, HeadlightsDepot.com, XenonHIDs.com, Protuninglab.com, and TopGearAutosport.com specialize in automotive lighting and offer a curated selection of projector headlights, often with more detailed fitment information and customer support.
- Honda CR-V Owner Forums and Communities: These platforms, like CRVOwnersClub.com and Reddit communities (r/crv), are excellent resources for real-world reviews, installation tips, and sometimes even direct sales from other enthusiasts.
Frequently Asked Questions About Headlight Upgrades
Can I just put LED bulbs in my original 2015 Honda CR-V halogen reflector headlights?
Will installing aftermarket projector headlights void my vehicle's warranty?
Do projector headlights require professional installation?
How do I aim my new projector headlights correctly?
Conclusion
Upgrading your 2015 Honda CR-V to projector headlights is a significant enhancement that offers both practical safety benefits through improved illumination and a desirable aesthetic upgrade. Whether you choose the simpler path of replacing the entire assembly with an aftermarket unit or opt for a more involved custom retrofit, the result is a more modern, safer, and visually appealing vehicle. Always prioritize quality, DOT/SAE compliant products, and consider your technical comfort level before embarking on the installation process.
Recommended Further Exploration
- Explore the best LED headlight bulbs specifically designed for projector housings in your 2015 Honda CR-V.
- Learn the precise steps for properly aiming your new projector headlights to ensure optimal visibility without blinding other drivers.
- Delve into a comparative analysis of OEM versus aftermarket headlight assemblies for the Honda CR-V.
- Identify and resolve common issues that may arise after installing projector headlights on your Honda CR-V.
References
 amazon.com
Last updated May 21, 2025