
Developing a No-Code iOS Breathing Guidance App
A detailed roadmap for creating an accessible, no-code solution for panic attack relief
Key Highlights
- Accessible Activation: Integrate a triple-click power button trigger through iOS accessibility shortcuts.
- No-Code Platforms: Utilize no-code app builders like Thunkable, Adalo, or PandaSuite for designing and deploying your app.
- Visual & Guided Breathing: Create a dynamic visual breathing guide that prolongs exhalation to stimulate a parasympathetic response.
Understanding the App Concept
Your concept aims to provide a tool that assists individuals during panic attacks by using visual cues and guided breathing techniques. The core functionality revolves around detecting when the user is hyperventilating and subsequently guiding them through slow breathing cycles, with an emphasis on prolonging the exhale. This is intended to shift the autonomic balance towards the parasympathetic nervous system, thereby promoting calmness.
Since you have no coding experience, the approach is to leverage no-code platforms with a drag-and-drop interface, which simplifies the process of app design and development. Moreover, integrating the iOS accessibility feature for a triple-click of the power button can provide a direct and effective disarming mechanism during episodes of high stress.
Detailed Roadmap to Build the App
Phase 1: Planning and Conceptualization
1.1 Define the App’s Functionality
Begin by determining the precise functions your app will offer. Key points include:
- Design a visual breathing guide that reflects the user’s inhalation and exhalation processes.
- Incorporate a gradual extension of the exhalation phase to enhance parasympathetic stimulation.
- Optionally include additional features such as user profiles, historical activity tracking, and customizable breathing patterns.
1.2 User Interface (UI) and User Experience (UX) Design
A calming, intuitive interface is vital, especially during heightened emotional states. Consider these elements:
- Calming color palettes (soft blues, greens, or pastel tones) to instill a sense of peace.
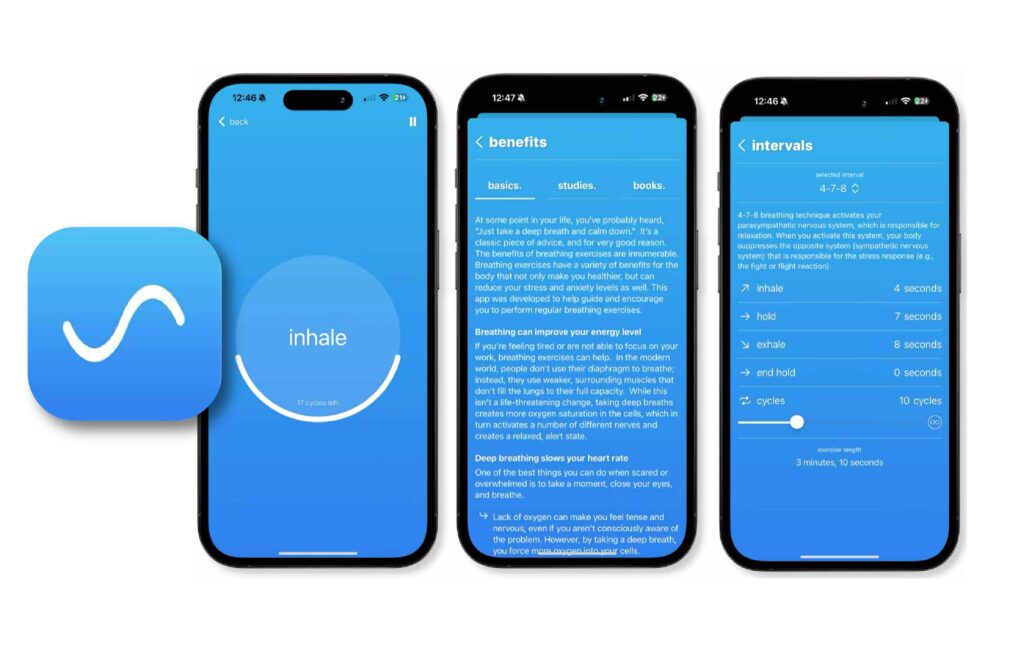
- Smooth animations to represent the breathing cycle: for example, an expanding and contracting circle.
- Clear instructions and possibly audio guidance to assist users in following the breathing pattern.
- Minimal design elements to avoid overwhelming the user during panic moments.
1.3 Integration of the Triple-Click Power Button Trigger
The trigger must be both intuitive and easily accessible:
- Utilize iOS’s Accessibility Shortcut feature to allow users to launch the app with a triple-click of the side button.
- If the direct feature is not available, guide users to set up a custom shortcut via the Settings application or Apple’s Shortcuts app.
Phase 2: Choosing Your No-Code Platform
2.1 Evaluating No-Code Options
Several no-code platforms support iOS app development. Key considerations are ease of use, available functionalities, and integration capabilities with iOS-specific features.
Popular choices include:
- Thunkable: Known for its intuitive drag-and-drop environment and ability to build complex interactive logic without coding.
- Adalo: Offers a user-friendly interface, suitable for building visually appealing mobile apps with multiple UI components.
- PandaSuite: Specializes in creating native iOS apps with robust support for animations and interactivity; a strong option if you require intricate visual designs.
2.2 Setting Up Your Development Environment
Once you have selected a platform:
- Create an account on the chosen platform.
- Familiarize yourself with the available tutorials and documentation to understand the interface and its functionalities.
- Explore sample projects or templates that can be adapted to your app’s design.
Phase 3: Designing the User Interface
3.1 Creating Wireframes and Mockups
Begin the design phase by sketching out wireframes:
- Create paper sketches or digital mockups outlining the user flow, from triple-click activation to the breathing guide interface.
- Map out each screen:
- Activation Screen: A succinct instruction page or direct launch screen triggered by accessibility shortcuts.
- Breathing Visualization: An animated visual guide, such as a dynamically expanding and contracting circle or waveform that represents breathing.
- Settings/Information: An optional page detailing the benefits of controlled breathing during panic attacks and allowing for personalized adjustments to the breathing pattern.
3.2 Designing the Visual Elements
Focus on creating calming and intuitive visuals:
- Select calming color combinations and ensure the interface uses minimalistic design principles.
- Design an engaging visual animation that guides the user through inhale and exhale phases. Consider using progress bars or animated geometric shapes.
- Incorporate audio elements if desired, such as gentle voice guidance or ambient sounds that signal inhale and exhale transitions.
Phase 4: Implementing App Logic and Functionality
4.1 Building the Breathing Guide Logic
With your design laid out, the next step involves programming the breathing pattern using the no-code platform’s visual scripting tools:
- Establish a timer mechanism that defines the duration of each breathing cycle. For example, set a timer for the inhale phase followed by a progressively longer exhale phase.
- Configure logic blocks to animate the breathing visualization. These blocks should correlate the timer intervals with visual changes, ensuring a smooth transition between states.
- Add functionality to handle user interactions. Include buttons for starting, pausing, or resetting the breathing exercise.
4.2 Integrating Accessibility Shortcut Features
Leveraging native iOS features to trigger the app is pivotal:
- Guide the user to enable the Accessibility Shortcut in Settings by navigating to Settings > Accessibility > Accessibility Shortcut and selecting your app.
- If the platform doesn’t provide direct integration for the triple-click action, instruct users on setting up the shortcut manually through iOS Shortcuts, often by linking a specific action to the Magnifier or another premade trigger.
- Test the integration to ensure that when the power button is triple-clicked, the breathing guidance screen launches promptly and without disruptions.
4.3 Data Handling and Optional Features
To enhance the app’s utility, consider integrating data tracking and customizable functionalities:
- Establish a user profile section to save personal settings, including preferred breathing patterns.
- Implement tracking for historical data, allowing users to monitor the frequency and duration of their breathing exercises.
- Ensure any personal or health data is stored securely, adhering to privacy regulations.
Phase 5: Testing, Feedback, and Iteration
5.1 Initial Testing
Prior to releasing the app, conduct thorough testing to ensure all functionalities operate seamlessly:
- Utilize the preview tools available within your no-code platform to simulate the app on an iOS device.
- Test the triple-click activation aspect to confirm that the app launches as expected.
- Verify that the breathing visualization correlates correctly with the timed logic, ensuring smooth animations and clear guidance.
5.2 Collecting User Feedback
Engage potential users in the testing phase:
- Involve friends, family, or potential users in simulated panic scenarios to assess the usability and effectiveness of the app.
- Gather feedback on visual clarity, timing of breathing cycles, and overall usability of the accessibility features.
- Document any issues or challenges faced during use, noting which areas might need further refinement.
5.3 Iterative Refinement
Based on the feedback obtained:
- Adjust visual elements and timing sequences to better suit user needs.
- Enhance the user experience by refining the interface for clarity and ease of use under stress.
- Expand features as required, such as customizable breathing profiles or additional calming cues.
Phase 6: Deployment and Maintenance
6.1 Preparing for App Store Submission
Once your app is thoroughly tested and refined, prepare to publish:
- Create an Apple Developer account, if you haven’t done so already (annual fee applies).
- Review Apple’s guidelines to ensure your app meets design, functionality, and privacy requirements.
- Prepare the necessary assets for app submission, including app icons, descriptions, and screenshots.
6.2 Deployment via No-Code Platform
Most no-code platforms offer integrated deployment tools:
- Use the platform’s tools to generate IPA files and other assets for iOS deployment.
- Follow the platform-specific directions for submitting your app to the App Store.
- Anticipate a review period during which Apple may request modifications or clarifications.
6.3 Post-Launch Maintenance
Continuous improvement is key for long-term success:
- Monitor app performance through user reviews and analytics provided via the no-code platform.
- Roll out timely updates to address bugs, incorporate user feedback, and enhance functionality.
- Consider future updates, such as integrating more advanced visualizations or data tracking features that help users better understand their progress.
Implementation Overview with a Table
The table below summarizes each phase with essential tasks and estimated timelines:
| Phase | Key Tasks | Estimated Duration |
|---|---|---|
| Planning & Conceptualization | Define app functionality, map user flows, design visual and interactive elements, plan accessibility trigger. | 2-3 Weeks |
| Platform Selection | Research and sign up on no-code platforms (Thunkable, Adalo, PandaSuite), familiarize with their interface. | 1 Week |
| UI Design | Create wireframes, design calming visuals, prepare user interface elements. | 2-3 Weeks |
| App Logic & Functionality | Build breathing timer, design animations, integrate triple-click accessibility, test app components. | 3-4 Weeks |
| Testing & Iteration | Conduct device testing, collect user feedback, refine features and visuals. | 2-3 Weeks |
| Deployment & Maintenance | Prepare for App Store submission, deployment through platform tools, ongoing updates. | 2 Weeks & Ongoing |
Additional Considerations
Technical and Privacy Concerns
User Privacy
While your app primarily serves as a guide during panic attacks, any incorporation of user data, such as tracking breathing sessions or storing personalized settings, should be handled with strict adherence to privacy standards. Ensure that data is stored securely and consider guidelines such as HIPAA if health information is involved.
Accessibility Compliance
The core accessibility feature – the triple-click trigger – is designed to assist users during distress. It is essential to ensure that your app not only integrates this feature smoothly but also explains clearly how users can set up the shortcut in their device settings. Consider including an onboarding tutorial that guides users through the necessary configuration steps.
User Experience and Feedback Integration
The success of an app like this depends heavily on its usability under stress. Continuously gather feedback, especially from individuals who might actually use the app during panic attacks, and iterate based on those insights. Emphasize a user-friendly interface with minimal steps to reach the breathing guide screen.
Installation and Post-Launch Activities
Preparing Your App for Users
Guidance for Users
Offer clear instructions within the app on how to activate the breathing guidance using the triple-click feature. This might involve:
- A step-by-step onboarding process that explains how to set up the Accessibility Shortcut via iOS Settings.
- A FAQ section addressing common questions or troubleshooting tips for the triple-click trigger.
- Tips on how to optimize the app experience during a panic attack, ensuring that the user can quickly and intuitively access the breathing guide.
Maintenance and Updates
Post-launch, prioritize releasing frequent updates to improve performance, add new features, and incorporate direct user feedback:
- Regularly monitor app performance using built-in analytics or feedback mechanisms provided by the no-code platform.
- Engage with your user community through in-app surveys or support channels to refine the app’s functionality and ease of use.
- Plan tiered updates that might gradually integrate more advanced features such as enhanced breathing analytics or integration with wearable sensors for more precise measurements.
References and Resources
- Thunkable - No-Code App Builder
- Adalo - Mobile App Creator
-
PandaSuite - Native iOS App Builder
- Apple Accessibility Shortcut Setup - Apple Support
- Apple Developer - Guidelines and Resources
- Bubble - Visual Web App Development
- Builder.ai - Custom No-Code Solutions
- Guide to Best No-Code App Builders
- Customizing iOS Accessibility Shortcuts - iMore
- No-Code iOS App Builders - Alpha Software
Recommended Related Queries
Last updated February 28, 2025