
Unlock a Smooth Move: Your Easy Guide to Microsoft 365 Tenant Migration with MigrationWiz!
Effortlessly transfer your organization's data from one Microsoft 365 'home' to another with this step-by-step walkthrough using BitTitan's MigrationWiz.
Key Insights for Your Migration Journey
- Simplicity is Key: MigrationWiz is designed to simplify the often complex process of moving data between Microsoft 365 accounts, automating many technical steps for you.
- Preparation Pays Off: Thorough planning and careful preparation before you start the migration are crucial for a successful and stress-free experience.
- Help is at Hand: BitTitan, the creators of MigrationWiz, offers extensive support resources, including video tutorials and detailed help articles, perfectly suited for users without a technical background.
Migrating from one Microsoft 365 "tenant" (your organization's dedicated space for Microsoft services like email and files) to another can seem like a monumental task, especially if you're not a tech expert. This often happens during company mergers, acquisitions, or organizational restructuring. But don't worry! Tools like MigrationWiz by BitTitan are designed to make this process as smooth as possible. This guide will walk you through each step in simple, easy-to-understand language.
Understanding the Basics: What Are We Doing?
Think of a Microsoft 365 tenant as your company's digital headquarters. A tenant-to-tenant migration is like moving all your digital assets – emails, documents, calendars, and team collaboration spaces – from an old headquarters to a new one. MigrationWiz acts as your expert moving company, handling the heavy lifting for you.
Why Use MigrationWiz?
MigrationWiz is a cloud-based tool, meaning you don't need to install any software on your computer. It automates the transfer of data, which helps to:
- Reduce manual effort and the time it takes.
- Minimize the risk of errors that can occur with manual transfers.
- Lessen downtime for your users, often allowing them to continue working during initial data transfer stages.
- Securely move various types of data, including emails, OneDrive files, SharePoint sites, and even Microsoft Teams data.
Phase 1: Preparation – Laying the Groundwork for Success
Good preparation is the secret to a smooth migration. This phase happens before you even log into MigrationWiz.
Step 1: Gather Your Information and Access
Admin Access is Crucial
You'll need administrator-level access to both your current Microsoft 365 tenant (the "Source") and the new Microsoft 365 tenant (the "Destination"). If you don't have this, you'll need to work closely with someone who does. These admin accounts allow MigrationWiz to access the data it needs to move.
Identify What to Move
Make a list of all the data you need to transfer. Common items include:
- User Mailboxes (emails, contacts, calendars)
- OneDrive for Business files (personal user files)
- SharePoint Online sites (team and organizational document libraries)
- Microsoft Teams data (chats, channels, files)
Knowing exactly what needs to move helps you choose the right type of migration project in MigrationWiz.
Step 2: Prepare the Destination Tenant
Create User Accounts
Before any data can be moved, user accounts must exist in the new (Destination) tenant. For example, if Jane Doe's email is jane.doe@oldcompany.com in the Source, you'll need to create an account for her in the Destination, like jane.doe@newcompany.com.
Assign Licenses
Ensure that all user accounts in the Destination tenant have the necessary Microsoft 365 licenses assigned to them before you start migrating their data. If a user doesn't have a license for, say, Exchange Online, their mailbox data cannot be migrated to the new tenant.
Step 3: Get Your MigrationWiz Account and Licenses
Sign Up for MigrationWiz
If you don't already have one, create an account on the BitTitan website. This will give you access to the MigrationWiz dashboard, your control center for the migration.
Purchase MigrationWiz Licenses
MigrationWiz requires licenses to move data. Typically, you'll need one license per user whose data is being migrated (e.g., a User Migration Bundle license which can cover mailboxes, documents, and personal archives). BitTitan offers different license types, including Tenant Migration Bundles for comprehensive projects. Purchase these through your MigrationWiz account.
Visualizing the Migration Process
To help you understand the overall flow, here's a mindmap outlining the key stages of a tenant-to-tenant migration project using MigrationWiz. This illustrates the journey from initial planning through to completion and support.
Phase 2: Setting Up Your MigrationWiz Project
With preparation complete, it's time to configure your migration project within the MigrationWiz platform.
Step 4: Create Your Migration Project
Log in to your MigrationWiz account.
Start a New Project
From the dashboard, click on "Create Project." MigrationWiz will ask you what type of migration you want to perform. For a full tenant-to-tenant move, you might create separate projects for Mailboxes, Documents (OneDrive/SharePoint), and Teams, or use a bundled project type if available.
- Select "Mailbox Migration" for emails, calendars, and contacts.
- Select "Document Migration" for OneDrive and SharePoint files.
- Select "Teams Migration" for Microsoft Teams data.
Give your project a clear name, like "Company X to Company Y Mailbox Migration."
Step 5: Configure Endpoints (Connection Points)
Endpoints tell MigrationWiz where to get the data from (Source) and where to put it (Destination).
Create Source Endpoint
You'll need to create a "New Endpoint" for your Source. Select "Microsoft 365" as the type and provide the admin credentials for your old tenant. MigrationWiz will guide you through granting necessary permissions, which usually involves signing in with your admin account and consenting to allow MigrationWiz to access the data.
Create Destination Endpoint
Similarly, create a "New Endpoint" for your Destination. Select "Microsoft 365" and provide the admin credentials for your new tenant, again granting necessary permissions.
Step 6: Add Users/Items to Your Project
Now, tell MigrationWiz whose data to move.
Adding Mailboxes Example
If you're migrating mailboxes, you'll add users to the project. You can do this one by one, or for many users, you can "Bulk Add" them using a CSV file (a simple spreadsheet). The CSV file typically needs columns for the Source Email Address and the Destination Email Address.
Example CSV content:
    SourceEmail,DestinationEmail

    john.doe@oldcompany.com,john.doe@newcompany.com

    jane.smith@oldcompany.com,jane.smith@newcompany.com
Upload this file to MigrationWiz. It will then list all the users ready for migration.
Phase 3: Configuration and Testing – Ensuring a Smooth Run
Step 7: Verify Credentials and Set Advanced Options
Before you start the actual migration, it's vital to check that MigrationWiz can connect to both tenants correctly for all users.
Run "Verify Credentials"
Select all users in your project and run the "Verify Credentials" action (often found under the "Start" button menu). This tests the connection for each user and flags any access issues. Resolve any errors before proceeding. This might involve checking permissions or password details.
Advanced Options and Staging
MigrationWiz offers several advanced options:
- Date Filters: You can choose to migrate data only from a specific date range.
- Pre-Stage Migration: This is highly recommended. It involves a multi-pass approach:
- First Pass (Pre-Stage): Migrates older items (e.g., emails older than 30 days). Users can still use their source mailboxes without interruption. This moves the bulk of the data.
- Second Pass (Full/Delta): Migrates new and remaining items just before the final switchover (cutover). This is much quicker as most data is already moved.
- Notifications: Set up email notifications to keep you updated on the migration progress or any errors.
Step 8: Perform a Test Migration
It's wise to perform a small test migration with a few non-critical user accounts. This helps you get familiar with the process and identify any potential issues before migrating everyone.
Select a few users, choose the "Full Migration" option (or a Pre-Stage followed by Full), and start it. Check their destination accounts afterwards to ensure data (emails, calendar appointments, files) has arrived as expected.
Comparative Analysis of Migration Aspects
The following radar chart provides a visual comparison of key aspects when using a tool like MigrationWiz versus attempting a more manual or less automated migration approach. This highlights areas where MigrationWiz typically excels, contributing to a smoother process for non-technical users.
This chart illustrates that MigrationWiz generally scores higher in areas beneficial for a smooth, less technical migration, such as automation and ease of setup, while requiring less technical skill.
Phase 4: Running the Migration – The Main Event
Step 9: Execute the Migration Passes
Pre-Stage Migration Pass
If you've opted for a pre-stage, select your users and start the "Pre-Stage Migration." Choose what to migrate (e.g., mail older than 30 days, calendars older than 14 days). This can run in the background over several days if needed, without impacting users.
Full Migration Pass (Delta Sync)
Once the Pre-Stage is complete for all users, and you are ready for the final cutover (switching users to the new tenant), perform a "Full Migration" pass. This pass migrates all new and changed items since the last pass (it's a "delta" sync). This is typically scheduled during a weekend or off-peak hours to minimize any disruption.
Step 10: Monitor Progress
The MigrationWiz dashboard provides real-time updates on the migration. You can see:
- How many items have been migrated for each user.
- The status of each user (e.g., Queued, In Progress, Completed, Failed).
- Any errors encountered. MigrationWiz often provides error codes and explanations, which you can look up in BitTitan's help documentation or use to contact their support.
If errors occur for specific users, you can often select those users and "Retry Failed Items."
Phase 5: After the Move – Post-Migration Steps
Once MigrationWiz reports that the migration is complete, there are still a few important things to do.
Step 11: Verify Data and Cutover
Verify Data in Destination
Have a few users log in to their new Microsoft 365 accounts and confirm that their emails, calendars, contacts, and files are present and correct. Spot-check a few mailboxes and OneDrive accounts.
DNS Cutover (Especially for Email)
This is a critical step if you are keeping the same email domain (e.g., yourcompany.com). You'll need to update your domain's MX records (Mail Exchange records) in your DNS settings to point to the new Microsoft 365 tenant. This directs new incoming emails to the new mailboxes. This change can take some time to propagate across the internet (usually a few hours, but can be up to 48). Plan this carefully, often over a weekend. Your IT administrator or domain registrar can help with this. MigrationWiz does not do this step; it must be done manually.
Step 12: User Communication and Device Configuration
Inform Your Users
Communicate clearly with your users about the migration: when it's happening, what to expect, and any actions they need to take (like logging into their new accounts or reconfiguring email on their phones).
Reconfigure Outlook Profiles and Devices
Users will likely need to set up new Outlook profiles on their computers to connect to their mailboxes in the new tenant. Mobile devices will also need to be reconfigured for email. BitTitan offers a separate tool called DeploymentPro that can automate Outlook profile configuration, which can be a huge time-saver.
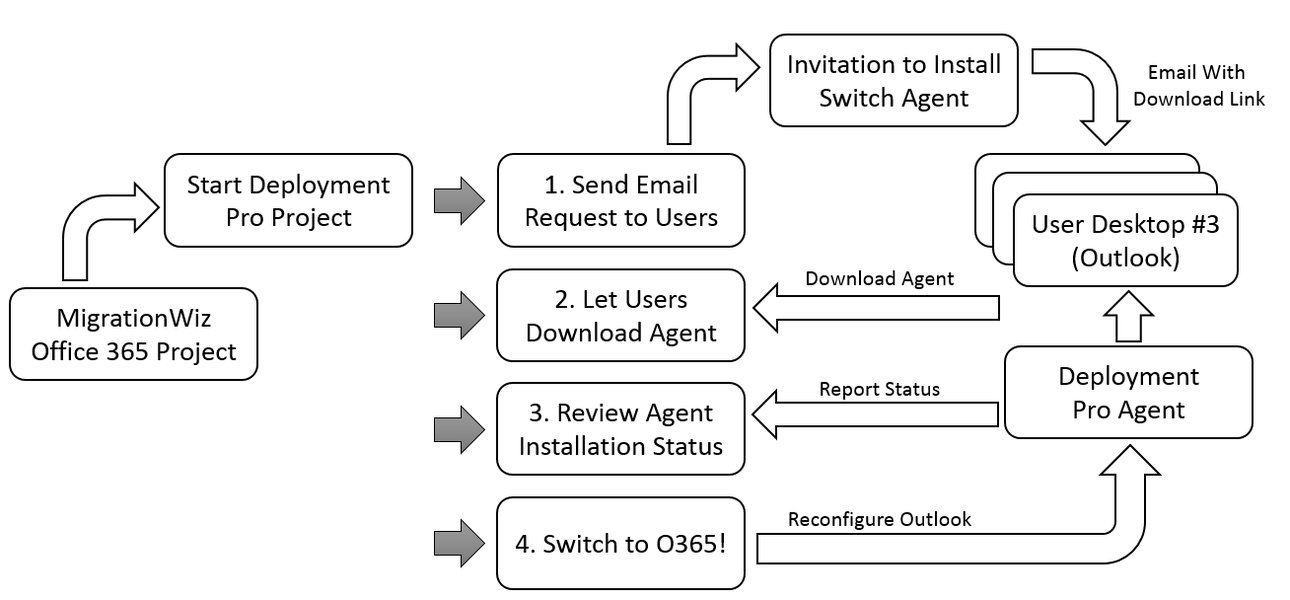
BitTitan's DeploymentPro can help automate Outlook profile configuration for users after migration.
Step 13: Decommission the Source Tenant (Eventually)
Once you are completely confident that all data has been successfully migrated, everything is working correctly in the new tenant, and users are comfortable, you can begin the process of decommissioning the old (Source) tenant. Do not rush this step. Keep the source tenant accessible for a period as a backup or for reference until you are absolutely sure it's no longer needed.
Video Guide: Getting Started with MigrationWiz
For a visual walkthrough of the MigrationWiz interface and initial setup, the following video provides a beginner-friendly introduction. Watching this can help you become more familiar with the tool before you start your own project.
A beginner's introduction to using BitTitan's MigrationWiz tool.
Quick Summary Table: MigrationWiz Steps
Here's a quick reference table summarizing the main phases and key actions involved in your MigrationWiz tenant-to-tenant migration:
| Phase | Key Actions | Focus for Non-Technical Users |
|---|---|---|
| 1. Preparation | Understand scope, secure admin access, prepare destination accounts & licenses, get MigrationWiz account & licenses. | Clearly list what data needs to move. Ensure user accounts are ready in the new "home." |
| 2. Project Setup | Create MigrationWiz project(s), configure Source & Destination Endpoints, add users/items (e.g., via CSV). | Follow on-screen prompts carefully. Use the CSV template for adding many users. |
| 3. Configuration & Testing | Verify credentials, set migration options (like Pre-Stage), run a test migration for a few users. | Always run "Verify Credentials." Test with a small group first to catch surprises. |
| 4. Execution | Run Pre-Stage migration pass, then Full (Delta) migration pass. Monitor progress. | Schedule main migration for off-hours. Keep an eye on the dashboard for status. |
| 5. Post-Migration | Verify data, perform DNS cutover, communicate with users, reconfigure devices, eventually decommission source. | Plan user communication. Get help for DNS changes if needed. Don't rush decommissioning. |
Frequently Asked Questions (FAQ)
Recommended Next Steps & Further Learning
To deepen your understanding or explore related topics, consider these queries:
- What are the differences between MigrationWiz User Migration Bundles and Tenant Migration Bundles?
- How does MigrationWiz handle the specific details of migrating Microsoft Teams channels and private chats?
- What are the best practices for communicating with users before, during, and after a Microsoft 365 tenant migration?
- How can a non-technical user troubleshoot common errors encountered in MigrationWiz?
References & Further Reading
Last updated May 20, 2025