
Unlock Your Nextcloud: Essential Port Forwarding for External Access
Discover which network ports are crucial for accessing your private cloud server from anywhere in the world.
Accessing your Nextcloud server from outside your local network (LAN) opens up a world of convenience, allowing you to reach your files, calendars, and contacts from anywhere with an internet connection. To achieve this, a crucial step is configuring port forwarding on your router. This process directs incoming internet traffic to the correct device—your Nextcloud server—within your home network. This guide will detail the specific ports you need to forward and other important considerations for a secure and reliable setup.
Key Insights for External Nextcloud Access
- Ports 80 (HTTP) and 443 (HTTPS) are fundamental for web access, with HTTPS being essential for security.
- A static internal IP address for your Nextcloud server is crucial for consistent port forwarding.
- Dynamic DNS (DDNS) and SSL certificates are highly recommended for secure and user-friendly remote access.
Understanding Port Forwarding for Nextcloud
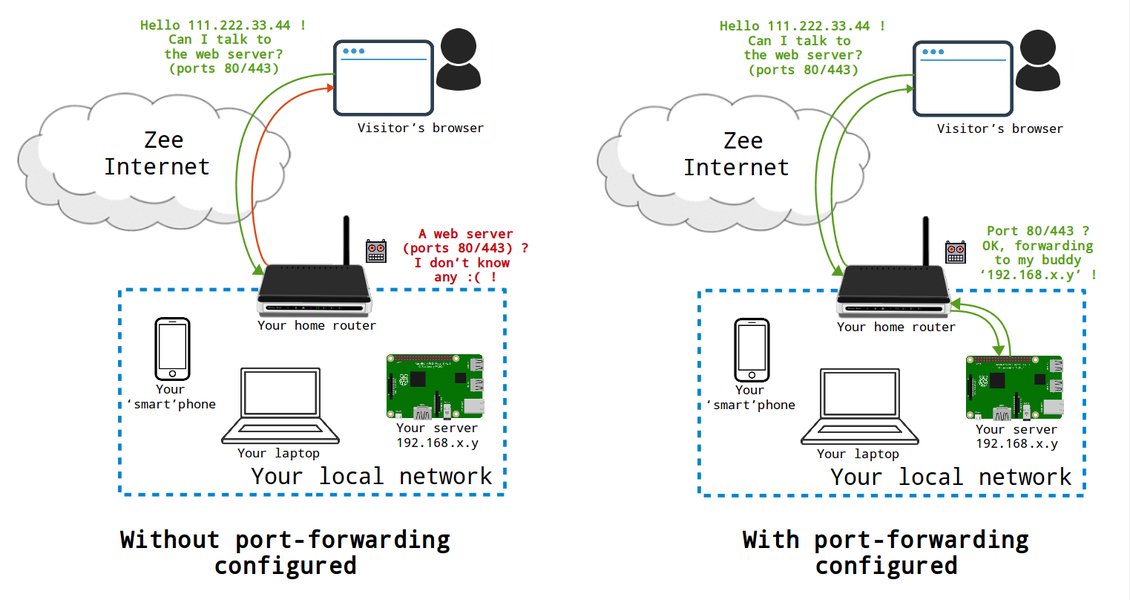
Port forwarding is a function of network routers that allows external devices to connect to a specific computing device or service within a private local-area network (LAN). When your Nextcloud server is running on your internal network, your router's firewall typically blocks incoming connections from the internet for security. Port forwarding creates an exception, telling the router that traffic arriving on certain external ports should be "forwarded" to the corresponding ports on your Nextcloud server's internal IP address.
An example illustrating port forwarding rules within a router's configuration page.
Essential Ports for Nextcloud
For basic external access to your Nextcloud instance, the following two ports are universally recognized as essential:
-
Port 443 (HTTPS/TCP)
This is the most critical port. Port 443 is the standard port for HTTPS traffic, which means secure, encrypted web communication. All sensitive data exchanged with your Nextcloud server (logins, files, etc.) should go over HTTPS to protect it from interception. You must forward external TCP port 443 to internal TCP port 443 on your Nextcloud server's IP address. An SSL/TLS certificate is required on your server for HTTPS to function correctly.
-
Port 80 (HTTP/TCP)
Port 80 is the standard port for HTTP traffic, which is unencrypted. While you should always aim to use HTTPS, port 80 is often forwarded for a few reasons:
- Initial Connection & Redirection: Many users will type a domain name without "https://". Port 80 can catch these requests and redirect them to HTTPS (port 443). This is a common and recommended practice.
- SSL Certificate Validation: Some SSL certificate providers (like Let's Encrypt) use port 80 for domain validation (e.g., via the HTTP-01 challenge).
Additional Ports for Specific Nextcloud Features
Depending on your Nextcloud setup and the features you use, you might need to forward additional ports:
-
Port 3478 (TCP/UDP) for Nextcloud Talk
If you plan to use Nextcloud Talk for audio/video calls and screen sharing, especially for users outside your network, you may need to forward port 3478 (both TCP and UDP) for the TURN server functionality. This port helps establish direct peer-to-peer connections or relays media when direct connections fail. It's often recommended to use a port number higher than 1024 if you configure a custom TURN server.
-
Ports 8080 (HTTP) and 8443 (HTTPS) for Alternative Setups or AIO
In some specific configurations, particularly with Nextcloud AIO (All-in-One) Docker setups or if standard ports 80/443 are blocked by your ISP, alternative ports like 8080 (for HTTP) or 8443 (for HTTPS) might be used by Nextcloud internally. If your Nextcloud instance is configured to listen on these ports, you would need to forward the external ports (e.g., external 443 to internal 8443, or external 8443 to internal 8443). For Nextcloud AIO, the AIO interface itself might be accessible on port 8080 locally, and if you expose ports 80 and 8443 publicly, the AIO can manage SSL certificates and proxy traffic to the appropriate containers.
Port Forwarding Summary Table
Here's a quick summary of the common ports associated with Nextcloud external access. The "Necessity" column indicates how critical they generally are.
| External Port | Internal Port | Protocol | Purpose | Necessity | Notes |
|---|---|---|---|---|---|
| 80 | 80 | TCP | HTTP (Unencrypted Web Traffic) | Recommended | Mainly for redirecting to HTTPS and SSL validation. |
| 443 | 443 | TCP | HTTPS (Secure Web Traffic) | Essential | Primary port for all Nextcloud access. Requires SSL certificate. |
| 3478 | 3478 (or custom) | TCP/UDP | Nextcloud Talk (STUN/TURN Server) | Optional | Only if using Nextcloud Talk extensively with external users. |
| 8080 | 8080 (or other) | TCP | Alternative HTTP / AIO Interface | Conditional | Used in some Docker/AIO setups or if standard ports are unavailable. |
| 8443 | 8443 (or other) | TCP | Alternative HTTPS / AIO Interface | Conditional | Used if port 443 is blocked or for specific AIO configurations. |
Visualizing Nextcloud Access Components
To better understand the elements involved in enabling external access to your Nextcloud server, the following mindmap outlines the key concepts and their relationships. It covers port forwarding, security measures, and necessary prerequisites.
Redirection, Certificate Validation"] id1_2_2["Port 443 (HTTPS)
Secure Data Transfer"] id1_3["Optional Ports"] id1_3_1["Port 3478 (TCP/UDP)
Nextcloud Talk"] id1_3_2["Port 8080 / 8443
Alternative/AIO Setups"] id2["Security Measures"] id2_1["SSL/TLS Certificate
Enable HTTPS"] id2_2["Firewall Configuration
Router & Server"] id2_3["Strong Credentials"] id2_4["Regular Software Updates"] id2_5["Trusted Domains
Nextcloud config.php"] id3["Prerequisites & Setup"] id3_1["Static Internal IP
For Nextcloud Server"] id3_2["Dynamic DNS (DDNS)
For Dynamic Public IP"] id3_3["ISP Port Blocking Check"] id4["Access Methods & Considerations"] id4_1["Direct Public Access"] id4_2["VPN Access
Enhanced Security Alternative"] id4_3["Hairpin NAT/Loopback
Access via public domain from LAN"]
Configuring Port Forwarding: A General Guide
The exact steps to configure port forwarding vary between router manufacturers and models. However, the general process is similar:
- Assign a Static Internal IP Address: Ensure your Nextcloud server has a static (fixed) IP address on your local network (e.g., 192.168.1.100). This prevents the IP from changing, which would break the port forwarding rules. You can usually set this via your router's DHCP reservation settings or by configuring a static IP manually on the server itself.
- Access Your Router's Configuration Page: Open a web browser and enter your router's IP address (commonly
192.168.1.1or192.168.0.1). Log in with your router's admin credentials. - Locate Port Forwarding Settings: Look for a section named "Port Forwarding," "Virtual Servers," "NAT Forwarding," or similar. This is often found under "Advanced Settings" or "Firewall" menus.
- Create New Port Forwarding Rules: You'll typically need to create one rule for each port you want to forward. For each rule, you'll specify:
- Service Name/Application Name: A descriptive name (e.g., "Nextcloud HTTP," "Nextcloud HTTPS").
- External Port (or WAN Port/Service Port): The port number the internet will see (e.g., 80, 443).
- Internal Port (or LAN Port/Private Port): The port number your Nextcloud server is listening on (usually the same as the external port, e.g., 80, 443).
- Internal IP Address (or Device IP): The static IP address of your Nextcloud server.
- Protocol: TCP for ports 80 and 443. TCP and UDP for port 3478 if used for Nextcloud Talk.
- Save and Apply Changes: After creating the rules, save them. Your router may need to restart to apply the changes.
This video provides a general overview of how to set up port forwarding on a home router.
Critical Considerations for Secure External Access
Opening ports to the internet requires careful attention to security:
SSL/TLS Certificates (HTTPS)
It cannot be overstated: always use HTTPS (port 443) for external Nextcloud access. Obtain a valid SSL/TLS certificate from a trusted Certificate Authority (CA). Let's Encrypt provides free certificates and is widely supported and can often be automated.
Dynamic DNS (DDNS)
Most residential internet connections have a dynamic public IP address that changes periodically. A DDNS service maps a memorable domain name (e.g., yourname.ddns.net) to your changing public IP address. This ensures you can always reach your Nextcloud server using the same domain name. Services like No-IP, DuckDNS, or FreeDNS are popular choices. Many routers have built-in DDNS client support.
Nextcloud Trusted Domains
Nextcloud requires you to specify which domain names or IP addresses are allowed to access it. You must add your public domain name (from DDNS) and potentially your public IP address to the trusted_domains array in your Nextcloud server's config/config.php file. Without this, you'll likely see an "Access through untrusted domain" error.
Firewall Configuration
Ensure your server's operating system firewall (e.g., ufw on Linux) is also configured to allow incoming traffic on the necessary ports. Your router's firewall handles external threats, while the server's firewall adds an internal layer of defense.
ISP Port Blocking
Some Internet Service Providers (ISPs) block common incoming ports like 80 or 443 on residential plans to prevent users from hosting servers. If you encounter issues, check with your ISP. If these ports are blocked, you might need to use non-standard external ports (e.g., forward external port 8443 to internal port 443 on your server) and then access Nextcloud using https://yourdomain.com:8443. However, this can sometimes complicate SSL certificate issuance and client configuration.
Hairpin NAT (NAT Loopback)
Hairpin NAT allows you to access your Nextcloud server using your public domain name even when you are on your internal LAN. If your router doesn't support this, you might need to use your server's internal IP address when on your LAN and the public domain name when outside. Alternatively, setting up a local DNS server (e.g., Pi-hole) to resolve your public domain to the internal IP can solve this.
Security Alternatives
If you are concerned about directly exposing your Nextcloud server to the internet, consider alternatives like:
- VPN (Virtual Private Network): Set up a VPN server on your network. To access Nextcloud, you first connect to your VPN, and then you can access Nextcloud via its internal IP address as if you were on your LAN. This is generally more secure as it doesn't expose any Nextcloud ports directly to the public internet.
- Reverse Proxy with Tunneling: Services like Cloudflare Tunnel or using a self-hosted reverse proxy (e.g., Nginx Proxy Manager) can provide secure access without traditional port forwarding, often adding extra security layers like Web Application Firewalls (WAF).
Relative Importance and Complexity of Setup Components
The radar chart below visualizes the perceived importance and complexity associated with key components for setting up external Nextcloud access. "Importance" reflects how critical a component is for a secure and functional setup, while "Complexity" indicates the general effort or technical knowledge required for its implementation.
This chart illustrates that while components like SSL certificates and forwarding Port 443 are highly important, their implementation complexity can vary. Simpler tasks like setting trusted domains are crucial yet less complex.
Frequently Asked Questions (FAQ)
https://yourdomain.com:external_port. Another approach is to use a tunneling service or a VPN.Conclusion
Enabling external access to your Nextcloud server primarily involves forwarding ports 443 (HTTPS) and 80 (HTTP) on your router to your Nextcloud server's static internal IP address. Coupled with essential security practices like using SSL certificates, Dynamic DNS, strong passwords, and keeping your system updated, this configuration allows you to securely access your private cloud from anywhere. For specific features like Nextcloud Talk or in particular AIO setups, additional ports such as 3478, 8080, or 8443 might be necessary. Always prioritize security and consult your router's documentation for specific port forwarding instructions.
Recommended Further Exploration
- How can I set up Dynamic DNS for my home server for stable remote access?
- What is the best way to install a Let's Encrypt SSL certificate on my Nextcloud server?
- What are the comprehensive security best practices for a self-hosted Nextcloud instance?
- Are there secure alternatives to port forwarding for accessing services on my home network?
References
Last updated May 21, 2025