
Optimal Spawn/Substrate Ratios for Shoebox Tek Mushroom Culture
Achieving the Perfect Balance for Maximum Yield and Minimal Contamination
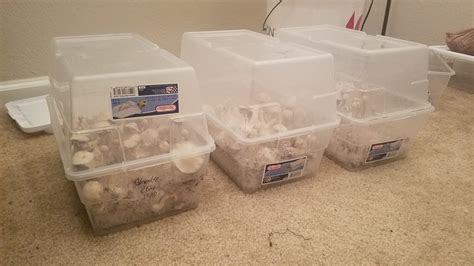
Key Takeaways
- Balanced Ratios Enhance Colonization: A spawn-to-substrate ratio between 1:1 and 1:3 is ideal for effective mycelial growth and reducing contamination risks.
- Substrate Composition is Crucial: Utilizing a high-quality substrate mix, such as coco coir, vermiculite, and gypsum, ensures optimal moisture retention and nutrient availability.
- Environmental Control Maximizes Yields: Maintaining appropriate temperature, humidity, and sterilization practices is essential for successful mushroom cultivation.
Introduction
Successfully cultivating mushrooms using the shoebox tek method hinges significantly on determining the appropriate spawn-to-substrate (S2S) ratio. This ratio is pivotal as it influences the speed of mycelial colonization, the risk of contamination, and the overall yield of the mushroom culture. This comprehensive guide delves into the optimal S2S ratios, substrate preparation, environmental considerations, and best practices to ensure a thriving shoebox tek mushroom cultivation setup.
Understanding Spawn/Substrate Ratio
The spawn-to-substrate ratio defines the proportion of mycelial spawn relative to the bulk substrate in your cultivation setup. This ratio is fundamental in mushroom cultivation, as it directly impacts the efficiency of colonization, resource utilization, and the likelihood of contamination.
A higher spawn ratio (e.g., 1:1) means more mycelial presence from the outset, facilitating faster colonization and stronger resistance to contaminants. Conversely, a lower spawn ratio (e.g., 1:4) conserves spawn resources but may extend colonization time and increase contamination risks if not managed properly.
Recommended Ratios and Their Benefits
Based on extensive research and practical applications, the following spawn-to-substrate ratios are recommended for shoebox tek mushroom cultures:
1. 1:1 Ratio
Equal parts spawn and substrate provide a robust foundation for rapid colonization. This ratio ensures that the mycelium can quickly dominate the substrate, leaving less room for contaminants to establish.
- Pros: Fast colonization, high contamination resistance, potentially higher yields.
- Cons: Higher spawn usage, increased cost, and more time-consuming spawn preparation.
2. 1:2 to 1:3 Ratio
These ratios offer a balanced approach, providing sufficient mycelial presence to ensure effective colonization while optimizing substrate usage.
- Pros: Good balance between colonization speed and substrate volume, cost-effective spawn usage, manageable contamination risks.
- Cons: Slightly longer colonization times compared to a 1:1 ratio.
3. 1:4 to 1:6 Ratio
These higher substrate ratios are typically reserved for experienced cultivators looking to maximize substrate usage and reduce spawn costs.
- Pros: Economical use of spawn, increased substrate volume for larger yields.
- Cons: Longer colonization periods, higher risk of contamination if environmental conditions are not meticulously controlled.
Comparison of Spawn/Substrate Ratios
| Ratio (Spawn:Substrate) | Colonization Speed | Contamination Risk | Yield Potential | Spawn Efficiency |
|---|---|---|---|---|
| 1:1 | Very Fast | Low | High | Low Efficiency |
| 1:2 - 1:3 | Moderate | Medium | Good | Balanced Efficiency |
| 1:4 - 1:6 | Slow | High | Potentially Higher | High Efficiency |
Choosing the Right Ratio for Your Setup
Selecting the optimal spawn-to-substrate ratio depends on several factors, including your level of experience, available resources, and specific cultivation goals. Here are key considerations to help you make an informed decision:
1. Experience Level
Beginners are often advised to use higher spawn ratios (1:1 to 1:2) to reduce contamination risks and ensure quicker colonization. Seasoned cultivators may opt for lower ratios to maximize substrate usage and produce larger yields.
2. Resource Availability
If spawn is limited or costly, using a lower ratio (e.g., 1:3) can be more economical. However, ensure that environmental conditions are optimal to support prolonged colonization periods.
3. Environmental Control
Maintaining strict control over environmental factors such as temperature, humidity, and cleanliness becomes increasingly important as you lower the spawn ratio. Stable and optimal conditions can mitigate some of the contamination risks associated with lower ratios.
Substrate Types and Preparation
The choice and preparation of the substrate play a critical role in the success of mushroom cultivation. A well-prepared substrate provides the necessary nutrients and moisture content for mycelial growth while minimizing contamination risks.
1. Common Substrate Components
- Coco Coir: Derived from coconut husks, coco coir is an excellent moisture-retaining material that provides a good aeration structure for mycelium.
- Vermiculite: A hydrophilic mineral that enhances moisture retention and improves the substrate's structural integrity.
- Gypsum: Added in small amounts to provide essential minerals like calcium and sulfur, which aid in mycelial growth.
2. Preparing the Substrate
Proper substrate preparation involves mixing the raw materials in the correct proportions, pasteurizing to eliminate contaminants, and achieving the desired moisture content. Here’s a step-by-step guide:
- Mixing: Combine coco coir, vermiculite, and gypsum in appropriate ratios. A common mix is 2 parts coco coir to 1 part vermiculite, with a small percentage of gypsum.
- Hydration: Add water to the dry mixture until it reaches field capacity—the point where the substrate retains moisture but does not drip excess water when squeezed.
- Pasteurization: Heat the substrate mixture to around 160-170°F (71-77°C) for one hour to kill off competing microorganisms.
- Cooling: Allow the substrate to cool completely before introducing the spawn to prevent killing the mycelium.
Environmental Factors and Maintenance
Maintaining optimal environmental conditions is essential for successful mushroom cultivation, especially when using lower spawn ratios. Key factors include:
1. Temperature Control
Most mushroom species thrive at temperatures between 68-75°F (20-24°C). Fluctuations outside this range can slow colonization or promote contamination.
2. Humidity Management
Maintaining high humidity levels (85-95%) is crucial during the colonization and fruiting stages. Proper humidity prevents the substrate from drying out and supports healthy mushroom development.
3. Cleanliness and Sterilization
Keeping the cultivation area clean reduces the risk of contamination. Use sterilized tools and maintain good hygiene practices throughout the cultivation process.
4. Airflow and Ventilation
Ensuring adequate airflow prevents the buildup of carbon dioxide, which can inhibit mushroom growth. However, excessive airflow can dry out the substrate, so balance is key.
Optimizing for Yield and Contamination Control
To maximize yield and minimize contamination risks, consider the following strategies:
1. Use High-Quality Spawn
Starting with robust, contaminant-free spawn sets a strong foundation for successful cultivation. Obtain spawn from reputable suppliers or ensure proper sterile techniques if cultivating your own.
2. Monitor Moisture Levels
Consistently check the substrate’s moisture content. Both overwatering and underwatering can adversely affect mycelial health and increase contamination risks.
3. Implement a Casing Layer
Adding a thin casing layer on top of the substrate can help maintain moisture levels and create favorable conditions for mushroom pinning.
4. Regular Inspection
Frequently inspect your cultivation setup for signs of contamination or other issues. Early detection allows for timely intervention to prevent widespread problems.
Practical Steps for Shoebox Tek Mushroom Culture
Follow these practical steps to establish a successful shoebox tek mushroom culture:
1. Preparation
- Gather materials: shoebox, substrate components (coco coir, vermiculite, gypsum), spawn, sterilization equipment.
- Mix and pasteurize the substrate as outlined previously.
2. Inoculation
- Once the substrate has cooled, evenly distribute the spawn across the substrate surface.
- Mix the spawn thoroughly with the substrate to ensure uniform colonization.
3. Colonization
- Place the shoebox in a controlled environment with stable temperatures and high humidity.
- Allow the mycelium to colonize the substrate completely, monitoring for signs of healthy growth.
4. Fruiting
- Once colonization is complete, initiate the fruiting phase by adjusting environmental conditions to promote mushroom development (e.g., increasing light exposure).
- Maintain optimal humidity and airflow to support healthy fruiting bodies.
5. Harvesting
-
Harvest mushrooms at peak maturity to ensure the best quality and potency.
-
After harvesting, consider initiating a second flush by rehydrating the substrate.
Conclusion
Determining the ideal spawn-to-substrate ratio is a critical component of successful shoebox tek mushroom cultivation. Ratios ranging from 1:1 to 1:3 offer a balanced approach, facilitating efficient colonization while minimizing contamination risks. By carefully selecting and preparing your substrate, maintaining optimal environmental conditions, and adhering to best cultivation practices, you can achieve high yields and robust mushroom growth. Whether you are a novice or an experienced cultivator, adjusting the spawn ratio to suit your specific needs and resources will enhance the overall success of your mushroom cultivation endeavors.
References
Last updated January 17, 2025