
Optimizing Your Lenovo P15 Gen 1 for Running Ubuntu via VirtualBox
A Comprehensive Step-by-Step Guide to Enhance Performance and Stability
Key Takeaways
- Host System Optimization: Proper BIOS configuration, driver updates, and resource allocation are crucial for virtualization efficiency.
- VirtualBox Configuration: Setting up VirtualBox with optimal settings ensures seamless Ubuntu installation and operation.
- Ubuntu VM Enhancement: Post-installation tweaks and service optimizations significantly improve the performance of the virtualized environment.
1. Preparing the Lenovo P15 Gen 1 Host Machine
1.1. Update the BIOS
Ensuring your BIOS is up-to-date guarantees compatibility with virtualization technologies and enhances system stability.
- Restart your Lenovo P15 Gen 1 and press F1 during boot to enter the BIOS setup.
- Navigate to Security > Virtualization Technology.
- Enable Intel VT-x and Intel VT-d if available.
- Save the changes and exit the BIOS.
Troubleshooting:
- If you cannot access the BIOS, ensure you press F1 immediately after powering on.
- Visit Lenovo’s official support site to download and install the latest BIOS updates if virtualization options are missing.
1.2. Update the Host Operating System
Keeping your host OS current ensures optimal performance and security, which are vital for running virtual machines effectively.
- Open Settings > Update & Security > Windows Update.
- Click on Check for updates and install all available updates.
Troubleshooting:
- If updates fail, restart your laptop and attempt the update process again.
- Use the Windows Update Troubleshooter for persistent issues.
1.3. Configure Power Settings
Optimizing power settings ensures that your laptop performs at its best during virtualization tasks.
- Open Lenovo Vantage and set the performance mode to "Best Performance".
- Connect your laptop to the AC adapter and set the battery mode to maximum performance.
- In Windows power settings, select the "High Performance" power plan.
Troubleshooting:
- If performance issues persist, verify that all power settings are correctly applied and that no power-saving modes are enabled.
1.4. Update System Drivers
Up-to-date drivers, especially for the GPU and chipset, are essential for hardware acceleration and overall system performance.
- Visit Lenovo's official support page: Lenovo Support.
- Download and install the latest BIOS updates and other critical drivers, focusing on GPU drivers (Intel/NVIDIA).
Troubleshooting:
- If a driver fails to install, ensure you have administrative privileges and disable any conflicting software temporarily.
1.5. Free Up System Resources
Allocating sufficient resources to VirtualBox without overburdening the host system ensures smooth virtualization.
- Open Task Manager and close unnecessary applications and background processes.
- Ensure at least 16GB of RAM is installed, allocating no more than 50% to the virtual machine.
- Maintain at least 50GB of free disk space on your SSD to accommodate the virtual machine and its operations.
Troubleshooting:
- If disk space is insufficient, delete unnecessary files or move them to external storage solutions.
- Use disk cleanup utilities to remove temporary files and free up additional space.
2. Installing and Configuring VirtualBox
2.1. Download and Install VirtualBox
VirtualBox is the virtualization software that allows you to run Ubuntu on your Lenovo P15.
- Visit the official VirtualBox website: VirtualBox.
- Download the latest version compatible with your host OS.
- Run the installer and follow the on-screen instructions, accepting default settings.
Troubleshooting:
- If the installation fails, ensure you are running the installer with administrative privileges.
- Temporarily disable antivirus software that may interfere with the installation process.
2.2. Install VirtualBox Extension Pack
The Extension Pack adds essential features such as USB 3.0 support, which enhances the functionality of your virtual machine.
- Download the Extension Pack from the same VirtualBox downloads page.
- Open VirtualBox, navigate to File > Preferences > Extensions.
- Click the Add button and select the downloaded Extension Pack file to install it.
Troubleshooting:
- Ensure the Extension Pack version matches your installed VirtualBox version to avoid compatibility issues.
2.3. Configure VirtualBox Host Settings
Optimizing VirtualBox settings ensures that both the host and virtual machines run efficiently.
- Open VirtualBox and go to File > Preferences.
- Under System, ensure that the Host I/O Cache is enabled for better disk performance.
- Configure network settings based on your requirements, opting for Bridged Networking for better local network performance if needed.
Troubleshooting:
- If network issues arise, verify that your host's network drivers are up-to-date and that VirtualBox has the necessary permissions.
3. Setting Up the Ubuntu Virtual Machine
3.1. Download the Ubuntu ISO
You need the Ubuntu installation file to create a new virtual machine.
- Visit the official Ubuntu website: Ubuntu Download.
- Download the latest LTS (Long-Term Support) version of Ubuntu.
- Save the ISO file to a known location on your host machine.
Troubleshooting:
- Verify the integrity of the downloaded ISO by checking its hash against the provided values on the Ubuntu website to ensure it is not corrupted.
3.2. Create a New Virtual Machine
Setting up a new VM with appropriate resources is crucial for optimal performance.
- Open VirtualBox and click on the New button.
- Enter a name for your VM (e.g., "Ubuntu VM"), set the Type to Linux, and the Version to Ubuntu (64-bit).
- Allocate at least 4GB of RAM to the VM, ensuring not to exceed 50% of your total system RAM.
- Create a virtual hard disk: choose VDI (VirtualBox Disk Image), set it to Fixed Size for better performance, and allocate at least 20GB of storage.
Troubleshooting:
- If the VM fails to start, ensure that virtualization is enabled in the BIOS and that sufficient resources are allocated.
- Adjust RAM or disk space allocations as necessary based on performance observations.
3.3. Configure VM Settings for Optimal Performance
Fine-tuning VM settings ensures that Ubuntu runs smoothly within VirtualBox.
- Select your newly created VM and click on Settings.
- Under System > Processor:
- Allocate 2-4 CPU cores, depending on your host's CPU capabilities.
- Enable PAE/NX and Enable Nested VT-x/AMD-V.
- Under Display > Graphics:
- Set Video Memory to 128MB (the maximum allowed).
- Enable 3D Acceleration to enhance graphics performance.
- Under Storage:
- Click on the Empty optical drive, then click the CD icon to choose a virtual optical disk file.
- Select the downloaded Ubuntu ISO file to mount it as the installation media.
Troubleshooting:
- If Ubuntu experiences graphics issues, ensure that the latest GPU drivers are installed on the host machine.
- Adjust CPU and RAM allocations based on the performance needs of your Ubuntu instance.
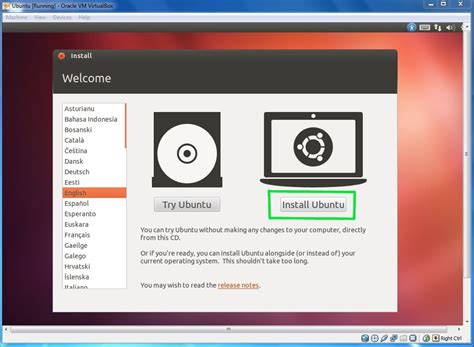
3.4. Install Ubuntu on the Virtual Machine
Follow the installation prompts to set up Ubuntu within VirtualBox.
- Start the VM by clicking the Start button.
- In the Ubuntu installer, select Install Ubuntu.
- Choose Minimal Installation to install only essential applications.
- Select "Erase disk and install Ubuntu" (this applies only to the virtual disk).
- Complete the installation and restart the VM when prompted.
Troubleshooting:
- If the installation process freezes, verify the integrity of the Ubuntu ISO file and ensure that the VM has sufficient allocated resources.
3.5. Install VirtualBox Guest Additions
Guest Additions enhance the performance and usability of the VM by enabling features like shared folders and clipboard synchronization.
- Once Ubuntu is installed and running, navigate to Devices > Insert Guest Additions CD Image in the VirtualBox menu.
- Open a terminal in Ubuntu and execute the following commands:
- After the VM restarts, Guest Additions should be active, allowing for better integration between the host and the VM.
sudo apt update
sudo apt install build-essential dkms linux-headers-$(uname -r)
sudo mount /dev/cdrom /mnt
sudo /mnt/VBoxLinuxAdditions.run
sudo reboot
Troubleshooting:
- If Guest Additions fail to install, ensure that all dependencies are met by verifying that kernel headers and build-essential packages are installed.
- Check the terminal output for specific error messages and address them accordingly.
3.6. Configure Shared Folders and Clipboard
Enabling shared folders and clipboard allows for seamless file transfers and copy-paste functionality between the host and the VM.
- In VirtualBox, go to Settings > Shared Folders for your VM.
- Click the Add button and select the folder you wish to share.
- Enable Auto-mount and Make Permanent to ensure the shared folder is available upon every VM start.
- To enable bidirectional clipboard, navigate to Settings > General > Advanced and set Shared Clipboard and Drag and Drop to Bidirectional.
Troubleshooting:
- If shared folders are not visible, ensure that Guest Additions are correctly installed and that the shared folder permissions are properly set in Ubuntu.
4. Optimizing the Ubuntu Virtual Machine
4.1. Allocate Swap Space
Allocating swap space ensures that your VM can handle memory-intensive tasks without performance degradation.
- Open a terminal in Ubuntu and execute the following commands:
sudo fallocate -l 2G /swapfile
sudo chmod 600 /swapfile
sudo mkswap /swapfile
sudo swapon /swapfile
echo '/swapfile none swap sw 0 0' | sudo tee -a /etc/fstab
Troubleshooting:
- If swap allocation fails, ensure that there is enough free disk space and that the VM has sufficient permissions.
4.2. Disable Unnecessary Services
Disabling services that are not required enhances the VM’s performance by freeing up system resources.
- Open a terminal and run the following commands:
- Reboot the VM to apply the changes:
sudo systemctl disable bluetooth
sudo systemctl disable cups
sudo systemctl disable ModemManager
sudo reboot
Troubleshooting:
- If disabling a service affects system functionality, re-enable it by replacing disable with enable in the commands above.
4.3. Install a Lightweight Desktop Environment (Optional)
If you experience sluggish performance, installing a lightweight desktop environment like Xfce can enhance responsiveness.
- Open a terminal and execute:
- During installation, select Xfce as the default display manager when prompted.
- Reboot the VM:
sudo apt update
sudo apt install xubuntu-desktop
sudo reboot
Troubleshooting:
- If the display manager fails to switch, reconfigure it using:
sudo dpkg-reconfigure lightdm
4.4. Install System Monitoring Tools
Monitoring tools like htop and iotop help you keep track of system resource usage and identify potential bottlenecks.
- Open a terminal and run:
- Launch these tools by typing htop or iotop in the terminal.
sudo apt install htop iotop
Troubleshooting:
- If these tools do not display properly, ensure that your VM has sufficient CPU and memory allocations.
4.5. Enable Zswap
Zswap compresses swap pages before they are written to disk, improving performance.
- Open a terminal and edit the GRUB configuration:
- Add zswap.enabled=1 to the GRUB_CMDLINE_LINUX_DEFAULT line. It should look like:
- Update GRUB and reboot:
sudo nano /etc/default/grub
GRUB_CMDLINE_LINUX_DEFAULT="quiet splash zswap.enabled=1"
sudo update-grub
sudo reboot
Troubleshooting:
- If the system fails to boot, revert the changes by removing zswap.enabled=1 from the GRUB configuration.
5. Final Checks and Maintenance
5.1. Test the Setup
Ensure that all configurations work as expected to validate the optimization process.
- Test USB device recognition by connecting a USB device to the host and verifying its accessibility in Ubuntu.
- Access shared folders to confirm proper mount and permissions.
- Perform typical tasks within Ubuntu to assess performance and responsiveness.
Troubleshooting:
- If USB devices are not recognized, verify that the Extension Pack is installed and that USB settings are correctly configured in VirtualBox.
- If shared folders are inaccessible, check the permissions and ensure that the Guest Additions are properly installed.
5.2. Perform Regular Updates
Keeping both the host system and the Ubuntu VM updated is essential for security and performance enhancements.
- On the host machine, regularly check for and install Windows updates.
- Within the Ubuntu VM, open a terminal and run:
sudo apt update
sudo apt upgrade -y
Troubleshooting:
- If updates fail in Ubuntu, ensure a stable internet connection and verify the repository sources in /etc/apt/sources.list.
5.3. Backup Your Virtual Machine
Regular backups safeguard your virtual environment against data loss and system failures.
- In VirtualBox, navigate to File > Export Appliance.
- Select your Ubuntu VM and follow the prompts to save the exported appliance file.
- Store the backup on an external drive or cloud storage for redundancy.
Troubleshooting:
- If the export process fails, ensure that the VM is powered off and that sufficient disk space is available on the backup destination.
5.4. Monitor System Performance
Regular monitoring helps identify and address performance issues proactively.
- Use htop and iotop within Ubuntu to monitor CPU and I/O usage.
- On the host machine, utilize Task Manager to oversee resource allocation and identify bottlenecks.
Troubleshooting:
- If you notice high resource usage, consider reallocating CPU cores or increasing RAM for the VM. Additionally, close unnecessary applications on the host to free up resources.
6. Additional Optimization Tips
6.1. Optimize Storage Performance
Enhancing storage performance ensures faster read/write operations within the VM.
- Ensure that the VM is stored on an SSD for quicker access times.
- Enable TRIM support in Ubuntu by running:
- Consider using a fixed-size virtual disk instead of dynamically allocated for better performance.
sudo systemctl enable fstrim.timer
Troubleshooting:
- If the VM disk appears slow, verify that the SSD is functioning correctly and that no other processes are heavily utilizing disk I/O.
6.2. Enhance Network Performance
Optimizing network settings can improve the efficiency of network-dependent applications within the VM.
- In VirtualBox, set the network adapter to Bridged Adapter for better network performance and visibility.
- Within Ubuntu, ensure that network drivers are properly installed and updated.
Troubleshooting:
-
If network connectivity is unstable, revert to NAT settings or troubleshoot the host’s network configuration.
6.3. Utilize Snapshots for Stability
Snapshots allow you to save the current state of your VM, enabling easy recovery in case of issues.
- Before making significant changes to the VM, click on Snapshots and then Take Snapshot.
- Provide a descriptive name and description for future reference.
- To revert, select the desired snapshot and click Restore.
Troubleshooting:
- If restoring a snapshot fails, ensure that the VM is powered off and that the snapshot files are intact.
Conclusion
By meticulously following the steps outlined in this guide, you can optimize your Lenovo P15 Gen 1 to run a local instance of Ubuntu via VirtualBox efficiently. Proper configuration of both the host machine and the virtualized environment ensures a seamless and high-performance experience. Regular maintenance, updates, and monitoring further sustain the stability and responsiveness of your setup.
References
- VirtualBox Official Website
- Ubuntu Official Download Page
- Lenovo Support
- Ubuntu VirtualBox Installation Guide
Last updated January 18, 2025