
Unlock Real-Time Engagement: Implementing Firebase Push Notifications in Your React.js App
A step-by-step guide to integrating Firebase Cloud Messaging for dynamic user alerts in your React projects.
Highlights
- Seamless Integration: Learn to connect Firebase Cloud Messaging (FCM) with your React application for robust push notification capabilities.
- Foreground & Background Handling: Understand how to manage notifications effectively, whether your app is active in the user's browser or running in the background via a service worker.
- User Permission & Token Management: Master the process of requesting user consent for notifications and handling unique FCM tokens for targeted messaging.
Introduction: Powering Up React with Firebase Push Notifications
Push notifications are a vital tool for enhancing user engagement by delivering timely and relevant information directly to users, even when they are not actively using your application. Firebase Cloud Messaging (FCM) provides a reliable and scalable cross-platform solution to send these notifications. When integrated into a React.js web application, FCM allows you to keep users informed about important updates, new messages, or critical events, significantly improving the user experience.
The core components involved include the Firebase project setup, your React application, a Firebase SDK, and a service worker. The service worker is a script that runs in the background, separate from your web page, and is crucial for receiving and displaying notifications when your application is not in focus or even closed. This guide will walk you through the entire process of implementing push notifications in your React app using Firebase.
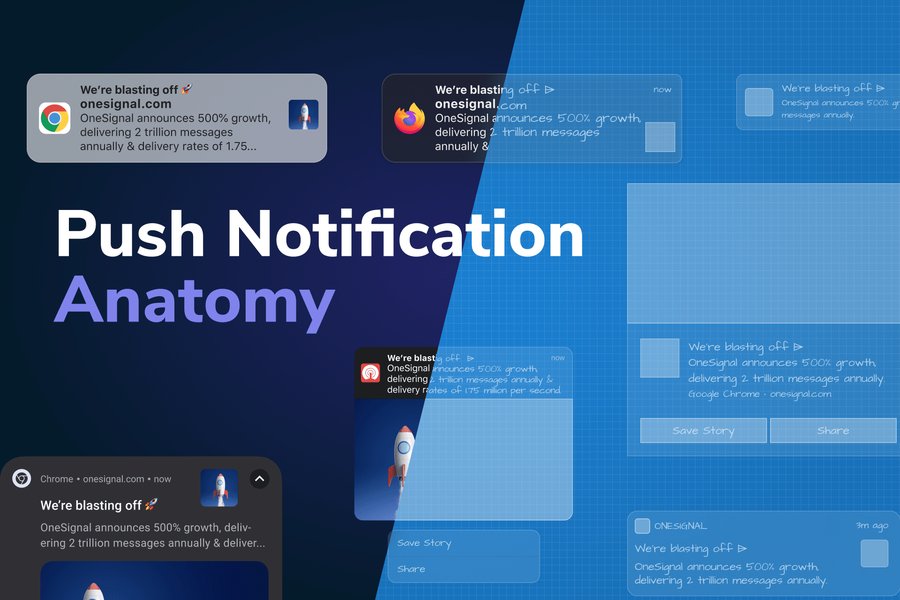
Visual anatomy of a typical web push notification, showcasing title, body, icon, and action buttons.
Step-by-Step Implementation Guide
Follow these steps to integrate Firebase push notifications into your React.js application.
Step 1: Setting Up Your Firebase Project
Before writing any code, you need a Firebase project configured for web push notifications.
Create a Firebase Project
- Navigate to the Firebase Console.
- Click on "Create a project" (or "Add project") and follow the on-screen instructions. Give your project a name and configure other settings as prompted.
Add a Web App to Your Project
- Once your project is ready, go to the Project Overview page.
- Click the web icon (
</>) to add a web app to your project. - Register your app by providing a nickname. Firebase Hosting setup is optional at this stage.
- After registering, Firebase will provide you with a configuration object (
firebaseConfig). Copy this object; you'll need it to initialize Firebase in your React app.
Firebase console: Adding a web app and obtaining the configuration object.
Generate VAPID Key (Web Push Certificate)
- In the Firebase Console, go to your Project Settings (click the gear icon next to Project Overview).
- Navigate to the "Cloud Messaging" tab.
- Scroll down to the "Web configuration" section and find "Web Push certificates".
- Click "Generate key pair". Firebase will generate a public VAPID (Voluntary Application Server Identification) key. Copy this key; it's required to authorize send requests to web push services and will be used in your client-side code.
Step 2: Integrating Firebase into Your React App
Install Firebase SDK
In your React project directory, install the Firebase SDK using npm or yarn:
npm install firebaseOr, if you use yarn:
yarn add firebaseInitialize Firebase in Your React App
Create a new file in your `src` directory, for example, `firebase.js` or `firebaseInit.js`. This file will hold your Firebase configuration and initialize the Firebase app and messaging service.
// src/firebaseInit.js
import { initializeApp } from "firebase/app";
import { getMessaging, getToken, onMessage } from "firebase/messaging";

// Replace with your actual Firebase project configuration
const firebaseConfig = {
  apiKey: "YOUR_API_KEY",
  authDomain: "YOUR_AUTH_DOMAIN",
  projectId: "YOUR_PROJECT_ID",
  storageBucket: "YOUR_STORAGE_BUCKET",
  messagingSenderId: "YOUR_MESSAGING_SENDER_ID",
  appId: "YOUR_APP_ID"
  // measurementId: "YOUR_MEASUREMENT_ID" // Optional, if you use Analytics
};

// Initialize Firebase
const app = initializeApp(firebaseConfig);
const messaging = getMessaging(app);

// Function to request permission and get token
export const requestForToken = async (vapidKey) => {
  try {
    const currentToken = await getToken(messaging, { vapidKey: vapidKey });
    if (currentToken) {
      console.log("FCM Token:", currentToken);
      // TODO: Send this token to your server to store it and send notifications later
      return currentToken;
    } else {
      console.log("No registration token available. Request permission to generate one.");
      return null;
    }
  } catch (error) {
    console.error("An error occurred while retrieving token: ", error);
    return null;
  }
};

export { messaging, onMessage };
Remember to replace the placeholder values in `firebaseConfig` with your actual project credentials from the Firebase console. Also, replace `"YOUR_PUBLIC_VAPID_KEY_FROM_FIREBASE_CONSOLE"` later in your component code with the VAPID key you generated.
Step 3: Creating and Registering the Service Worker
A service worker is essential for handling push notifications when your app is in the background or closed.
Create the Service Worker File
In your `public` directory (ensure it's at the root of your `public` folder so it's served from `/firebase-messaging-sw.js`), create a file named `firebase-messaging-sw.js`. Add the following code:
// public/firebase-messaging-sw.js

// Scripts for Firebase products - Ensure versions are compatible.
// Using compat versions for service worker as they are often easier to set up in this context.
importScripts('https://www.gstatic.com/firebasejs/10.12.4/firebase-app-compat.js');
importScripts('https://www.gstatic.com/firebasejs/10.12.4/firebase-messaging-compat.js');

// Initialize the Firebase app in the service worker
// by passing in the messagingSenderId.
// Replace with your actual Firebase project configuration
const firebaseConfig = {
  apiKey: "YOUR_API_KEY",
  authDomain: "YOUR_AUTH_DOMAIN",
  projectId: "YOUR_PROJECT_ID",
  storageBucket: "YOUR_STORAGE_BUCKET",
  messagingSenderId: "YOUR_MESSAGING_SENDER_ID",
  appId: "YOUR_APP_ID"
  // measurementId: "YOUR_MEASUREMENT_ID" // Optional
};

firebase.initializeApp(firebaseConfig);

// Retrieve an instance of Firebase Messaging so that it can handle background messages.
const messaging = firebase.messaging();

messaging.onBackgroundMessage(function(payload) {
  console.log('[firebase-messaging-sw.js] Received background message ', payload);

  // Customize notification here
  const notificationTitle = payload.notification.title;
  const notificationOptions = {
    body: payload.notification.body,
    icon: payload.notification.icon || '/logo192.png' // Default icon if not provided in payload
  };

  // The ServiceWorkerGlobalScope.registration property returns a reference
  // to the ServiceWorkerRegistration object, which is used to display the notification.
  return self.registration.showNotification(notificationTitle, notificationOptions);
});
Important: Replace the `firebaseConfig` in `firebase-messaging-sw.js` with your project's configuration, same as in `firebaseInit.js`. Ensure the path to your default icon (e.g., `/logo192.png`) is correct.
Register the Service Worker
While modern browsers often automatically register `firebase-messaging-sw.js` if it's correctly named and placed, explicit registration can be done in your main application file (e.g., `index.js` or `App.js`) to ensure it's set up. However, Firebase's `getToken` method typically handles the registration if the file is present at the root.
If you need explicit registration (usually not required for FCM if file is correctly placed):
// Example: In your src/index.js or App.js
if ('serviceWorker' in navigator) {
  window.addEventListener('load', function() {
    navigator.serviceWorker.register('/firebase-messaging-sw.js').then(function(registration) {
      console.log('Service Worker registered with scope: ', registration.scope);
    }).catch(function(err) {
      console.log('Service Worker registration failed: ', err);
    });
  });
}
Step 4: Requesting User Permission and Retrieving FCM Token
You need to ask the user for permission to send notifications and then retrieve an FCM token for their device.
// Example: In a React component (e.g., src/components/NotificationButton.js)
import React, { useEffect, useState } from 'react';
import { requestForToken, onMessage, messaging } from '../firebaseInit'; // Adjust path as needed

const NotificationHandler = () => {
  const [notification, setNotification] = useState({ title: '', body: '' });
  const [token, setToken] = useState(null);
  const [permissionStatus, setPermissionStatus] = useState(Notification.permission);

  // Replace with your VAPID key from Firebase Console > Project Settings > Cloud Messaging > Web Push certificates
  const VAPID_KEY = "YOUR_PUBLIC_VAPID_KEY_FROM_FIREBASE_CONSOLE";

  useEffect(() => {
    const setupNotifications = async () => {
      if (Notification.permission === 'granted') {
        console.log('Notification permission already granted.');
        const fcmToken = await requestForToken(VAPID_KEY);
        setToken(fcmToken);
      } else if (Notification.permission === 'default') {
        console.log('Requesting notification permission...');
        // No direct request here; usually triggered by user action (e.g., button click)
      } else {
        console.log('Notification permission denied.');
      }
      setPermissionStatus(Notification.permission);
    };

    setupNotifications();

    // Listener for foreground messages
    if (messaging) {
      const unsubscribe = onMessage(messaging, (payload) => {
        console.log('Foreground message received: ', payload);
        setNotification({
          title: payload.notification.title,
          body: payload.notification.body,
        });
        // Displaying an alert for foreground messages.
        // For a better UX, consider using an in-app notification component (e.g., a toast).
        alert(`New Message: ${payload.notification.title}\n${payload.notification.body}`);
      });
      return () => unsubscribe(); // Cleanup listener on component unmount
    }
  }, [VAPID_KEY]); // messaging can be added if it's from props/context and can change

  const handleRequestPermission = async () => {
    if (Notification.permission === 'default') {
      const permission = await Notification.requestPermission();
      setPermissionStatus(permission);
      if (permission === 'granted') {
        console.log('Notification permission granted after request.');
        const fcmToken = await requestForToken(VAPID_KEY);
        setToken(fcmToken);
      } else {
        console.log('User denied notification permission.');
      }
    } else if (Notification.permission === 'granted' && !token) {
        // If permission is granted but token is not yet fetched
        const fcmToken = await requestForToken(VAPID_KEY);
        setToken(fcmToken);
    }
  };

  return (
    <div>
      <h4>Push Notification Setup</h4>
      <p>Current Permission: <b>{permissionStatus}</b></p>
      {permissionStatus === 'default' && (
        <button onClick={handleRequestPermission}>Enable Notifications</button>
      )}
      {token && <p>FCM Token: <i>{token.substring(0,30)}...</i></p>}
      {notification.title && (
        <div style={{ marginTop: '20px', border: '1px solid #ccc', padding: '10px' }}>
          <h5>Last Foreground Notification Received:</h5>
          <p><b>Title:</b> {notification.title}</p>
          <p><b>Body:</b> {notification.body}</p>
        </div>
      )}
    </div>
  );
};

export default NotificationHandler;
Crucial: Replace `YOUR_PUBLIC_VAPID_KEY_FROM_FIREBASE_CONSOLE` with your actual public VAPID key. The FCM token obtained should be sent to your backend server and stored securely, associated with the user, so you can send targeted notifications later.
Step 5: Handling Incoming Notifications
Foreground Messages
When your app is in the foreground (i.e., the user is actively viewing the tab), incoming messages are handled by the `onMessage` callback in your React component (as shown in `NotificationHandler.js` above). You can then decide how to display this notification to the user, perhaps using a custom in-app alert or toast, rather than a system notification which can be intrusive when the app is active.
Background Messages
When your app is in the background or closed, the `onBackgroundMessage` handler in your `public/firebase-messaging-sw.js` service worker file takes over. This script will display a system notification using `self.registration.showNotification()`.
Step 6: Sending Notifications (Overview)
Notifications can be sent in a few ways:
- Firebase Console: For testing or simple broadcast messages, you can use the Cloud Messaging composer in the Firebase console.
- Backend Server with Firebase Admin SDK: For programmatic sending, such as targeted user notifications or event-triggered alerts, you'll set up a backend server (e.g., Node.js, Python, Java) using the Firebase Admin SDK. Your server will use the stored FCM tokens to send messages to specific devices or topics.
Key Implementation Factors
This radar chart visualizes key aspects and their perceived complexity or importance when implementing Firebase Push Notifications in a React application. Scores are on a scale of 1 to 10 (higher is better or more significant).
The chart highlights that while Firebase setup and background reliability are strong points, areas like token security management and ensuring a good user experience for permissions require careful attention.
Visualizing the Notification Flow
The mindmap below illustrates the interconnected components and processes involved in setting up and using Firebase push notifications within a React application.
This mindmap provides a high-level overview, from initial setup in the Firebase console to how messages are handled and sent, emphasizing the roles of the React app, the service worker, and your backend.
Essential Configuration Summary
This table summarizes the key files and configuration items involved in setting up Firebase push notifications for your React application.
| Item / File | Location / Type | Purpose | Key Details / Configuration |
|---|---|---|---|
| Firebase Project | Firebase Console | Central hub for backend services, including FCM. | Provides API keys, Project ID, Messaging Sender ID. |
| Web App Registration | Firebase Console | Links your web application to the Firebase project. | Generates the firebaseConfig object. |
| VAPID Key Pair | Firebase Console (Cloud Messaging settings) | Authenticates your application server to web push services. | Public key is used in client-side getToken call. |
firebaseInit.js (or similar) |
src/ directory in your React app |
Initializes Firebase and Firebase Messaging in your main application. | Contains firebaseConfig; exports messaging, requestForToken, onMessage. |
firebase-messaging-sw.js |
public/ directory (root level) |
Service worker script that handles push notifications when the app is in the background or closed. | Must initialize Firebase (usually with compat libraries); implements onBackgroundMessage to show notifications. |
React Component (e.g., NotificationHandler.js) |
src/components/ or similar |
Requests notification permission from the user and handles foreground messages. | Calls Notification.requestPermission(), requestForToken(), and sets up onMessage listener. |
Firebase SDK (firebase package) |
Installed via npm/yarn (in node_modules/) |
JavaScript library providing Firebase functionalities. | Use modular imports (e.g., import { getMessaging } from "firebase/messaging";). |
Video Tutorial: Visualizing the Implementation
For a visual walkthrough, the following video demonstrates how to implement push notifications in a React application using Firebase. It covers many of the steps discussed, providing a practical demonstration of the setup process.
This video, "How to Implement Push Notifications in React Using Firebase", offers insights into creating the Firebase project, setting up the React application, and handling notifications. Watching such tutorials can complement this written guide by showing the process in action.
Key Considerations and Best Practices
- HTTPS Required: Service workers, and therefore FCM for web, require your application to be served over HTTPS. During development, `localhost` is typically an exception.
- User Consent: Always request permission at an appropriate time in the user journey, explaining the value of notifications. Don't ask immediately on page load.
- Token Management: FCM tokens can change or expire. Implement logic on your server to handle updated tokens and remove stale ones. Store tokens securely.
- Testing: Thoroughly test notifications on different browsers and devices, and in various app states (foreground, background, closed). Use the Firebase Console to send test messages.
- Payload Size: Notification payloads have size limits. Keep them concise and focused.
- Error Handling: Implement robust error handling for permission denials, token retrieval failures, and message delivery issues.
- Customization: Customize notification appearance (icon, title, body) and behavior (actions, sounds) for a better user experience, where supported.
Frequently Asked Questions (FAQ)
What is a VAPID key and why is it crucial for web push notifications?
VAPID (Voluntary Application Server Identification) keys are a security measure for web push notifications. They consist of a public and a private key pair. The public VAPID key is used in your client-side JavaScript to subscribe a user to push notifications. This key is sent to the push service (like FCM) to identify your application server. The corresponding private key is kept secret on your application server and is used to sign requests when sending push messages. This ensures that only your authorized server can send messages to your users, preventing other applications from sending notifications to your subscribers.
Why must my web application be served over HTTPS to use Firebase Cloud Messaging?
Firebase Cloud Messaging for web relies on Service Workers to receive and display push notifications, especially when the app is in the background or closed. Service Workers are powerful scripts that can intercept network requests and manage background tasks. Due to their capabilities, browsers require them to be registered and run only on pages served over HTTPS to ensure security and prevent man-in-the-middle attacks. This secure context requirement protects user data and ensures that the service worker script hasn't been tampered with. `localhost` is an exception during development.
How can I test if my push notifications are set up correctly?
You can test your push notification setup in several ways:
- Using the Firebase Console: After obtaining an FCM token from your client app (log it to the console), you can go to the Firebase Console > Cloud Messaging > Compose notification. Select "Send test message," enter the FCM token, and send.
- Browser Developer Tools: Check the console for successful Firebase initialization, token retrieval, and any errors. For service workers, Chrome DevTools (Application > Service Workers) allows you to inspect, debug, and even simulate push events.
- Logging: Add `console.log` statements in your `firebaseInit.js` (for token retrieval and foreground messages) and `firebase-messaging-sw.js` (for background messages) to trace the flow.
- Testing Different States: Test with your app in the foreground, background (another tab active or browser minimized), and closed to ensure notifications are handled correctly in all scenarios.
What is the difference in handling notifications when my app is in the foreground versus the background?
Foreground Notifications: When your web app is currently open and active in the user's browser tab, incoming push messages are caught by the `onMessage` callback within your React application's JavaScript code (e.g., in your `NotificationHandler` component). You have full control to handle this payload data and decide how to inform the user – perhaps by updating the UI, showing an in-app banner, or playing a sound, rather than a system notification.
Background Notifications: When your app is in the background (e.g., the browser is minimized, another tab is active) or closed, push messages are received and handled by the `firebase-messaging-sw.js` service worker. The `onBackgroundMessage` handler in this file is responsible for displaying a system-level notification to the user using `self.registration.showNotification()`. This allows users to receive alerts even if they are not actively using your app.
Where and how should I securely store the FCM registration tokens?
FCM registration tokens are sensitive credentials that identify a specific app instance on a user's device. They should be stored securely on your backend server, typically in a database, associated with a user ID if your application has user accounts.
How to store them:
- When a client app obtains an FCM token, it should send this token to your server over an HTTPS connection.
- Your server then stores this token, linking it to the specific user or device.
- When you want to send a notification to that user/device, your server retrieves the token from the database and uses it with the Firebase Admin SDK to send the message.
Security considerations:
- Protect your database from unauthorized access.
- Implement mechanisms to update tokens if they change (FCM tokens can be refreshed) and remove stale/invalid tokens to avoid sending messages to inactive devices.
- Never hardcode tokens or expose your server's private VAPID key or Firebase Admin SDK credentials in client-side code.
Recommended Further Exploration
- How can I customize the appearance and actions of push notifications sent via Firebase in a React app?
- What are Firebase Cloud Messaging topics, and how can they be used for sending notifications to groups of users in a React application?
- What are some advanced strategies for managing FCM token refresh and cleanup on the backend for a React application?
- How do I set up a Node.js backend with the Firebase Admin SDK to send push notifications to my React frontend?
References
Last updated May 15, 2025