
Unlocking Clear Vision: A Deep Dive into Subjective Refraction with Trial Lenses
Discover the meticulous process optometrists use to precisely tailor eyeglasses prescriptions, blending science with patient perception.
Key Insights into Subjective Refraction
- Patient-Guided Precision: Subjective refraction is a highly personalized clinical procedure that relies on the patient's real-time feedback to fine-tune lens powers, ensuring the most comfortable and clearest possible vision.
- Systematic Refinement: The process follows a logical sequence, typically refining spherical power first, then cylinder axis, and finally cylinder power, often compensating spherical power changes during astigmatism correction to maintain optimal focus.
- Optical Harmony: By adjusting lenses, the procedure aims to align the eye's focal points precisely on the retina, correcting refractive errors such as myopia, hyperopia, and astigmatism to achieve the best-corrected visual acuity (BCVA).
Subjective refraction is a cornerstone clinical procedure employed by eye care professionals, including orthoptists, optometrists, and ophthalmologists, to ascertain the most accurate and comfortable corrective lens prescription for an individual. Unlike objective refraction methods that provide an initial estimate without patient input, subjective refraction meticulously fine-tunes this estimate by integrating the patient's direct perception of clarity and comfort. This interactive process is crucial for achieving the best-corrected visual acuity (BCVA) and is indispensable for prescribing eyeglasses or contact lenses.
Foundational Concepts and Essential Principles
To fully grasp the intricacies of subjective refraction, an understanding of several fundamental optical and ocular-physiological concepts is essential:
Understanding Refractive Errors
Common Vision Conditions
- Myopia (Nearsightedness): Light focuses in front of the retina, causing distant objects to appear blurry. Corrected with concave (minus) spherical lenses.
- Hyperopia (Farsightedness): Light focuses behind the retina, making near objects blurry. Corrected with convex (plus) spherical lenses.
- Astigmatism: Occurs when the cornea or lens has an irregular curvature, causing light to focus at multiple points or focal lines instead of a single point on the retina. This results in blurred or distorted vision at all distances. Corrected with cylindrical lenses.
Lens Types and Their Functions
Correcting Vision Imperfections
- Spherical Lenses: These lenses possess the same refractive power across all meridians and are utilized to correct myopia or hyperopia by uniformly shifting the focal point onto the retina. The goal is often to find the "maximum plus to maximum visual acuity" (MPMVA) or "least minus" power for optimal comfortable vision.
- Cylindrical Lenses: Characterized by different refractive powers in different meridians, these lenses are specifically designed to correct astigmatism. They focus light along a specific meridian without affecting the perpendicular one.
- Axis of Astigmatism: This vital parameter defines the orientation (from 0 to 180 degrees) of the cylindrical lens required to neutralize the astigmatism.
Key Optical and Physiological Terms
The Science Behind Refraction
- Jackson Cross Cylinder (JCC): A pivotal diagnostic tool in subjective refraction, the JCC consists of two cylindrical lenses of equal power but opposite signs (e.g., +0.25/-0.25 D), with their axes perpendicular to each other. It is primarily used to refine both the power and axis of the cylinder. The endpoint is achieved when the patient reports equal perceived distortion between flips.
- Circle of Least Confusion: In astigmatic eyes, light focuses as two distinct focal lines. The circle of least confusion is the point midway between these two focal lines, representing the smallest blur circle. A primary goal of astigmatism correction is to position this circle precisely on the retina.
- Visual Acuity (VA): A quantitative measure of the eye's ability to discern fine details and shapes at a specified distance, commonly assessed using a Snellen chart.
- Accommodation: The natural ability of the eye's crystalline lens to change its shape and thus its focal length to maintain clear vision of objects at varying distances. Controlling accommodation is crucial during subjective refraction to prevent over-minusing.
Equipment Essentials: Trial Lens Set and Trial Frame
The core tools for subjective refraction are the trial lens set and the trial frame.
- Trial Lens Set: A comprehensive collection of spherical, cylindrical, and sometimes prismatic lenses, available in various powers. These lenses are inserted into the trial frame.
- Trial Frame: An adjustable, spectacle-like device designed to comfortably hold multiple trial lenses in front of the patient's eyes. Modern trial frames allow for precise adjustments of pupillary distance (PD), temple length and angle, and nose bridge height, ensuring the optical centers of the lenses align accurately with the patient's pupils. The frame often accommodates three lenses in the front and one behind, allowing for quick changes.
The precise fitting of the trial frame is paramount for accurate refraction. The pupillary distance (PD) must be adjusted to match the patient's interpupillary distance, typically ranging from 48 mm to 80 mm (or 27-35 mm per side). The nose pads and temple length should be adjusted for a secure yet comfortable fit, with the front surfaces of the lenses positioned approximately 12-14 mm from the cornea to mimic actual spectacle wear and minimize vertex distance errors. Lenses must be well-centered and stable within the frame to avoid inducing unwanted prismatic effects or optical aberrations. The trial frame also facilitates 360-degree rotation of lenses for precise cylindrical axis adjustment.
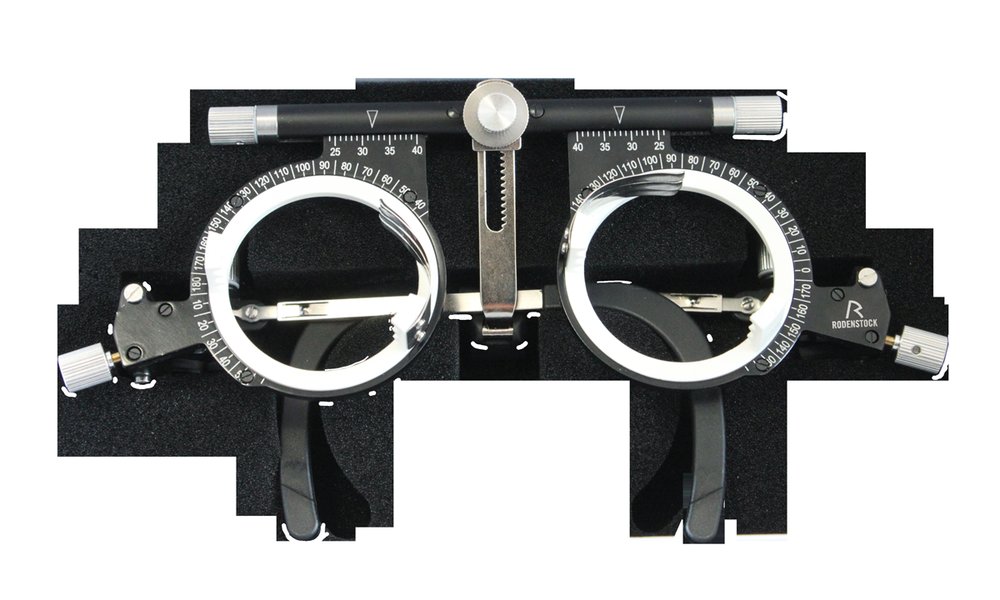
A modern trial frame designed for precise subjective refraction.
A Systematic Journey to Optimal Vision: Step-by-Step Subjective Refraction
Subjective refraction typically commences after an objective assessment, such as retinoscopy or autorefraction, which provides a preliminary estimate of the patient's refractive error. The procedure is structured around several intermediate goals, each progressively refining the prescription.
Intermediate Goals of the Process
- Establish Best Spherical Correction: Determine the spherical power that yields the clearest vision for each eye independently.
- Determine and Refine Astigmatism: Identify the presence of astigmatism and precisely determine its axis and power.
- Achieve Comfortable Binocular Balance: Ensure both eyes work together harmoniously, providing balanced and comfortable vision.
Detailed Monocular Subjective Refraction (Performed for Each Eye Separately)
I. Initial Setup and Trial Frame Adjustment
Before commencing, ensure the trial frame is selected and adjusted for maximum patient comfort and optical precision. This includes meticulous adjustment of pupillary distance (PD), temple length, temple angle, and nose rest length/angle, ensuring the trial lenses align with the patient's visual axis.
II. Determine the Best Vision Sphere (Sphere Refinement)
This phase aims to find the most plus or least minus spherical power that provides the clearest vision for each eye.
- Starting Point: Begin by inserting the spherical lens power derived from objective refraction (retinoscopy or autorefraction) into the trial frame for the eye being tested, while occluding the other eye. The patient observes a Snellen chart at a standard distance (e.g., 6 meters or 20 feet).
-
Maximum Plus to Maximum Visual Acuity (MPMVA):
- Present +0.25 D sphere lenses, asking if vision improves or blurs. Continue adding +0.25 D spheres until a slight blur or no further improvement is reported. This prevents "over-minusing."
- Then, gradually reduce the plus power (or add minus power) in -0.25 D steps until the patient achieves their best possible visual acuity (e.g., 20/20).
Logic: The objective refraction provides an efficient starting point. The MPMVA technique ensures the patient's accommodation is relaxed, providing the minimal minus power necessary for clear vision, thus preventing accommodative strain. Optically, this step positions the single focal point (for non-astigmatic eyes) or the circle of least confusion (for astigmatic eyes) directly onto the retina.
III. Determine and Refine Astigmatism (Cylinder Refinement)
This crucial phase identifies astigmatism and precisely determines its axis and power.
- Astigmatism Detection: If not clearly evident from objective refraction, tools like the Astigmatic Dial (a chart with radial lines) or a Stenopeic Slit (a narrow aperture) can be used to identify the principal meridians of astigmatism.
-
Refine the Cylinder Axis (Using Jackson Cross Cylinder - JCC):
- Insert an initial cylindrical lens (from objective refraction) into the trial frame at its estimated axis.
- Present the JCC, aligning its handle with the trial frame cylinder's axis. The patient compares two orientations: one with the JCC's axes aligned with the trial frame cylinder, and the other with the JCC flipped 90 degrees. Ask: "Which view is clearer, Option 1 or Option 2?"
- Rotate the trial frame cylinder axis towards the preferred JCC axis (e.g., if the patient prefers the view with the JCC's red dots at 90 degrees, rotate the trial frame cylinder towards 90 degrees). Make small adjustments (initially 5-10 degrees, then 2-5 degrees).
-
Refine the Cylinder Power (Using JCC):
- Once the axis is refined, re-align the JCC. Present it with its "plus" power aligned with the refined cylinder axis and its "minus" power perpendicular, and vice versa. Ask: "Which view is clearer, Option 1 (more plus cylinder) or Option 2 (more minus cylinder)?"
- Adjust cylinder power in 0.25 D steps based on patient preference.
- Crucial Spherical Compensation: For every -0.50 D change in cylinder power, compensate by adjusting the sphere power by +0.25 D to keep the circle of least confusion on the retina. For example, adding -1.00 D of cylinder requires adding +0.50 D of sphere. Conversely, reducing cylinder by -0.50 D requires subtracting +0.25 D from the sphere.
This video illustrates the Jackson Cross Cylinder technique, a core method for refining astigmatism during subjective refraction. It demonstrates how the cross-cylinder lens is used to determine both the axis and power of astigmatism by allowing the patient to compare different orientations and strengths of corrective cylinder, ultimately leading to the sharpest possible vision.
IV. Binocular Balance
After monocular refraction for both eyes, binocular balancing ensures that both eyes work together comfortably and equally, preventing eye strain.
- Balancing Procedure: Common methods include adding +0.75 D sphere to both eyes to slightly blur vision (e.g., to 20/30 or 20/40 level). Techniques like alternate occlusion (rapidly occluding each eye) or Risley prisms (on a phoropter) are used. The patient is asked if vision is clearer in one eye than the other, and sphere power is adjusted in 0.25 D steps until clarity is balanced between both eyes.
Logic: This step ensures equal accommodation and balanced vision, which is crucial for comfort and reducing eye strain in real-world viewing.
Decision-Making Logic and Search Range Refinement
The decision-making process in subjective refraction is a systematic, iterative refinement. It leverages binary choices and comparative feedback to progressively narrow down the optimal lens prescription.
- Iterative Halving: For spherical corrections, the clinician starts with an initial estimate and then presents choices in decreasing increments (e.g., from ±0.50 D to ±0.25 D). Each patient response ("clearer," "blurrier," or "no difference") eliminates a range of possibilities, effectively halving the search space until the endpoint of maximum clarity with minimal power is reached.
- Equal Interval Principle (JCC): In astigmatism correction with the JCC, the patient compares two options that represent a small shift in cylinder axis or power. The endpoint for axis is reached when the patient reports "no difference" or "equally blurry" between the two flipped positions, indicating the true axis lies precisely between the induced shifts. For power, the endpoint is when adding or subtracting more cylinder results in equally perceived blur or clarity, signaling the precise power needed.
- Converging on the Optimal Solution: This systematic elimination of suboptimal choices, guided by consistent patient feedback, ensures the procedure converges on the most precise and comfortable prescription. The process moves from gross adjustments to fine-tuning, ensuring comprehensive correction of all refractive errors.
The Optical and Ocular-Physiological Basis of Lens Power Determination
The entire subjective refraction process is fundamentally an exercise in manipulating light rays to achieve optimal focus on the retina, while also respecting the eye's natural physiological responses.
Sphere Refinement: Sculpting the Focal Point
From an optical perspective, spherical lenses adjust the vergence of light rays entering the eye. In myopia, minus (concave) lenses diverge light rays before they enter the eye, pushing the focal point backward to land precisely on the retina. In hyperopia, plus (convex) lenses converge light rays, or, more crucially, allow the eye's natural accommodative effort to relax while still achieving a sharp focus. The "maximum plus to maximum visual acuity" principle is physiologically sound; it aims to provide the least amount of minus power (for myopes) or the most plus power (for hyperopes) that allows the patient to achieve their best visual acuity. This minimizes the accommodative effort required by the ciliary muscle, preventing eye strain and discomfort. Optically, this ensures that the overall focal point or the "circle of least confusion" (in astigmatic eyes) is precisely positioned on the fovea, the central part of the retina responsible for sharp vision.
Cylinder Refinement: Merging Focal Lines
Astigmatism causes light to focus as two distinct focal lines because the eye's refractive surfaces (cornea or lens) have different curvatures in different meridians. Cylindrical lenses are designed to selectively alter the vergence in only one meridian, effectively collapsing these two focal lines into a single, sharp focal point.
- Axis Refinement: When using the JCC to refine the cylinder axis, the clinician is systematically rotating a small, induced astigmatism. The patient's perception of "clearer" or "equally blurry" guides the alignment of the corrective cylinder with the eye's principal meridians. Physiologically, the patient indicates which orientation of the corrective lens best neutralizes their eye's astigmatic error, causing the two focal lines to merge. The "equal interval" endpoint signifies that the corrective cylinder is perfectly aligned, bringing the focal lines into congruence.
- Power Refinement: Once the axis is correct, adjusting the cylinder power with the JCC alters the separation distance between the two focal lines. The patient's feedback, coupled with the critical spherical compensation, allows the clinician to finely tune the magnitude of the cylinder power. This ensures that the two focal lines effectively merge into a single, sharp focus at the precise plane of the circle of least confusion, which is maintained on the retina through continuous spherical adjustments. This coordinated adjustment ensures that as the astigmatic blur is minimized, the overall focus remains on the retina, preventing induced myopia or hyperopia.
In essence, the entire procedure is a sophisticated interplay of optical principles (light vergence, focal points, wavefront aberrations) and physiological responses (accommodation, retinal image formation, patient perception) to achieve the most accurate and comfortable visual correction possible.
Standard Test Environment Parameters
A consistent and controlled test environment is crucial for obtaining reliable subjective refraction results. Key parameters include:
| Parameter Category | Specific Parameter | Details and Rationale |
|---|---|---|
| Lighting Conditions | Room Illumination | Consistent, diffuse room lighting (e.g., 300-500 lux or 85 candelas/m²) to avoid glare and simulate natural viewing conditions. This prevents over-minusing due to pupil dilation in dim light. |
| Chart Illumination | Bright and uniform illumination of the Snellen or LogMAR chart to ensure high contrast and readability. | |
| Colorimetric Conditions | Light Temperature | Neutral white light (~5500 K color temperature) for accurate color perception. This is particularly important for tests like the duochrome test, which relies on chromatic aberration. |
| Chart Background | Typically black letters on a white background to maximize contrast. | |
| Spatial-Dimensional Parameters | Test Distance | Standard distance of 6 meters (20 feet) to simulate optical infinity, minimizing the influence of accommodation. If a shorter lane is used (e.g., 4 meters or 10 feet), a mirror system or appropriate vergence compensation is applied. |
| Chart Placement | The eye chart should be positioned at eye level to ensure comfortable viewing and avoid head tilt, which could affect axis measurements. | |
| Pupil Size | A normal, undilated pupil is preferred for subjective refraction, as pupil size impacts depth of focus and the extent of aberrations affecting vision. | |
| Minimizing Distractions | The exam room should be free from excessive noise or visual distractions that could interfere with patient concentration and feedback. |
Synthesizing Subjective Refraction Expertise
This radar chart illustrates the relative importance of different components in a successful subjective refraction, based on a comprehensive understanding of the process. Each spoke represents a critical aspect, with higher values indicating greater impact on the accuracy and patient satisfaction of the final prescription.
Potential Mistakes and How to Avoid Them
Even with a systematic approach, several common pitfalls can compromise the accuracy and effectiveness of subjective refraction. A skilled tester must be aware of these and actively seek to avoid them.
This mind map illustrates common mistakes in subjective refraction. Each node branches into more specific errors, highlighting potential issues ranging from incorrect equipment setup and technical execution flaws to communication breakdowns and environmental factors. By understanding these pitfalls, practitioners can proactively implement strategies to avoid them, thereby enhancing the accuracy and reliability of the prescribed corrective lenses.
Frequently Asked Questions (FAQ)
Conclusion
Subjective refraction, performed meticulously with a trial lens set and trial frame, stands as a testament to the blend of scientific optics and personalized patient care in ophthalmology and optometry. It is a systematic, patient-guided process that progressively refines corrective lens powers, transforming objective measurements into a subjectively optimal visual experience. By understanding the underlying optical principles, adhering to precise step-by-step procedures, and diligently avoiding common pitfalls, eye care professionals ensure that patients receive a prescription that not only maximizes visual acuity but also guarantees comfort and binocular harmony. This comprehensive approach ensures that the intricate dance between light, the eye, and human perception culminates in the clearest possible vision.
Recommended Further Exploration
- How to interpret objective refraction results for subjective start?
- Advanced techniques for refracting difficult patients.
- The role of duochrome test in finalizing sphere power.
- Understanding prescribing considerations beyond refraction.
