
Unlocking Network Management: The Essential Guide to Switch Console Access
Master the fundamental skill of connecting to network switches via console cable for configuration, troubleshooting, and management

Key Points About Console Cable Connection
- Direct Access Path: Console connections provide access to switches even when network connectivity isn't available, making them essential for initial setup and recovery situations
- Universal Skill: This is a fundamental networking skill needed for configuring virtually all enterprise-grade network switches
- Simple Equipment Requirements: You only need a console cable, terminal software, and basic knowledge of terminal settings
What You'll Need
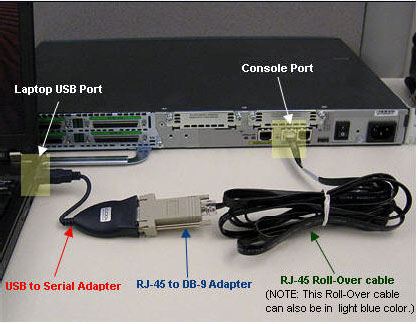
Required Equipment
Before you begin, gather these essential items:
Console Cable Types
- Traditional Console Cable: RJ45 to DB9 (Serial) connector - the most common type for older switches
- USB Console Cable: USB to RJ45 connector - for computers without serial ports
- USB-C Console Cable: USB-C to RJ45 - for newer laptops with only USB-C ports
- Mini-USB Console Cable: For switches with mini-USB console ports instead of RJ45
Software Requirements
- Terminal Emulation Software: PuTTY, SecureCRT, Tera Term, or similar
- USB-to-Serial Drivers: Required if using USB console cables
Step-by-Step Connection Process
Physical Connection
The first step is properly connecting your computer to the switch:
Locating the Console Port
- Identify the console port on your switch (typically labeled "CONSOLE" or "CON")
- Console ports are usually RJ45 (similar to Ethernet) but with a distinct color or label
- Some newer switches may have USB or mini-USB console ports instead
Cable Connection
- Connect the RJ45 end of your console cable to the switch's console port
- Connect the other end (DB9/USB) to your computer
- If using a USB-to-Serial adapter, connect this to your computer first
Terminal Software Configuration
Once physically connected, you'll need to configure your terminal software:
PuTTY Configuration (Most Common)
- Open PuTTY on your computer
- Select "Serial" as the connection type
- Identify the correct COM port:
- For Windows: Check Device Manager under "Ports (COM & LPT)"
- For Mac: Look for devices under "/dev/tty."
- For Linux: Check "/dev/ttyUSB0" or similar
- Configure serial connection parameters:
- Baud Rate: 9600 (most common) or 115200 (for newer devices)
- Data Bits: 8
- Stop Bits: 1
- Parity: None
- Flow Control: None
- Click "Open" to start the session
| Parameter | Typical Setting | Alternative Settings | Notes |
|---|---|---|---|
| Baud Rate | 9600 | 115200, 57600, 38400 | Check device documentation for specific requirements |
| Data Bits | 8 | 7 (rarely used) | Almost always set to 8 |
| Stop Bits | 1 | 2 (rarely used) | Almost always set to 1 |
| Parity | None | Even, Odd (rarely used) | Almost always set to None |
| Flow Control | None | Hardware, Software (rarely used) | Almost always set to None |
Accessing the Switch CLI
After establishing the connection:
Initial Access
- Press Enter to initialize the connection
- You should see a command prompt or login screen
- If the screen appears blank, try pressing Enter again
Authentication
- Enter username and password if prompted
- Default credentials vary by manufacturer (often admin/admin, cisco/cisco, or no password)
- Check your device documentation for default credentials
- Once logged in, you'll have access to the Command Line Interface (CLI)
Common Console Connection Comparison
Troubleshooting Common Issues
Connection Problems
If you can't establish a connection to your switch, try these troubleshooting steps:
No Output in Terminal
- Verify physical connections are secure
- Confirm you're using the correct COM port
- Try different baud rate settings (9600, 115200)
- Check if USB-to-Serial drivers are properly installed
- Try a different console cable
Garbled Text Output
- Incorrect baud rate is the most common cause
- Verify all serial parameters match device requirements
- Try connecting with different terminal software
Device-Specific Considerations
Different Manufacturer Settings
While most settings are standardized, some manufacturers use different defaults:
- Cisco: Usually 9600 baud for switches, 115200 for newer devices
- HP/Aruba: Typically 9600 baud
- Juniper: Often 9600 baud
- Dell: Usually 115200 baud for newer models
Frequently Asked Questions
Why do I need a console cable when I can SSH to the switch?
My laptop doesn't have a serial port. How can I connect to the switch?
What's the difference between a console port and a management port?
I've connected everything but see garbled text. What's wrong?
References
- Access the CLI via PuTTY using a Console Connection on 300 Series Switches - Cisco
- How to connect Switch with console port - Cisco Learning Network
- How to Connect a Router/Switch Through the Console Port - Router Switch Blog
- How to connect and access a router or a switch using console connection - OmniSecu
-
Connecting the console cable - HPE Networking
- How to Configure Cisco Switches: A Step-by-step Guide - NetAdmin Tools
Recommended Searches
Last updated April 3, 2025
Ask Ithy AI
Download Article
Delete Article