
Building a Secure TypeScript Express REST API with Firebase JWT Authentication
Integrating Firebase Authentication for Robust API Security
Creating a robust and secure REST API is paramount for modern web applications. When building with TypeScript and Express.js, incorporating a reliable authentication mechanism is a critical step. Firebase Authentication offers a powerful and flexible solution, and utilizing Firebase JSON Web Tokens (JWTs) provides a secure way to authenticate requests to your backend.
This guide will walk you through the process of setting up a TypeScript Express REST API and securing it using Firebase JWTs. We will cover the essential steps from project setup to implementing middleware for token verification, ensuring that only authenticated users can access protected endpoints.
Key Highlights of Firebase JWT Authentication in Express/TypeScript
- Seamless Integration: Firebase Authentication integrates smoothly with Node.js and Express.js, allowing you to leverage its authentication features within your TypeScript API.
- Token-Based Security: Utilizing JWTs provides a stateless and secure method for verifying the identity of clients making requests to your API.
- Customizable Authentication Flow: Firebase allows for creating custom tokens and claims, offering flexibility in defining user roles and permissions for granular access control.
Setting Up Your TypeScript Express Project
Before we dive into implementing authentication, we need to set up a basic TypeScript and Express.js project. This involves initializing a Node.js project, installing the necessary dependencies, and configuring TypeScript.
Project Initialization and Dependencies
First, create a new directory for your project and initialize a Node.js project:
mkdir firebase-express-auth-api
cd firebase-express-auth-api
npm init -y
Next, install Express, TypeScript, and the necessary type definitions:
npm install express typescript @types/express @types/node
We will also need the Firebase Admin SDK to verify the JWTs on the server-side:
npm install firebase-admin
TypeScript Configuration
Initialize your TypeScript configuration file:
npx tsc --init
In your tsconfig.json file, you might want to adjust some settings, such as the outDir for compiled JavaScript files and the esModuleInterop flag for better module compatibility.
Basic Express Application Setup
Create a basic Express application entry point, for example, src/index.ts:
import express from 'express';

const app = express();
const port = process.env.PORT || 3000;

app.use(express.json());

app.get('/', (req, res) => {
  res.send('Hello, Secure API!');
});

app.listen(port, () => {
  console.log(<code>Server running on port ${port});
});
Compile your TypeScript code and run the application:
npx tsc
node dist/index.js
You should see "Server running on port 3000" in your console.
Integrating Firebase Authentication
To use Firebase Authentication in your backend, you need to set up a Firebase project and obtain service account credentials.
Firebase Project Setup and Service Account
Go to the Firebase console and create a new project or use an existing one. Navigate to "Project settings" > "Service accounts". Click "Generate new private key" to download a JSON file containing your service account credentials. Keep this file secure and do not expose it publicly.
In your Express application, initialize the Firebase Admin SDK using these credentials:
import express from 'express';
import admin from 'firebase-admin';

// Replace with the path to your service account key file
const serviceAccount = require('../path/to/your/serviceAccountKey.json');

admin.initializeApp({
  credential: admin.credential.cert(serviceAccount)
});

const app = express();
const port = process.env.PORT || 3000;

app.use(express.json());

app.get('/', (req, res) => {
  res.send('Hello, Secure API!');
});

app.listen(port, () => {
  console.log(<code>Server running on port ${port});
});
Ensure you replace ../path/to/your/serviceAccountKey.json with the actual path to your downloaded JSON file.
Illustrative diagram of backend authentication with Firebase.
Implementing JWT Authentication Middleware
The core of securing your API with Firebase JWTs lies in creating middleware that intercepts incoming requests, extracts the JWT, and verifies its authenticity using the Firebase Admin SDK.
Creating the Authentication Middleware
Create a new file, for example, src/middleware/auth.ts, for your authentication middleware:
import { Request, Response, NextFunction } from 'express';
import admin from 'firebase-admin';

export const authenticateToken = async (req: Request, res: Response, next: NextFunction) => {
  const authHeader = req.headers['authorization'];
  const token = authHeader && authHeader.split(' ')[1]; // Extract token from "Bearer TOKEN"

  if (token == null) {
    return res.sendStatus(401); // If there's no token, return 401 Unauthorized
  }

  try {
    const decodedToken = await admin.auth().verifyIdToken(token);
    // Attach the decoded token to the request object for later use
    (req as any).user = decodedToken;
    next(); // Proceed to the next middleware or route handler
  } catch (error) {
    console.error('Error verifying Firebase ID token:', error);
    res.sendStatus(403); // If token is invalid, return 403 Forbidden
  }
};
This middleware function performs the following:
-
It extracts the JWT from the
Authorizationheader, expecting the formatBearer TOKEN. -
If no token is present, it sends a 401 Unauthorized response.
-
It uses
admin.auth().verifyIdToken(token)to verify the token with Firebase. This function also checks if the token is expired. -
If the token is valid, the decoded token (containing user information) is attached to the request object, and the request is allowed to proceed using
next(). -
If verification fails (e.g., invalid token, expired token), it catches the error and sends a 403 Forbidden response.
Applying the Middleware to Protected Routes
Now, apply this middleware to the routes you want to protect in your src/index.ts file:
import express from 'express';
import admin from 'firebase-admin';
import { authenticateToken } from './middleware/auth'; // Import the middleware

// Replace with the path to your service account key file
const serviceAccount = require('../path/to/your/serviceAccountKey.json');

admin.initializeApp({
  credential: admin.credential.cert(serviceAccount)
});

const app = express();
const port = process.env.PORT || 3000;

app.use(express.json());

app.get('/', (req, res) => {
  res.send('Hello, Secure API!');
});

// Protected route
app.get('/protected', authenticateToken, (req, res) => {
  // Access user information from the decoded token attached by the middleware
  const firebaseUser = (req as any).user;
  res.send(<code>Hello, authenticated user! Your Firebase UID is: ${firebaseUser.uid});
});

app.listen(port, () => {
  console.log(Server running on port ${port});
});
In this example, the /protected route is now secured by the authenticateToken middleware. Any request to this route without a valid Firebase JWT in the Authorization header will be rejected with a 401 or 403 status code.

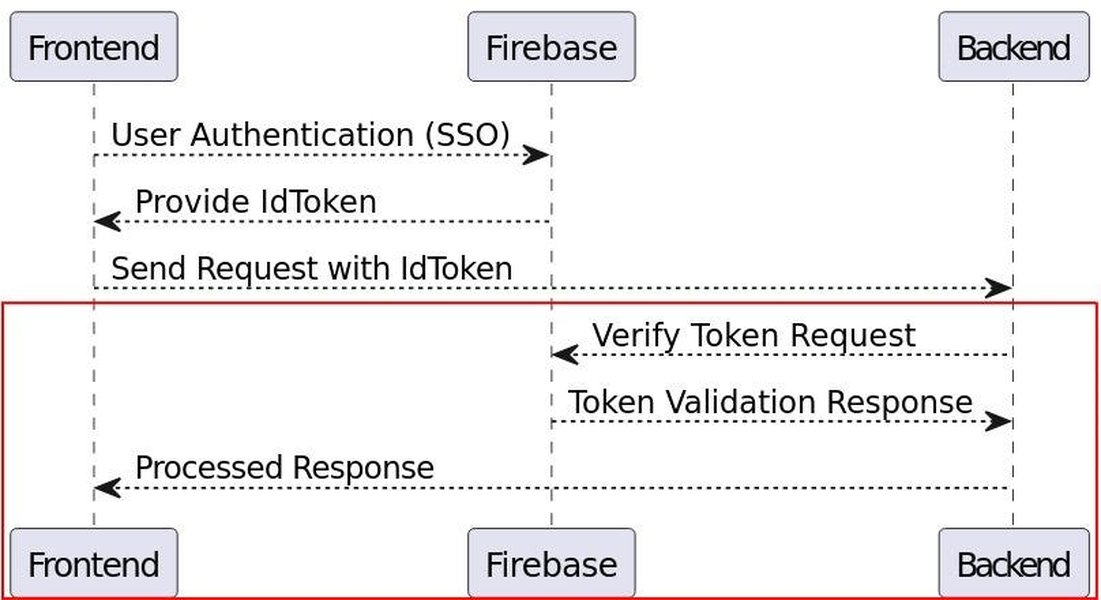
Flow of Firebase Authentication with a custom backend.
Obtaining and Using Firebase JWTs on the Client-Side
On the client-side (your web or mobile application), you will use the Firebase client SDK to authenticate users and obtain the JWT (specifically, the ID token) to send with requests to your protected backend API.
Client-Side Authentication with Firebase SDK
After a user successfully signs in using any of Firebase's authentication methods (e.g., email/password, Google Sign-In), you can get the user's ID token:
import firebase from 'firebase/app';
import 'firebase/auth';

// Initialize Firebase on the client-side
const firebaseConfig = {
  // Your Firebase client configuration
};
firebase.initializeApp(firebaseConfig);

// After a user signs in successfully
firebase.auth().currentUser.getIdToken()
  .then((idToken) => {
    // Use this idToken to authenticate requests to your backend
    console.log("Firebase ID Token:", idToken);
  })
  .catch((error) => {
    console.error("Error getting ID token:", error);
  });
The getIdToken() method retrieves the current user's ID token. This token should be included in the Authorization header of your requests to the protected endpoints of your Express API, in the format Bearer <idToken>.
Making Authenticated Requests
When making requests from your client to your protected Express endpoints, include the obtained ID token in the Authorization header:
const idToken = 'YOUR_FIREBASE_ID_TOKEN'; // Get this from firebase.auth().currentUser.getIdToken()

fetch('/protected', {
  method: 'GET',
  headers: {
    'Authorization': <code>Bearer ${idToken},
    'Content-Type': 'application/json',
  },
})
.then(response => {
  if (response.ok) {
    return response.text();
  }
  throw new Error('Request failed with status ' + response.status);
})
.then(data => {
  console.log('Protected data:', data);
})
.catch(error => {
  console.error('Error accessing protected endpoint:', error);
});
Your Express backend, with the authenticateToken middleware, will then verify this token and allow or deny the request accordingly.
Advanced Considerations and Best Practices
While the basic setup provides a good starting point, there are additional considerations for building a secure and scalable API.
Handling Custom Claims
Firebase allows you to add custom claims to a user's ID token using the Admin SDK. This is useful for storing user roles or permissions directly within the token, allowing for role-based access control (RBAC) in your API.
// Example using Firebase Admin SDK to set custom claims
admin.auth().setCustomUserClaims(uid, { role: 'admin' })
  .then(() => {
    // Custom claims set. The user's ID token will now contain these claims.
  })
  .catch((error) => {
    console.error('Error setting custom claims:', error);
  });
In your authentication middleware or route handlers, you can access these custom claims from the decoded token to implement authorization logic.
import { Request, Response, NextFunction } from 'express';
import admin from 'firebase-admin';

export const authenticateToken = async (req: Request, res: Response, next: NextFunction) => {
  // ... (token extraction and verification as before)
  try {
    const decodedToken = await admin.auth().verifyIdToken(token);
    (req as any).user = decodedToken;

    // Example of checking for a custom claim
    if ((decodedToken as any).role === 'admin') {
      next(); // User is an admin, allow access
    } else {
      res.sendStatus(403); // User is not an admin, deny access
    }

  } catch (error) {
    console.error('Error verifying Firebase ID token:', error);
    res.sendStatus(403); // If token is invalid, return 403 Forbidden
  }
};
Token Refresh
Firebase ID tokens are short-lived and automatically refreshed by the Firebase client SDK. Your client application should handle token refreshing and ensure that the latest token is used for API requests.
Environment Variables
Store sensitive information, such as the path to your service account key file, in environment variables rather than directly in your code. This is crucial for security, especially when deploying your API.
// Use environment variable for the service account file path
const serviceAccountPath = process.env.FIREBASE_SERVICE_ACCOUNT_KEY_PATH;
if (!serviceAccountPath) {
  throw new Error('FIREBASE_SERVICE_ACCOUNT_KEY_PATH environment variable is not set.');
}
const serviceAccount = require(serviceAccountPath);

admin.initializeApp({
  credential: admin.credential.cert(serviceAccount)
});
Error Handling and Logging
Implement comprehensive error handling and logging in your API to monitor authentication failures and other issues.
This video provides a visual guide to implementing JWT authentication with Firebase for your API, complementing the concepts discussed in this guide. It can help solidify your understanding of the practical steps involved in securing your endpoints.
Comparing Authentication Methods
While JWT authentication is a popular choice for REST APIs, it's helpful to understand its place among other authentication methods.
| Method | Description | Pros | Cons |
|---|---|---|---|
| JWT (JSON Web Token) | Tokens containing claims about the user, signed to prevent tampering. Client stores the token and sends it with each request. | Stateless, scalable, widely supported. Can include custom claims. | Token size can increase with many claims. Requires secure storage on the client. Token revocation can be complex. |
| Session-Based Authentication | Server creates a session upon login and stores session information. Client receives a session ID (e.g., in a cookie). | Simpler to implement for basic cases. Easy to revoke sessions. | Stateful (server needs to maintain session state). Can be less scalable in distributed systems. Vulnerable to CSRF attacks if not mitigated. |
| API Keys | Static keys provided to clients to access specific API endpoints. | Simple to implement for basic access control. | Less secure for user authentication. Difficult to manage per-user permissions. Keys can be compromised. |
Firebase JWTs offer a good balance of security, scalability, and ease of use for authenticating users in a TypeScript Express API.
Frequently Asked Questions
What is a JWT and why use it with Firebase?
A JSON Web Token (JWT) is a compact, URL-safe means of representing claims to be transferred between two parties. Firebase uses JWTs (specifically ID tokens) to securely transmit information about the authenticated user from the Firebase authentication service to your backend. This allows your backend to verify the identity of the user making a request without needing to directly communicate with Firebase for every request.
How do I handle token expiration?
Firebase ID tokens have a short lifespan (typically one hour). The Firebase client SDK automatically handles refreshing these tokens. Your client application should ensure it always uses the current user's latest ID token when making requests to your backend. On the backend, the verifyIdToken function automatically checks for token expiration.
Is it safe to store Firebase JWTs on the client-side?
Firebase client SDKs typically store the ID token in browser storage (like IndexedDB or Local Storage). While this is generally considered safe for tokens with short lifespans and transmitted over HTTPS, it's important to be aware of potential risks like XSS attacks. Using HTTP-only cookies for storing session tokens (derived from JWTs) can offer additional security, but Firebase's default approach is common for SPA-based applications.
Can I use custom authentication logic with Firebase?
Yes, Firebase allows you to create custom authentication systems using custom tokens. You can mint custom tokens on your backend (using the Admin SDK) after verifying user credentials through your own logic, and then use signInWithCustomToken on the client-side to authenticate with Firebase and receive an ID token.
How do I handle authorization (permissions) after authentication?
Once a user is authenticated using their Firebase JWT, you can implement authorization logic in your backend. This can involve checking custom claims in the decoded JWT (as discussed earlier), querying your database for user roles or permissions, or using a dedicated authorization library.
References
 dylanwooters.wordpress.com
Last updated April 30, 2025