
UTM Disk Resize Button Vanished? Unlock the Secrets to Expanding Your VM Storage!
Your comprehensive guide to troubleshooting the missing resize button and successfully increasing your UTM virtual machine's disk space.
Encountering a missing "Resize" button when you're trying to expand your UTM virtual machine's disk can be a common frustration. This guide provides a detailed walkthrough of potential causes and effective solutions to help you navigate this issue and successfully manage your VM's storage.
Key Insights: Quick Fixes & Essential Checks
- Power Down Completely: Ensure your Virtual Machine (VM) is fully shut down, not merely paused or suspended. Disk operations like resizing require the VM to be inactive.
- Disk Format Matters: The "Resize" option is most reliably available for virtual disks in the QCOW2 format. RAW disk images might not offer this feature directly through the UTM graphical user interface (GUI).
- Keep UTM Updated: Always use the latest stable version of UTM. Updates often include bug fixes and improvements to features like disk resizing.
Understanding the UTM Disk Resizing Process
Increasing the disk size for a UTM virtual machine is typically a two-stage process:
- Host-Side Resizing: First, you increase the virtual disk file's allocated size within the UTM application settings on your host operating system (macOS). This is where the "Resize" button comes into play.
- Guest-Side Expansion: After successfully increasing the disk size on the host, you must then boot into your guest operating system (e.g., Windows, Linux) and use its native disk management tools to expand the existing partitions or create new ones to utilize the newly available unallocated space.
If the "Resize" button is missing in UTM, it prevents you from completing the first crucial step.
Why Is the "Resize" Button Missing? Common Culprits
Several factors can contribute to the "Resize" button not appearing in your UTM drive settings. Understanding these can help pinpoint the solution faster.
Virtual Machine State
The most common reason: the VM is still running, paused, or in a saved state. UTM requires the VM to be completely powered off to modify its hardware configuration, including disk size.
Drive Type and Format
The "Resize" functionality is primarily designed for non-removable virtual hard drives, especially those using the QCOW2 format. QCOW2 (QEMU Copy On Write 2) is a flexible format that supports features like snapshots and dynamic sizing. RAW disk images (.img) may have limited or no GUI support for resizing, and the option might be absent for ISO images or drives marked as removable.
UTM Version
Older versions of UTM might have bugs or lack the resize feature altogether, or it might be implemented differently. Keeping UTM updated is crucial.
Specific VM Configuration or GUI Glitches
Occasionally, issues with the VM's configuration file (.utm package) or temporary GUI glitches within the UTM application or macOS can cause interface elements to disappear. Restarting UTM or even the host machine can sometimes resolve this.
Platform Limitations
While UTM is available for macOS and iOS/iPadOS, feature parity isn't always 100%. GUI-based disk resizing is more robust and consistently available on macOS. iOS/iPadOS versions might have limitations.
Experimental Nature
In some contexts, particularly with RAW disk images, resizing via the GUI might be considered an experimental feature and may not always be present or function as expected.
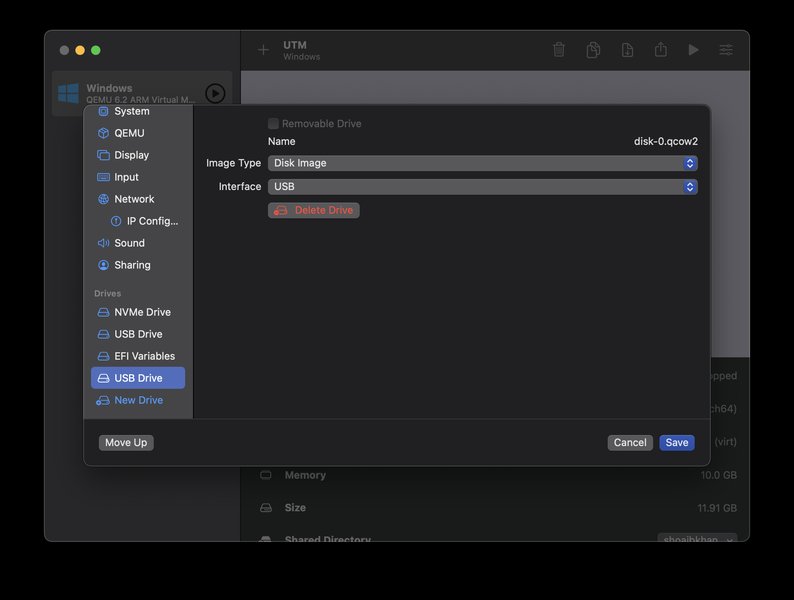
Example of UTM Drive Settings interface where resize options are typically found.
Troubleshooting Steps: Bringing Back the "Resize" Button
Follow these steps methodically to identify and resolve the issue:
1. Essential Pre-Checks
- Completely Power Off the VM:
- Shut down the guest OS from within the VM (e.g., Start Menu > Shutdown in Windows, or `sudo shutdown now` in Linux).
- Ensure the VM's status in the UTM sidebar shows as "Stopped" or "Powered Off".
- Backup Your Virtual Machine: Before making any changes to disk configurations, it's highly recommended to back up your VM. This can be done by copying the `.utm` package file to a safe location. Data loss, though rare, can occur with disk operations.
- Update UTM: Check for and install the latest version of UTM from the official website (getutm.app) or the Mac App Store.
2. Inspect UTM Drive Settings
- Access VM Configuration:
- Open UTM.
- Select the target VM from the list in the left sidebar.
- Right-click on the VM and choose "Edit" or click the settings icon.
- Navigate to Drives: In the VM settings window, select "Drives" from the left-hand menu.
- Select the Correct Drive: Identify your main system disk. This is typically a "VirtIO" drive and will have a `.qcow2` file associated with it. Click on this drive in the list.
- Look for the "Resize..." Button: The "Resize..." button, if available, should appear in the settings pane for the selected drive.
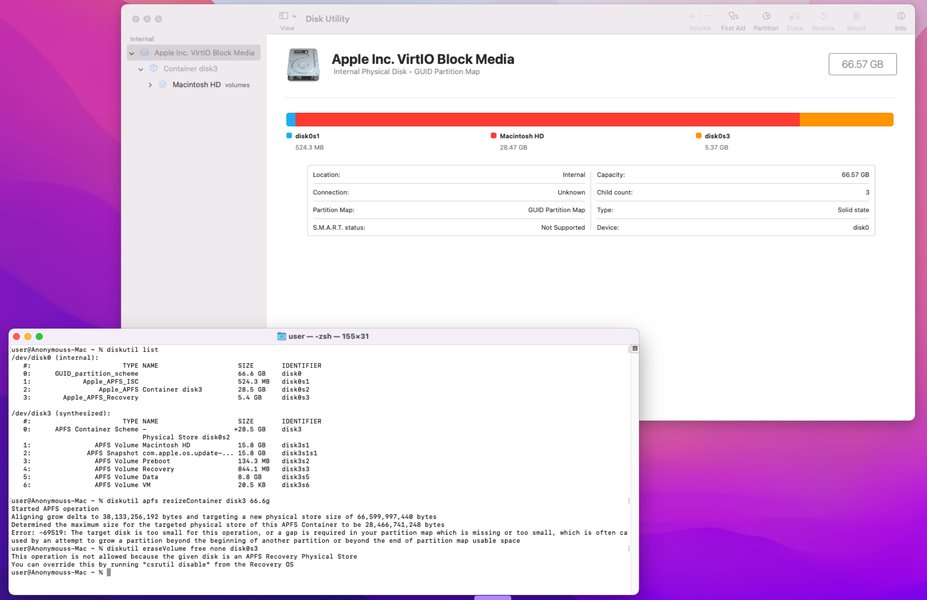
Illustration showing where the resize interface elements might be located in UTM drive settings.
- Verify Drive is Non-Removable: Ensure the drive you are trying to resize is not marked as "Removable." Resizing options are generally available for non-removable storage.
3. Address Potential Glitches and Format Issues
- Restart UTM and Host: If the button is still missing, try quitting UTM completely and relaunching it. If that doesn't work, restart your Mac.
- Check Disk Image Format:
- Confirm the disk image is in QCOW2 format. If it's a RAW image (`.img`), the GUI resize option might be absent. UTM's documentation notes that resizing QCOW2 images is well-supported.
- Resizing RAW disk images directly via the UTM GUI is considered experimental and may not always work or be visible.
4. Factors Impacting Resize Button Visibility
The visibility of the resize button can be influenced by several factors. The radar chart below illustrates a hypothetical impact score (1-10, higher means more likely to cause the button to be missing or for the feature to be problematic) for common issues.
This chart visualizes that having the VM powered on, using an incompatible disk format (like RAW for GUI resizing), or running an outdated UTM version are significant contributors to the resize button not appearing. Removable drive configurations and platform limitations (like on iOS) also play a role.
Advanced Solution: Command-Line Resizing with `qemu-img`
If the "Resize" button remains elusive in the UTM GUI, you can often resize the virtual disk image using the `qemu-img` command-line tool. This is a powerful utility that comes with QEMU, the backend UTM uses for virtualization.
Steps for Command-Line Resizing:
- Install QEMU (if necessary): If you don't have QEMU installed, you might need to install it. On macOS, Homebrew is a common way:
brew install qemu. - Locate Your Virtual Disk File:
- Right-click your VM in UTM and select "Show in Finder." This will open the `.utm` package.
- Right-click the `.utm` file and choose "Show Package Contents."
- Navigate to the `Images` folder. You should find your disk image file here (e.g., `disk-0.qcow2`). Note its full path.
- Open Terminal: Launch the Terminal application on your Mac.
- Execute the Resize Command: Use the `qemu-img resize` command.
Replace `/path/to/your/disk-0.qcow2` with the actual path to your disk image file. Replace `+20G` with the amount of space you want to add (e.g., `+50G` to add 50 Gigabytes, or `100G` to set the total size to 100 Gigabytes).qemu-img resize /path/to/your/disk-0.qcow2 +20G - Verify: The command should execute without errors. This step only resizes the container file; you still need to expand the partition within the guest OS.
Caution: Using command-line tools requires care. Always ensure your paths are correct and you understand the command before executing it. Make sure the VM is powered off.
Visualizing the Troubleshooting Path
The mindmap below outlines the general workflow for troubleshooting a missing resize button in UTM, from initial checks to advanced solutions and the critical post-resize steps within the guest OS.
This mindmap helps to systematically approach the problem, ensuring all key areas are considered during the troubleshooting process.
Summary Table: Causes and Solutions
Here's a quick reference table summarizing common reasons for the missing resize button and their corresponding checks or solutions:
| Potential Issue | Why It Matters | What to Check/Do |
|---|---|---|
| VM is Running or Suspended | UTM prevents disk modifications on active or suspended VMs to avoid data corruption. | Ensure the VM is completely shut down (powered off) from within the guest OS and verified in UTM. |
| Incorrect Drive Type Selected in Settings | The resize option is for the primary virtual hard disk, not for ISO images, shared directories, or removable media. | In UTM's "Drives" settings, ensure you have selected the main system disk (usually a VirtIO drive with a .qcow2 file extension). |
| Disk Image Format (e.g., RAW) | RAW images (.img) have limited GUI resize support in UTM; QCOW2 is the preferred format for flexibility. | Check the disk format. If it's RAW, the GUI option may be missing. Consider converting to QCOW2 or use command-line tools for resizing. |
| Outdated UTM Version | Older versions of UTM may contain bugs that hide UI elements or lack the resize feature. | Update UTM to the latest stable release from the official UTM website or the Mac App Store. |
| Drive Marked as Removable | The resize option is typically available only for drives configured as non-removable. | Verify in the drive's settings that it is not set as "Removable." |
| UTM GUI Glitch or Host OS Issue | Temporary software interface problems can occasionally cause buttons or options to not display correctly. | Quit and restart the UTM application. If the issue persists, try restarting your Mac. |
| Platform Limitations (e.g., iOS/iPadOS) | Feature sets can differ between UTM for macOS and UTM for iOS/iPadOS, with macOS generally offering more comprehensive GUI options. | Disk resizing via the GUI is best supported and most reliable on macOS. Functionality might be limited or different on iOS/iPadOS. |
| Experimental Feature Status | Resizing certain disk types (like RAW via GUI) might be classified as experimental and thus not always consistently available or functional. | For formats where GUI resizing is experimental or unsupported, the command-line (`qemu-img`) method is a more robust alternative. |
Crucial Final Step: Expanding the Partition in the Guest OS
Successfully resizing the virtual disk image in UTM (either via GUI or command line) only allocates more space to the virtual disk file on your host machine. The guest operating system inside the VM will not automatically use this new space. You must boot into the guest OS and use its disk management utilities to extend the existing partitions or create new ones in the unallocated space.
For Windows Guests:
- Boot your Windows VM.
- Open Disk Management: Right-click the Start button and select "Disk Management," or press
Win + R, typediskmgmt.msc, and press Enter. - You should see "Unallocated space" next to your main partition (usually C: drive).
- Right-click on the partition you want to extend (e.g., C: drive) and select "Extend Volume..."
- Follow the wizard to add the unallocated space to the partition.
For Linux Guests:
- Boot your Linux VM.
- Open a terminal.
- Use tools like
lsblkorfdisk -lto identify your disk and partitions. - Use a partitioning tool like
GParted(if a GUI is available and installed),fdisk, orpartedto resize the partition. This process varies depending on the tool and your partition scheme (e.g., if using LVM, you'd use LVM tools likepvresize,lvresize). - After resizing the partition, you'll need to resize the filesystem on it. For example, for an ext4 filesystem, use
resize2fs /dev/sdXN(replacing/dev/sdXNwith your actual partition).
Failure to perform this step will result in your guest OS still reporting the old, smaller disk size, even though UTM shows the disk as larger.
General UTM Guidance and Troubleshooting
Understanding the basics of UTM can often help in troubleshooting various issues. The following video provides a general overview of installing and using UTM on a Mac, which can be helpful for familiarizing yourself with its interface and settings, potentially aiding in identifying where things might be going amiss, such as in the drive configuration settings.
General guide on installing and using UTM on Mac, covering basic setup and interface.
While this video doesn't specifically address the missing resize button, understanding the overall UTM environment, including how drives are configured and managed, is foundational knowledge for effective troubleshooting.
Frequently Asked Questions (FAQ)
Why is my VM still showing the old disk size after I resized it in UTM?
What if my disk image is in RAW (.img) format and I can't see the resize button?
Is the disk resizing process different on UTM for iOS/iPadOS?
I've tried everything, and the resize button is still missing. What else can I do?
Recommended Next Steps & Further Exploration
- Explore methods for converting UTM RAW disk images to the more flexible QCOW2 format.
- Find a detailed guide specifically for expanding Linux LVM partitions after resizing the disk in UTM.
- Learn about the best practices for comprehensively backing up your UTM virtual machines on macOS.
- Investigate common errors and troubleshooting tips for when a Windows guest OS fails to boot or has issues after configuration changes in UTM.
References
Last updated May 18, 2025