
Protect Your Ride: Your Essential Guide to the Pre-Panel Beater Vehicle Condition Form
Ensure transparency and peace of mind when handing over your car for repairs with a detailed, editable assessment document.
Handing your vehicle over to a panel beater requires trust. A crucial step in this process is documenting the exact condition of your car before any work begins. This is achieved using a Vehicle Condition Assessment Form (also known as a Vehicle Condition Report or Handover Form). While I cannot directly generate a downloadable Microsoft Word file for you, this guide provides everything you need to create a comprehensive, editable form yourself.
Key Highlights of a Pre-Repair Assessment Form
- Comprehensive Documentation: Creates a detailed, timestamped record of your vehicle's condition, including existing scratches, dents, or mechanical issues.
- Dispute Prevention: Serves as a mutually agreed-upon baseline, significantly reducing the potential for disagreements about pre-existing versus repair-related damage.
- Clear Communication: Establishes clear expectations between you and the panel beater regarding the vehicle's initial state and the scope of work required.
Why This Form is Crucial Before Panel Beating
Using a detailed condition assessment form before entrusting your vehicle to a panel beater is a vital practice for several reasons:
- Protection for Both Parties: It protects you by ensuring pre-existing damage isn't mistakenly attributed to the repair process. It also protects the panel beater by clearly outlining the vehicle's state upon arrival.
- Establishes a Baseline: The form serves as an objective reference point. After repairs are completed, this baseline helps verify that the agreed-upon work has been done correctly and no new damage has occurred.
- Enhances Professionalism: It demonstrates a thorough and professional approach to the repair process, fostering trust and transparency.
- Legal Clarity: In the unlikely event of a dispute, a signed condition report provides valuable evidence detailing the vehicle's state at the time of handover.
Core Components of Your Vehicle Condition Assessment Form
A robust form should capture specific details systematically. Here’s a breakdown of essential sections to include:
Identifying Information
This section collects basic details to identify the owner, the vehicle, the repairer, and the time of handover.
1. Owner/Customer Details
- Full Name
- Contact Number
- Email Address
- Home Address
2. Vehicle Details
- Make, Model, Year
- Color, Body Style (e.g., Sedan, SUV)
- Vehicle Identification Number (VIN)
- License Plate Number
- Current Odometer Reading (Mileage)
3. Panel Beater/Repair Facility Details
- Company Name
- Contact Person Accepting Vehicle
- Contact Number
- Address
4. Date and Time of Handover
- Date: [e.g., May 05, 2025]
- Time: [e.g., 10:30 AM]
The Detailed Assessment Checklist
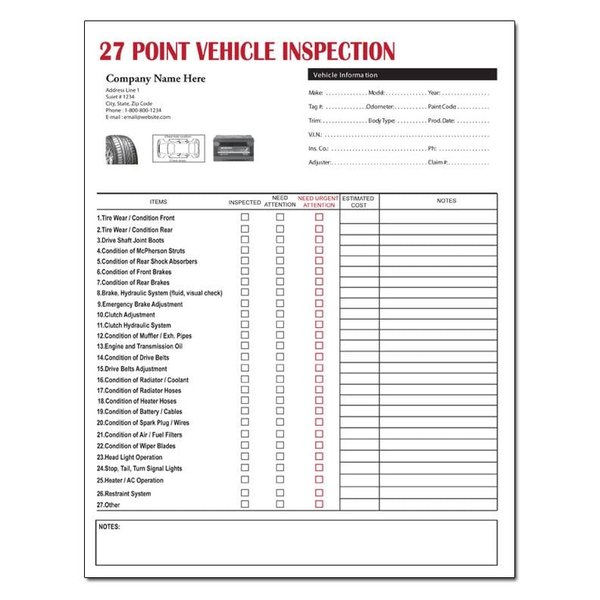
This is the heart of the form, where you meticulously document the condition of various parts of the vehicle. Using a table format in your Word document is highly recommended for clarity. Consider using condition codes (e.g., G=Good, S=Scratch, D=Dent, C=Chip, M=Missing, R=Rust, F=Faded) alongside descriptions.
Example layout for a vehicle inspection checklist.
Exterior Condition
Check each panel and component for existing damage like dents, scratches, chips, rust, or paint issues.
| Exterior Area | Condition (Code/Description) | Notes (Location, Size, Severity) |
|---|---|---|
| Front Bumper | ||
| Rear Bumper | ||
| Hood (Bonnet) | ||
| Roof | ||
| Trunk (Boot) Lid | ||
| Left Front Fender | ||
| Right Front Fender | ||
| Left Door(s) | ||
| Right Door(s) | ||
| Left Rear Quarter Panel | ||
| Right Rear Quarter Panel | ||
| Windshield | (Note chips, cracks) | |
| Side & Rear Windows | (Note cracks, tint damage) | |
| Headlights | (Note cracks, fogging, function) | |
| Taillights & Indicators | (Note cracks, function) | |
| Side Mirrors | (Note cracks, scratches, function) | |
| Paint Condition | (Note overall fading, peeling, major blemishes) |
Interior Condition
Assess the state of the cabin, including upholstery, dashboard, controls, and cleanliness.
- Seats (Upholstery tears, stains, burns, wear)
- Dashboard & Console (Cracks, scratches, sticky residue)
- Carpets & Floor Mats (Stains, tears, excessive wear)
- Headliner (Sagging, stains)
- Functionality Check: Air Conditioning/Heating, Radio/Infotainment, Power Windows, Power Locks, Interior Lights
- Presence of Personal Items (Advise removal, but note if any remain)
- Odor Check (Smoke, pets, mildew)
Wheels & Tires
Document the condition of each wheel and tire.
- Rim Condition (Scratches, curb rash, dents) - Specify which wheel(s)
- Tire Condition (Cuts, bulges, uneven wear) - Specify which tire(s)
- Tire Tread Depth (Approximate, if possible)
- Presence of Spare Tire & Tools (Jack, lug wrench)
Mechanical Check & Fuel Level (Optional but Recommended)
Briefly note any known issues or observations.
- Warning Lights on Dashboard (e.g., Check Engine, ABS, Airbag)
- Known Mechanical Issues (Note any noises, leaks, or performance problems mentioned by the owner)
- Fuel Level (Estimate: e.g., Full, 3/4, 1/2, 1/4, Empty)
Visual Documentation: The Power of a Diagram
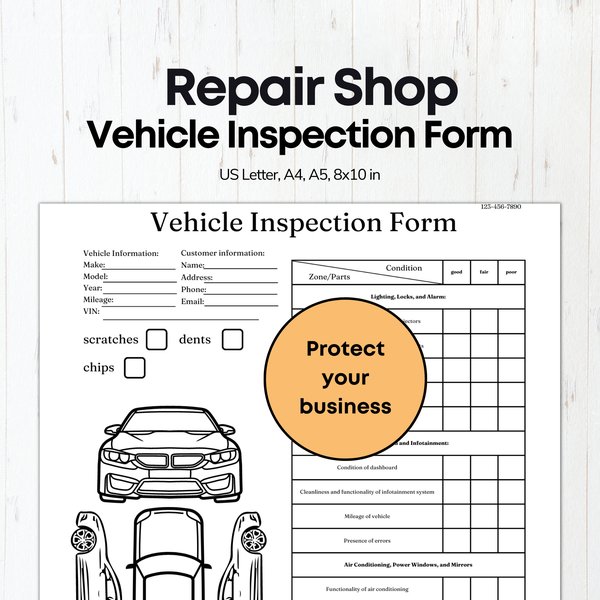
Including a simple outline diagram of a car (top-down and side views) is incredibly helpful. You can mark the exact location of scratches, dents, or chips directly on the diagram. This visual reference complements the checklist and makes damage locations unambiguous.
Using a vehicle diagram helps pinpoint damage locations precisely.
Additional Notes & Observations
Provide a blank space for any other relevant comments, specific instructions for the panel beater, or observations not covered elsewhere in the checklist.
Signatures for Agreement
The form must conclude with signature lines for both the vehicle owner (or representative) and the panel beater's representative, along with the date of signing. This signifies mutual agreement on the documented condition of the vehicle at the time of handover.
- Owner/Customer Signature: _________________________ Date: _________
- Panel Beater Representative Signature: ________________ Date: _________
Visualizing the Assessment Focus
Different areas of the vehicle require varying levels of detailed inspection during this pre-repair assessment. While all areas are important, the focus might be higher on body panels and paintwork when heading to a panel beater. This chart provides a conceptual overview of the typical focus intensity for each major area during the handover inspection.
This chart illustrates that while all areas are checked, the exterior body and paint condition typically receive the most detailed scrutiny before panel beating work commences, followed by glass, wheels, and interior, with basic mechanical checks being less intensive unless related to the damage.
Mapping the Form's Structure
This mind map provides a visual overview of the essential sections that constitute a comprehensive Vehicle Condition Assessment Form for handover to a panel beater.
(Name, Contact)"] id1b["Vehicle Details
(Make, Model, VIN, Plate, Mileage)"] id1c["Panel Beater Details
(Name, Contact)"] id1d["Date & Time of Handover"] id2["Detailed Assessment Checklist"] id2a["Exterior Condition"] id2a1["Body Panels (Dents, Scratches)"] id2a2["Paintwork (Chips, Rust, Fading)"] id2a3["Glass (Windshield, Windows)"] id2a4["Lights (Headlights, Taillights)"] id2a5["Mirrors"] id2a6["Bumpers"] id2b["Interior Condition"] id2b1["Upholstery (Seats, Headliner)"] id2b2["Dashboard & Controls"] id2b3["Carpets & Mats"] id2b4["Functionality (AC, Radio, etc.)"] id2c["Wheels & Tires"] id2c1["Rim Condition"] id2c2["Tire Condition & Tread"] id2c3["Spare Tire & Tools"] id2d["Mechanical & Fuel"] id2d1["Warning Lights"] id2d2["Known Issues"] id2d3["Fuel Level"] id3["Visual Documentation Aid"] id3a["Vehicle Outline Diagram
(Mark damage locations)"] id4["Additional Information"] id4a["Notes/Comments Section"] id4b["Photo Documentation Reference
(Optional but recommended)"] id5["Agreement & Signatures"] id5a["Owner Signature & Date"] id5b["Panel Beater Signature & Date"]
Following this structure ensures all critical aspects are covered systematically.
Creating Your Editable Form in Microsoft Word
While I provide the structure and content, you'll need to create the actual file. Here’s how you can easily do this in Microsoft Word:
- Open Word: Start with a new blank document.
- Add Title and Sections: Use the headings outlined above (e.g., "Vehicle Condition Assessment Form", "Identifying Information", "Detailed Assessment Checklist").
- Use Tables for Checklists: For the Exterior Condition Checklist (and potentially Interior/Wheels), insert a table (
Insert>Table). This keeps the information organized. Create columns for 'Item', 'Condition', and 'Notes'. - Incorporate Form Fields (Optional but helpful):
- Enable the 'Developer' Tab: Go to
File>Options>Customize Ribbon. In the right-hand list, check the box next to 'Developer' and click OK. - Add Checkboxes: In your table or lists, place your cursor where you want a checkbox, go to the 'Developer' tab, and click the checkbox icon in the 'Controls' group.
- Add Text Fields: For areas like 'Notes' or contact information, use 'Plain Text Content Control' or 'Rich Text Content Control' from the Developer tab.
- Enable the 'Developer' Tab: Go to
- Insert a Vehicle Diagram Image: Find a simple car outline image online (ensure it's free for personal use) and insert it (
Insert>Pictures). You can then draw shapes or use text boxes over it to mark damage when filling out the form later. - Add Signature Lines: Type underscore characters (
_) to create lines for signatures and dates. - Save as .docx: Save the file in the standard Word format (.docx). This ensures it remains editable for both you and potentially the panel beater (if you share it digitally). You can then print physical copies or fill it digitally.
By following these steps, you can create a professional, editable, and downloadable form based on the comprehensive structure provided here.
Best Practices for Using the Form
- Conduct a Joint Walk-Around: Fill out the form together with the panel beater representative during the vehicle handover. This ensures mutual agreement on the assessment.
- Be Thorough: Inspect the vehicle in good lighting conditions. Don't rush the process.
- Take Photos/Videos: Supplement the form with clear photos or a video walk-around of the vehicle, paying close attention to any existing damage noted on the form. Keep these photos with your copy of the form.
- Sign and Date: Ensure both parties sign and date the completed form.
- Keep Copies: Retain a copy for your records and ensure the panel beater has a copy.
Understanding Vehicle Inspections
Vehicle inspections are a standard part of automotive service. While your form focuses on the pre-repair condition for panel beating, understanding broader inspection processes can be helpful. Many dealerships and service centers use multi-point inspections to assess overall vehicle health. The video below explains what typically happens during such an inspection, highlighting the detailed examination involved – similar in principle to the care needed for your pre-handover check.
This video demonstrates the methodical approach service experts take, checking various components like tires, brakes, fluids, and batteries. Applying a similarly thorough approach when documenting your car's condition before handing it over ensures accuracy and protects your interests.
Frequently Asked Questions (FAQ)
Why is this form so important? Can't I just trust the panel beater?
While most repair shops are reputable, misunderstandings can happen. This form isn't about mistrust; it's about clarity and professionalism. It creates an objective record of the vehicle's condition before work starts, protecting both you and the panel beater from potential disputes over pre-existing damage. It ensures everyone is on the same page.
What if we miss some minor damage during the inspection?
The goal is to be as thorough as possible. Doing the inspection in good light and taking your time helps minimize omissions. If minor, clearly old damage is discovered later by the panel beater, it's usually not contentious. However, documenting everything you *do* see strengthens the form's purpose. Supplementing with photos is also highly recommended as visual proof.
Should I include photos along with the form?
Absolutely! Photos (or even a video walk-around) provide excellent supplementary evidence. Take clear pictures of the overall vehicle from all angles, and close-ups of any specific damages noted on the form (scratches, dents, chips, etc.). Mention on the form that photos were taken (e.g., "See attached photos dated [Date]").
Can I use a digital version instead of printing it?
Yes, a digital version can work well. You can fill out the Word document on a tablet or laptop during the handover. Both parties can potentially sign digitally (using relevant software or apps), or you could print just the signature page if needed. Ensure both parties receive a digital copy of the completed and signed form.
Recommended Further Exploration
- Learn advanced techniques for documenting vehicle damage accurately before repair work begins.
- Explore the typical intake procedures panel beaters follow when accepting a vehicle for repair.
- Understand the legal standing and importance of vehicle condition reports in resolving auto repair disputes.
- Find downloadable and customizable vehicle inspection checklist templates available online.
References
Last updated May 5, 2025