
Unveiling the Virtual Reality Rendering Pipeline: From 3D Models to Immersive Worlds
A Deep Dive into the Complex Process That Powers Your VR Experiences
The graphics rendering pipeline in a Virtual Reality (VR) system is a sophisticated sequence of computational stages that transforms abstract 3D models and scene data into the vivid 2D images you perceive on your VR headset displays. This intricate process is fundamental to delivering the immersive and interactive experiences that define modern VR. Unlike traditional 2D display rendering, VR introduces unique challenges such as stereoscopic rendering, high refresh rates, and extremely low latency requirements to prevent motion sickness and maximize immersion.
Key Insights into VR Graphics Rendering
- Fundamental Transformation: The core function of the VR graphics pipeline is to convert 3D virtual environments into the 2D images displayed to each eye, accounting for individual perspectives to create a sense of depth.
- Optimization is Paramount: Due to the demanding nature of VR—requiring high frame rates (typically 90 FPS or more) and minimal latency—the pipeline is heavily optimized with techniques like single-pass rendering, foveated rendering, and late latching.
- Specialized Stages for VR: While sharing commonalities with traditional graphics pipelines, VR rendering incorporates additional or modified stages, such as stereoscopic projection and distortion correction, crucial for a comfortable and realistic virtual experience.
Understanding the VR Graphics Rendering Pipeline
The graphics rendering pipeline is often conceptualized as a series of steps that GPUs (Graphics Processing Units) execute to convert raw 3D data into pixels on a screen. For VR, this process is duplicated and optimized to generate two slightly different images—one for each eye—which the brain then combines to perceive depth. This "stereoscopic rendering" is at the heart of VR's immersive quality.
Core Stages of the Pipeline
While the exact implementation can vary depending on the hardware, software, and APIs (like OpenGL, DirectX, or Vulkan), a typical VR graphics pipeline generally involves the following stages:
1. Scene Preparation and Application Stage
This initial phase is largely handled by the CPU (Central Processing Unit) and involves setting up the scene for rendering. It includes:
- Scene Graph Management: Organizing all objects, lights, cameras, and their relationships within the virtual world.
- Culling: Identifying and discarding objects or parts of objects that are outside the camera's field of view or are occluded by other objects. This significantly reduces the amount of data that needs to be processed. For VR, culling often needs to consider the wider field of view of VR headsets.
- Animation and Physics: Updating the positions, rotations, and scales of dynamic objects based on animations or physics simulations.
- Sending Data to GPU: Preparing vertex data, texture data, and shader programs, and sending them to the GPU for further processing.
2. Geometry Processing Stage
Once data reaches the GPU, the geometry processing stage begins. This is where 3D models are transformed from their initial object-space coordinates into various other coordinate systems.
- Vertex Shading: Each vertex (a point defining a 3D model's shape) is processed by a "vertex shader." This programmable stage applies transformations (model, view, projection matrices), calculates lighting per vertex, and prepares data for the next stages. The transformations involve converting object-space coordinates to world-space, then to view-space (camera's perspective), and finally to clip-space.
- Homogeneous Coordinates and Projection: Vertices are represented in homogeneous coordinates
\(\text{p} = \begin{pmatrix} \text{x} \ \text{y} \ \text{z} \ 1 \end{pmatrix}\)to facilitate matrix multiplications for transformations. The projection matrix transforms the 3D view-space coordinates into 2D clip-space coordinates, effectively "flattening" the 3D scene onto a 2D plane. - Clipping: Primitives (triangles, lines, points) that are partially or completely outside the camera's view frustum are clipped or discarded. This ensures only visible geometry proceeds down the pipeline.
- Stereoscopic Projection: A critical difference in VR is that this stage occurs twice, or is optimized to run efficiently for both eyes. Each eye has a slightly different camera position and projection matrix, mimicking the interpupillary distance (IPD) of human eyes. This creates the necessary disparity for depth perception.
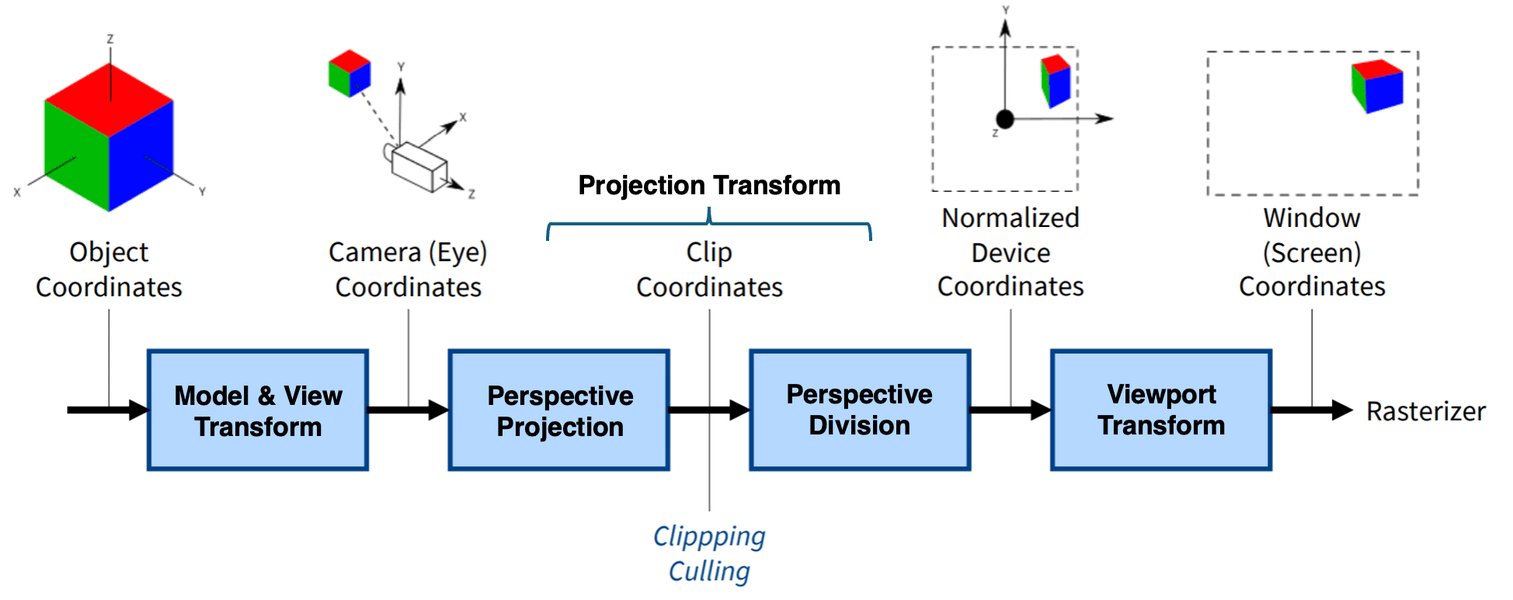
Diagram illustrating the vertex processing stage, where 3D vertices undergo transformations.
3. Rasterization Stage
This stage converts the geometric primitives into fragments (potential pixels) on the screen. It is hardware-accelerated and highly optimized.
- Screen Mapping: The 2D coordinates of the clipped primitives are mapped to the viewport of the display.
- Triangle Setup: Edge equations are computed for triangles, and attributes (like color, texture coordinates, normals) are interpolated across the triangle's surface.
- Fragment Generation: For each pixel covered by a triangle, a "fragment" is generated. This fragment contains interpolated attributes and its depth value.
4. Fragment Processing Stage (Pixel Shading)
Here, each generated fragment is processed to determine its final color. This is another highly programmable stage.
- Fragment Shading: A "fragment shader" (also known as a pixel shader) is executed for each fragment. This shader calculates the final color of the pixel, taking into account lighting, textures, materials, and other visual effects. Complex lighting models, reflections, refractions, and post-processing effects are often implemented here.
- Depth Testing: The depth value of the current fragment is compared with the value already stored in the depth buffer for that pixel. If the current fragment is closer, it passes the depth test and its color is written to the color buffer. This handles occlusion, ensuring objects closer to the camera obscure those further away.
- Blending: If transparency or translucency is involved, the fragment's color is blended with the existing color in the color buffer.
5. Output Merger Stage and Display
The final stage combines the processed fragments into the final image.
- Color Buffer Write: The final color of each pixel is written to the color buffer.
- Post-Processing: Effects like anti-aliasing, bloom, depth of field, and color grading are applied to the entire rendered image.
- Lens Distortion Correction: Crucially for VR, the rendered 2D image for each eye must be distorted to counteract the optical distortion introduced by the headset's lenses. This ensures that the image appears correct to the user.
- Chromatic Aberration Correction: Similar to distortion, this corrects color fringing caused by lenses.
- Display: The final, corrected images for the left and right eyes are sent to the headset displays, typically at high refresh rates (e.g., 90Hz, 120Hz).
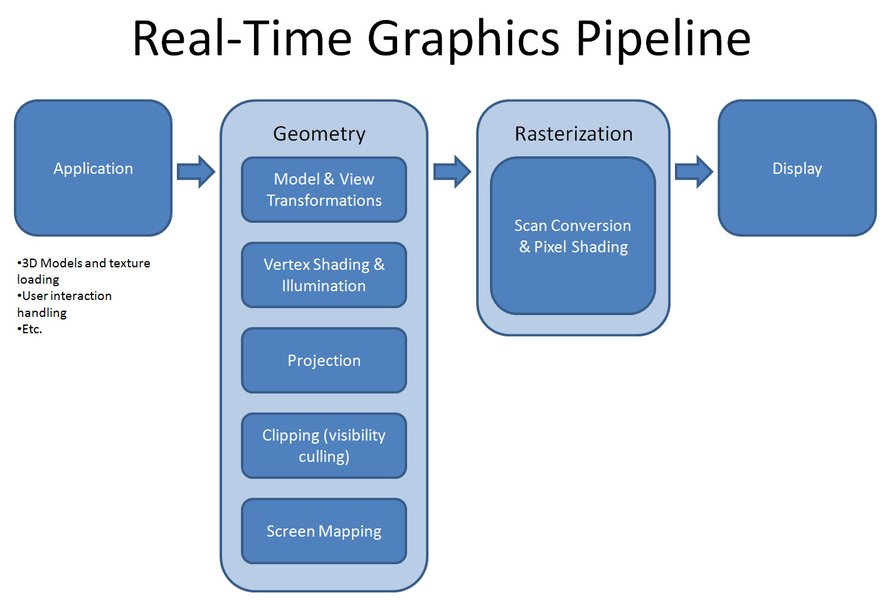
An illustration of a typical 3D rendering pipeline.
VR-Specific Optimizations and Challenges
VR imposes stringent requirements that necessitate specialized optimizations:
- High Frame Rates (FPS): To prevent motion sickness and ensure a smooth experience, VR applications target 90 FPS or higher per eye. This means each frame must be rendered in approximately 11.1 milliseconds or less.
- Low Latency (Motion-to-Photon): The time from a user's head movement to the corresponding visual update on the display must be extremely low (ideally under 20ms). High latency causes discomfort and breaks immersion. Techniques like Late Latching (or Pose Prediction/Asynchronous Timewarp/Spacewarp) are used to compensate for head tracking latency by re-projecting the rendered image based on the latest head pose just before display.
- Stereoscopic Rendering: As mentioned, rendering two slightly different views significantly increases computational load.
- Field of View: VR headsets have a much wider field of view than traditional monitors, meaning more content needs to be rendered, potentially increasing pixel count.
- Resolution: Modern VR headsets have high-resolution displays, pushing the demand for pixel processing.
Optimization Techniques
To meet these demands, several optimization techniques are employed:
- Single-Pass Stereo Rendering (Single-Pass Instancing): Instead of rendering the scene twice (once for each eye), this technique renders both eye views in a single pass using a texture array for render targets and instanced draw calls. This reduces CPU overhead and improves GPU cache utilization.
- Foveated Rendering: Leveraging the eye's fovea (the central part of vision with highest acuity), this technique renders the central part of the view at full resolution and progressively lowers the resolution in the periphery. This reduces rendering workload without noticeable visual degradation.
- Asynchronous Timewarp (ATW) / SpaceWarp (ASW): These techniques are crucial for reducing perceived latency. ATW re-projects the last rendered frame based on the most recent head orientation before it's displayed, minimizing judder. ASW goes further by synthesizing intermediate frames to smooth out motion even if the application can't maintain the target framerate.
- Tile-Based Rendering: Common in mobile VR, this optimizes memory bandwidth by breaking the screen into tiles and rendering each tile independently, often leveraging on-chip memory.
- Level of Detail (LOD): Using simpler models or textures for objects further away from the camera reduces the rendering complexity.
- Batching: Combining multiple smaller draw calls into fewer, larger ones to reduce CPU overhead.
- Occlusion Culling: More aggressive culling techniques to eliminate drawing objects hidden behind others, even if they are within the frustum.
Radar Chart: VR Rendering Pipeline Performance Facets
This radar chart illustrates the relative importance and typical performance levels of various aspects within a well-optimized VR rendering pipeline. The values are conceptual and reflect a general balance rather than specific metrics, emphasizing the critical interplay between different factors for a successful VR experience.
The chart emphasizes that low latency and high frame rates are paramount for an immersive VR experience, often taking precedence over absolute visual fidelity, especially in mobile VR. Computational efficiency and stereo rendering performance are crucial enablers for achieving these goals. Power efficiency is also a significant consideration, particularly for standalone VR headsets.
Software Tools and APIs for VR Rendering
Developers rely on various software frameworks and APIs to build VR experiences:
- Game Engines: Unity and Unreal Engine are widely used, offering built-in VR support and render pipelines (e.g., Unity's Universal Render Pipeline (URP) and High Definition Render Pipeline (HDRP)) that simplify VR development. HDRP, for instance, is designed for high-fidelity VR experiences, supporting features like single-pass instancing and post-processing compatible with VR.
- Graphics APIs: OpenGL, DirectX, and Vulkan provide low-level control over the graphics pipeline, allowing for highly optimized custom rendering solutions.
- VR SDKs: Oculus SDK, SteamVR (OpenVR), and OpenXR provide specific APIs for interacting with VR hardware, managing head tracking, input, and displaying content correctly.
Example of VR Rendering Pipeline Stages and Associated Components
The following table summarizes the key stages of the VR rendering pipeline, their primary functions, and the types of components involved, highlighting the unique considerations for VR.
| Pipeline Stage | Primary Function | Key VR Considerations | Components Involved |
|---|---|---|---|
| Application / Scene Prep | Manage scene data, culling, animation, physics. | Aggressive culling for wide FOV, preparing data for dual-eye rendering. | CPU, Game Engine (Unity, Unreal), Scene Graph, Culling Algorithms |
| Geometry Processing | Transform 3D models into 2D screen coordinates. | Stereoscopic projection (separate views for each eye), efficient vertex shading. | GPU, Vertex Shaders, Model/View/Projection Matrices |
| Rasterization | Convert geometric primitives into fragments (potential pixels). | Efficient fragment generation across two viewports. | GPU (Fixed-function hardware), Triangle Setup |
| Fragment Processing (Pixel Shading) | Determine final color of each fragment. | High-performance pixel shading, efficient texture sampling, depth testing. | GPU, Fragment Shaders, Texture Units, Z-buffer |
| Output Merger & Display | Combine fragments into final image, apply post-processing. | Lens distortion correction, chromatic aberration correction, TimeWarp/SpaceWarp, high refresh rate output. | GPU, Frame Buffer, Post-processing Units, VR Headset Displays |
A Visual Explanation of the Graphics Pipeline for VR
To further illustrate the complexity and critical steps involved in transforming 3D data into the immersive visuals of a VR experience, watch this video from a computer graphics and virtual reality course. It provides a foundational overview of the graphics rendering pipeline relevant to VR systems.
This video, titled "Graphics rendering pipeline - Introduction to Virtual Reality," offers a high-level walkthrough of how 3D scenes are converted into 2D images. While it covers the general graphics pipeline, the principles it explains are directly applicable to VR, forming the bedrock upon which VR-specific optimizations are built. Understanding these fundamental stages is key to appreciating how VR systems achieve their impressive visual fidelity and responsiveness.
Future Trends in VR Rendering
Research and development continue to push the boundaries of VR rendering. Innovations like machine learning-based rendering, radiance fields (e.g., 3D Gaussian splatting), and advanced hardware architectures are emerging to further streamline the pipeline, enhance photorealism, and reduce computational overhead. Projects like "VR-Pipe" aim to integrate these innovations directly into hardware to improve volume rendering and overall performance. The goal is to make VR experiences even more compelling, accessible, and indistinguishable from reality.
Frequently Asked Questions (FAQ)
Conclusion
The graphics rendering pipeline in a Virtual Reality system is a marvel of computer graphics engineering, meticulously designed to create compelling and comfortable immersive experiences. It extends the principles of traditional 3D rendering with specialized stages and aggressive optimizations to overcome the unique challenges posed by head-mounted displays, such as stereoscopy, ultra-low latency, and high refresh rates. As VR technology continues to evolve, so too will its rendering pipelines, integrating cutting-edge techniques and hardware innovations to deliver ever more realistic and seamless virtual worlds.
Recommended Further Exploration
- How to optimize VR graphics for low latency?
- What is single-pass stereo rendering in VR?
- Explain foveated rendering and its benefits.
- What does the future hold for real-time rendering in virtual reality?