
How to Create a Report Using WordPad
A comprehensive guide to crafting effective reports on WordPad
Key Highlights
- Step-by-Step Instructions: Detailed guidance from opening WordPad to saving and printing your report.
- Essential Formatting Tips: Learn how to format titles, paragraphs, and lists for clarity and readability.
- Handling Limitations: Understand WordPad's constraints and workarounds to create professional reports.
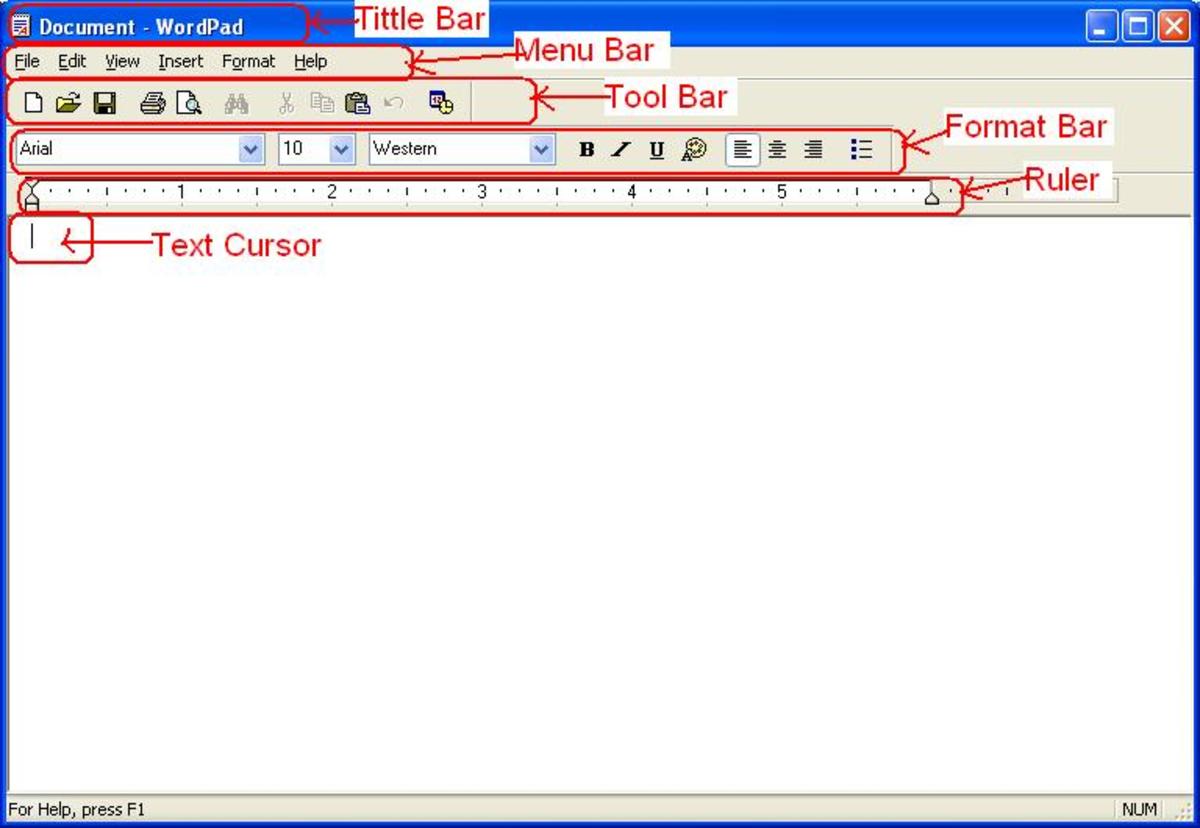
Introduction to WordPad
WordPad is a basic yet versatile word processing application included with Windows operating systems. While it does not have the full range of features found in advanced software like Microsoft Word, it remains a practical tool for creating simple reports, letters, and documents. This guide is designed to provide you with exhaustive steps and tips on how to create a well-structured report using WordPad, ensuring that even users with limited experience can produce a professional end product.
Step 1: Launching WordPad
Starting the Application
To begin your report, you first need to open WordPad:
Accessing WordPad on Your Computer
Using the Start Menu: Click on the Start button and type "WordPad" in the search bar. Once the application appears in the results, click on it to open.
Using the Programs List: Navigate to All Programs, then Accessories. Within this category, you will find WordPad. Click the icon to launch the application.
The startup process is quick and once open, you will see a clean interface that provides easy access to basic editing and formatting functions.
Step 2: Setting Up a New Document
Creating a Blank Workspace
Once WordPad is open, you have the option to start with a new document:
Opening a New Document
To ensure you are not editing a previous file, select File > New or press Ctrl + N. This action opens a blank page, ready to be transformed into your report.
Starting with a blank document prevents any formatting issues that might arise from residual styles and ensures a smooth workflow.
Step 3: Title and Introduction
Creating a Compelling Title
The title of your report is the first element readers will notice. To make a strong impact:
Formatting the Title
Position the title at the top of your document and apply formatting enhancements such as a larger font size, bold text, and center alignment.
Example instructions:
- Type your desired title, for example, "Annual Financial Analysis Report."
- Select the text, then choose a font size that stands out.
- Click the Center option in the Paragraph section to align the title centrally on the page.
Next, write an introductory paragraph that outlines the report’s purpose, the main topics you will cover, and a brief overview of the key findings or recommendations.
Step 4: Organizing Your Report into Sections
Structuring Content for Clarity
A well-organized report is divided into multiple sections, each serving a specific role:
Main Sections to Consider
It is recommended to break your report into the following sections:
- Introduction: Introduces the topic, objectives, and scope of the report.
- Body: Contains the detailed information, data analysis, findings, and discussions.
- Conclusion: Summarizes the key points and might include recommendations or a call to action.
- References: Lists sources of information if any data or external opinions are included.
While WordPad does not offer built-in styles for headings like more advanced processors, you can simulate section headers by manually adjusting the font size and weight.
Step 5: Adding and Formatting Content
Inputting Report Data and Insights
With your sections outlined, begin typing the content for each part of your report.
Formatting Text
WordPad provides a suite of basic formatting tools to control appearance:
- Font Styles: Choose from various fonts and sizes available in the toolbar. Adjust these to suit the style guidelines of your report.
- Text Decorations: Use bold, italics, or underlining to emphasize key points. For instance, bold any major findings or key statistics.
- Alignment Options: Align text left, center, or right to enhance readability.
These formatting tweaks ensure that your report is not only informational but also visually appealing.
Organizing with Lists
Lists are an effective way to break down complex information into digestible parts. WordPad allows you to create both bulleted and numbered lists:
- To create a list, click on the bullet or numbering option in the toolbar.
- Begin each list entry with a concise statement or fact.
- Use lists to highlight steps, data points, or key findings.
For instance, if you are listing the challenges faced during a fiscal year, a numbered list provides clear hierarchy and order.
Step 6: Inserting Visual Elements
Enhancing Your Report with Visuals
Visual elements such as images and manually created tables can significantly enhance the readability and impact of your report. However, WordPad has limitations when it comes to advanced visual formatting:
Inserting Images
To insert an image:
- Navigate to the “Insert” menu in the toolbar, then choose the option to insert a picture from a file.
- Select the desired image and adjust its size and position as necessary.
- Ensure that images complement the textual content and underscore the report’s message.
It is important to note that while WordPad supports basic image insertion, advanced positioning or text wrapping refinements available in other programs might not be possible.
Manual Table Creation
Unlike some word processors, WordPad does not support direct table insertion. However, you can simulate a table format using a monospaced font and keyboard characters, like so:
+------------+-----------------+----------------+
|  Column 1  |    Column 2     |   Column 3     |
+------------+-----------------+----------------+
|    Data    |      Data       |     Data       |
|    Data    |      Data       |     Data       |
+------------+-----------------+----------------+
This approach may require some finesse, and while it is not as flexible as dedicated table tools, it can be effective when used judiciously.
Step 7: Saving and Backing Up Your Report
Ensuring Data Security
Once your report is nearing completion, it is critical to save your work to avoid accidental data loss:
Saving Your Document
Within WordPad, you can save your document by selecting:
- File > Save As: Choose a location on your computer, a USB drive, or cloud storage.
- Choose an appropriate file format such as RTF (Rich Text Format), DOC, or TXT. RTF is usually the best option for maintaining formatting integrity across different systems.
- Regularly save while working to ensure minimal data loss in the event of a system error.
Follow good file management practices by including a clear filename and version number. For example, you might save your report as “Annual_Financial_Report_v1.rtf.”
Step 8: Finalizing and Printing Your Report
Review and Prepare for Distribution
Before finalizing your report, it is advisable to review every section for accuracy, formatting consistency, and overall readability. Use a second pair of eyes if possible to catch any oversights.
Printing Options
To print the report:
- Go to the File menu and select Print.
- Adjust the printer settings if needed (orientation, margins, etc.) before proceeding.
- Alternatively, you can save a digital copy in PDF format by using a virtual printer, enabling easy sharing via email or cloud storage services.
Even if the final version is to be distributed digitally, a printed version remains a useful tool for internal reviews or presentations.
Additional Tips for Enhanced Reporting
Maximizing the Usefulness of Your Report
Although WordPad is inherently basic, there are several strategies you can adopt to enhance your report's quality:
Utilize Consistent Formatting
Establish a uniform format for headers, subheaders, and body content throughout your report. This consistency aids in readability and gives your document a professional appearance.
Employ Section Dividers
To clearly separate different sections of your report without relying on automatic styles, use horizontal rules or several line breaks. This visually segments the content making it easier for readers to follow the flow of information.
Maintain a Logical Flow
Always consider your audience. Structure the report in a way that logically transitions from one section to the next, preemptively addressing potential questions and providing clear answers.
In situations where detailed numerical data are presented, consider manually inserting charts or data represented in tables (despite WordPad’s limitations) to enhance clarity.
Integrating a Comprehensive Table
Manual Table Representation in WordPad
Even though WordPad does not support direct table insertion, you can create the illusion of a data table by manually formatting text. Below is an example of how you might set up a data table manually:
| Section | Content Overview | Formatting Tip |
|---|---|---|
| Title & Introduction | Engaging title and purpose statement | Center-align text and use bold formatting |
| Body | Detailed facts, analysis, and discussion | Use clear headings and lists |
| Conclusion | Summarize key findings | Include recommendations and final insights |
| References | List of sources | Maintain uniform citation style |
This manual approach may require some creative formatting. Using a monospaced font like Courier New for these sections can help maintain alignment across the rows and columns.
Troubleshooting and Overcoming Limitations
Managing WordPad’s Constraints
Given that WordPad is designed as a basic tool, there are inherent limitations when compared to more advanced word processors:
Lack of Advanced Formatting Options
WordPad does not support advanced features such as style sheets, complex table tools, or automated formatting adjustments. If your report requires these features, you might consider drafting the document in WordPad and later transferring it to a more feature-rich editor. However, for many straightforward reports, WordPad’s capabilities are sufficient.
Limited Image and Object Insertion
While you can insert images, the editing options are relatively simple. For instance, you cannot perform detailed image cropping or advanced text wrapping within WordPad. To mitigate this, pre-edit images using dedicated software before inserting them into your report.
Despite these limitations, WordPad remains a reliable option for creating clear, effective reports when advanced formatting is not required.
Formatting and Final Touches
Ensuring a Professional Look
After you have filled the body of your report, take the time to format and review the content:
Finalizing the Document
Go through the following checklist to make sure your report is ready for presentation:
- Verify that the title is clear and stands out using larger fonts and bold text.
- Ensure each section is properly labeled, and clear breaks separate distinct parts of the document.
- Proofread for any spelling or grammatical errors. Since WordPad does not include an advanced spell-check tool, consider using an external tool or manually reviewing the text.
- Cross-check numerical data, figures, and any manually inserted tables to verify accuracy.
- Confirm that all images are appropriately sized and do not disrupt the text flow.
After verifying these details, save your final version once more. This careful review ensures that your report is not only informative but also visually coherent and professional.
References
- Help With WordPad in Windows 11 - iTechGuides
- Get Help With WordPad In Windows 11 - GeekChamp
- Ultimate Guide to Microsoft WordPad - Ask.com
-
Basics of WordPad - Microsoft Support
-
How to Use WordPad in Windows 10 - Windows Central
Recommended Further Queries
Last updated March 20, 2025