
Unlock Sustainable Living: Your Comprehensive Guide to Home Rainwater Harvesting
Discover how to build an efficient rainwater collection system using your existing downspouts, reducing water bills and boosting your environmental impact.
Key Insights into Rainwater Harvesting
- Strategic Planning is Paramount: Before starting, thoroughly assess your water needs, roof catchment area, and local regulations to design a system that truly meets your goals.
- Simplicity Meets Sustainability: A basic rain barrel system connected to an existing downspout is an accessible and highly effective starting point for homeowners.
- Quality and Maintenance Matter: Selecting appropriate materials and performing regular upkeep—like cleaning gutters and filters—are crucial for maintaining water quality and system longevity.
Harnessing rainwater from your home's roof through existing downspouts is a remarkably effective way to conserve water, reduce utility expenses, and contribute to environmental sustainability. This guide offers detailed, step-by-step instructions for establishing a rainwater collection system, from initial planning to ongoing maintenance. Whether you're aiming to water your garden, flush toilets, or even consider potable uses with advanced filtration, this system can be tailored to your specific needs.
Understanding Rainwater Collection Systems
A rainwater collection system captures precipitation from a catchment surface, typically your roof, and channels it into a storage container for later use. This process reduces stormwater runoff, minimizes reliance on municipal water supplies, and can significantly lower your water bills. These systems are scalable, ranging from a simple rain barrel for garden irrigation to complex setups with multiple cisterns and advanced purification for household use.
The Essential Components of a Rainwater Harvesting System
Understanding the core parts of a rainwater harvesting system is crucial for successful installation. Each component plays a vital role in ensuring efficient collection and storage of water.
Catchment Surface: Your Roof
Your home's roof acts as the primary collection area. The type of roofing material can influence water quality and collection efficiency. Smooth, non-absorbent surfaces like metal or slate are ideal because they maximize runoff and are less likely to leach contaminants. While asphalt shingles can be used, they may introduce chemicals and require more rigorous filtration if the water is intended for edible plants or indoor use.
Channeling System: Gutters and Downspouts
Gutters and downspouts are the arteries of your system, directing rainwater from the roof's edge to the storage unit. It's essential to ensure your gutters are clean, free of debris, properly sloped, and securely attached to channel water efficiently towards the chosen downspout location.
Pre-filtration: Leaf Screens and First-Flush Diverters
To maintain water quality and prevent clogging, pre-filtration is critical. Leaf screens on gutters stop larger debris like leaves and twigs. First-flush diverters are ingenious devices that bypass the initial flow of rainwater, which often contains accumulated dust, bird droppings, and other roof contaminants, ensuring cleaner water enters your main storage tank.
Storage Container: Rain Barrels and Cisterns
This is where your harvested water is stored. Options range from simple 55-gallon rain barrels, perfect for beginners and small-scale gardening, to large cisterns or IBC totes (275 gallons and up) for greater capacity or whole-house supply. Opaque containers are highly recommended to prevent sunlight penetration, which can foster algae growth.
Delivery System: Spigots and Pumps
Once collected, water needs to be delivered to its point of use. For basic systems, a spigot near the bottom of the barrel allows gravity-fed dispensing. For higher pressure needs, such as connecting to a hose or indoor plumbing, an electric pump may be necessary.
Treatment and Purification
The level of treatment depends entirely on the intended use of the water. For non-potable uses like garden irrigation, minimal to no treatment beyond screening may suffice. For potable (drinking) water or indoor uses (laundry, flushing toilets), multi-stage filtration, including sediment filters, carbon filters, and UV sterilization, is crucial to remove contaminants, odors, and bacteria. Such advanced systems can be a significant investment but ensure water safety.
Planning Your Rainwater Collection System
Careful planning is the cornerstone of an effective and sustainable rainwater collection system. This phase involves assessing your needs, understanding your environment, and complying with local regulations.
Determining Your Water Needs and Collection Potential
Before any construction begins, clarify how you intend to use the collected water. This decision will dictate the system's size, complexity, and necessary filtration.
Intended Water Use
Are you collecting water for garden irrigation, washing vehicles, flushing toilets, or potentially for potable use? Garden irrigation often requires the least treatment, while potable water demands rigorous purification, including filters and UV sterilization.
Calculating Catchment Area and Potential Yield
Your roof's surface area is directly proportional to the amount of water you can collect. A common rule of thumb is that approximately 0.62 gallons of water can be collected per square foot of roof for every inch of rainfall. To estimate your monthly collection potential, multiply your building's square footage by 0.62 and then by your area's average monthly rainfall. For example, a 1,000 sq ft roof in an area receiving 1 inch of rain can yield approximately 620 gallons.
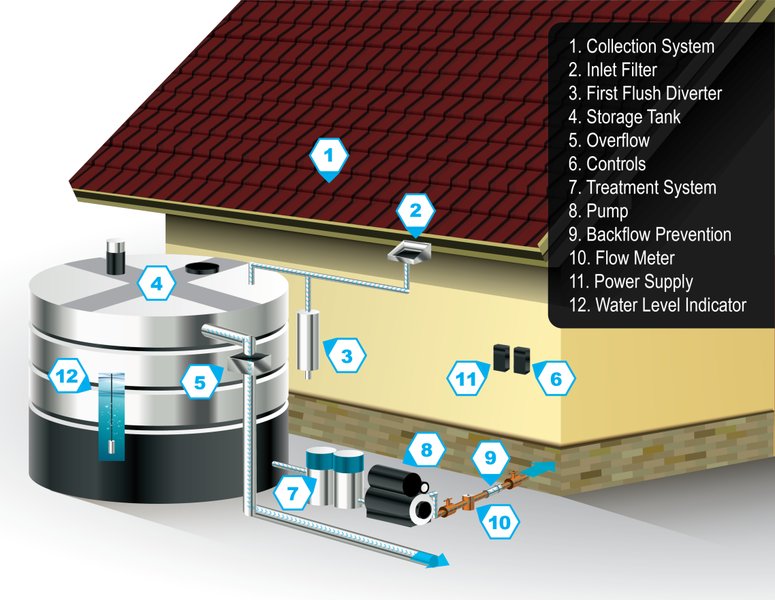
An illustrative diagram showcasing the various components of a comprehensive rainwater harvesting system.
Local Regulations and Safety
Before investing in a system, always check local regulations regarding rainwater harvesting. While it's legal and encouraged in many places, some areas may have restrictions or require permits. Additionally, ensure your system is designed with proper overflow mechanisms to prevent flooding and foundation damage, and to avoid creating breeding grounds for mosquitoes.
Essential Materials for Your System
Gathering the right materials is the next critical step. For a basic system using existing downspouts, focus on these key components:
| Component | Description | Purpose |
|---|---|---|
| Rain Barrel/Tank | 55-gallon food-grade barrels, IBC totes, or larger cisterns. Opaque is preferred. | Stores collected rainwater. |
| Downspout Diverter | Connects downspout to barrel; often has a shutoff valve. | Redirects rainwater from downspout into storage. |
| Leaf Screens/Filters | Mesh screens for gutters and barrel inlets. | Prevents leaves, debris, and insects from entering the system. |
| Sturdy Base/Stand | Cinder blocks or a custom platform. | Elevates the barrel for gravity flow and stability. |
| Spigot/Hose Bib | Connects to barrel for water dispensing. | Provides easy access to collected water. |
| Overflow Outlet/Pipe | Hose or pipe near the top of the barrel. | Directs excess water away from the foundation. |
| Flexible Piping/Hoses | Connects diverter to barrel and barrels in series. | Facilitates water transfer within the system. |
| Sealant (Optional) | Weatherproof tape or silicone. | Ensures watertight connections. |
Step-by-Step Installation Guide
This section provides a detailed installation process for a home rainwater collection system, focusing on integrating with existing downspouts. This approach is beginner-friendly and designed for efficiency.
Phase 1: Site and Gutter Preparation
Clear and Clean Gutters
Begin by thoroughly cleaning your existing gutters and downspouts. Remove any leaves, twigs, dirt, or accumulated debris. This ensures a clean flow of water and prevents contaminants from entering your collection system. Ensure gutters are properly angled towards the downspout you plan to use.
Select and Prepare Barrel Location
Choose a downspout location that is close to where you intend to use the water (e.g., your garden). The area should be level and free from overhanging trees that might drop excessive debris. Place your rain barrel on a sturdy, level base, such as cinder blocks, at least 1-2 feet off the ground. This elevation allows for easy access to the spigot and facilitates gravity-fed water dispensing.

A typical rain barrel setup, positioned on a sturdy base to allow for gravity-fed water dispensing.
Phase 2: Downspout Modification and Diverter Installation
Measure and Cut the Downspout
Measure the height at which the downspout diverter will be installed. This measurement is typically about 18-24 inches above the top of your rain barrel, allowing space for the diverter and connections. Carefully cut the downspout using a hacksaw or tin snips. Ensure the cut is clean and straight.
Install the Downspout Diverter
A downspout diverter is a critical component that intercepts rainwater from your downspout and redirects it into your barrel. Attach the diverter securely into the cut section of your downspout, following the manufacturer's instructions. Most diverters are designed for easy DIY installation and are compatible with common downspout sizes (e.g., 2"x3" or 3"x4"). Ensure all connections are watertight, using sealant or weatherproof tape if necessary. Many diverters include a shutoff mechanism to prevent overflow once the barrel is full or to direct water back into the regular downspout during winter.
This video demonstrates how to set up a rainwater collection system using a downspout rain barrel, detailing the process of installing a downspout diverter and connecting it to the collection barrel for efficient water harvesting.
Phase 3: Rain Barrel Setup
Connect the Diverter to the Barrel
Connect the outlet hose or pipe from the downspout diverter to the inlet hole on your rain barrel. Ensure this connection is snug and sealed to prevent leaks. Many barrels come with pre-drilled holes for this purpose.
Install Inlet Screen and Spigot
Fit a mesh screen or filter over the barrel's inlet hole. This acts as an additional barrier, preventing small debris, leaves, and mosquitoes from entering the collected water. Next, drill a hole near the bottom of the barrel (about 2-4 inches from the base to avoid sediment buildup) and install the spigot or hose bib tightly. Use a rubber washer and nut on the inside to ensure a watertight seal.
Set Up Overflow Mechanism
Near the top of your rain barrel, install an overflow outlet. This could be an open top or a pipe that directs excess water away from your home's foundation once the barrel is full. You can route this overflow pipe back into the original downspout drainage system or direct it to a rain garden or another designated area.
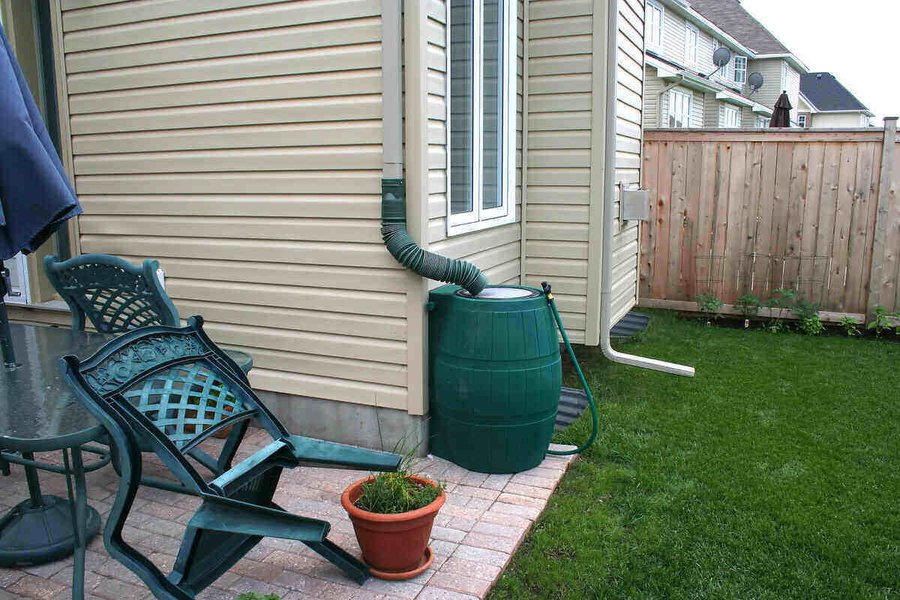
A close-up view of a rain barrel setup, illustrating the downspout connection and overflow pipe for efficient water management.
Phase 4: Advanced Considerations and Testing
Connecting Multiple Barrels (Optional)
To increase your storage capacity, you can connect multiple rain barrels in a series. Use hoses or pipes to link them, allowing water to flow from one barrel to the next once the first one is full. Install valves to isolate barrels for easier maintenance or specific water usage.
Incorporating Filtration and Pumps (Optional)
For higher water quality or to move water against gravity, consider adding more advanced components:
- First-Flush Diverter: As mentioned, this diverts the initial, most contaminated rainwater flow before it reaches your main storage.
- Sediment Filters: These remove fine particles and improve water clarity.
- Activated Carbon Filters: Essential for removing odors, chlorine, and some organic compounds, improving taste for certain uses.
- UV Sterilizers: Crucial for killing bacteria and viruses if water is intended for potable or sensitive indoor uses.
- Pumps: A small submersible pump can provide pressure for garden hoses or to move water to elevated points.
Testing the System
Once installation is complete, test your system. You can simulate rain by running a garden hose into your gutters. Observe if water flows correctly into the barrel, if there are any leaks in connections, and if the overflow mechanism functions properly. Check the spigot to ensure water dispenses smoothly.
Understanding System Performance Metrics
Evaluating the performance of your rainwater collection system involves considering several factors, including efficiency, reliability, and maintenance requirements. While exact metrics depend on individual setup and local conditions, the following radar chart provides a comparative overview of key performance aspects for basic versus advanced systems.
This radar chart visually compares the performance aspects of a basic rain barrel system with a more advanced system incorporating filtration and pumps. A basic system excels in ease of installation and maintenance but may have lower collection efficiency due to simpler diverters and offers non-potable water quality. An advanced system, while more complex to install and maintain, provides superior collection efficiency, significantly higher water quality suitable for diverse uses, and greater scalability for increased water demand.
Understanding System Scalability and Benefits
Rainwater harvesting systems are inherently scalable, meaning they can grow with your needs and resources. A basic rain barrel setup can serve as an excellent starting point, allowing you to gauge your water collection potential and actual usage before expanding to a more complex system.
The Modular Nature of Rainwater Systems
Beginning with a single 55-gallon rain barrel connected to a downspout is highly recommended. This allows you to experience the benefits of rainwater harvesting firsthand without significant upfront investment. If you find your demand for collected water increases, you can easily add more barrels in series, increasing your total storage capacity. This modularity means your system can evolve from simple garden irrigation to supplying a significant portion of your non-potable household water needs.
Expanding Your System
- Adding More Barrels: Connect multiple barrels to the same downspout or to different downspouts around your home.
- Larger Storage: Transition to larger cisterns (e.g., 275-gallon IBC totes or custom-built tanks) as your water demands grow.
- Advanced Filtration: Integrate multi-stage filters (sediment, carbon, UV) if you plan to use water for indoor purposes or desire higher quality.
- Pumping Solutions: Install pumps for pressurized delivery to various parts of your property or into your home's plumbing.
The Multifaceted Benefits of Rainwater Harvesting
Implementing a rainwater collection system offers a multitude of advantages beyond just reducing your water bill.
- Water Conservation: Reduces reliance on municipal water supplies, especially during droughts or peak usage times.
- Cost Savings: Lower utility bills due to decreased municipal water consumption.
- Environmental Impact: Minimizes stormwater runoff, which can reduce erosion and pollution of local waterways.
- Water Quality: Rainwater is naturally soft and free of chlorine and other chemicals found in treated tap water, making it excellent for plants and certain household uses.
- Emergency Preparedness: Provides an alternative water source during outages or emergencies.
- Sustainable Living: Promotes self-sufficiency and a smaller environmental footprint.
Maintaining Your Rainwater Collection System
Regular maintenance is essential to ensure your system remains efficient, safe, and provides high-quality water. Simple, routine checks can prevent common issues and prolong the life of your setup.
Routine Checks and Cleaning
- Gutter and Downspout Inspection: Regularly inspect and clean your gutters and downspouts, especially after heavy rains or during seasons with significant leaf fall. Remove any accumulated debris to ensure unobstructed water flow.
- Filter and Screen Maintenance: Check leaf screens on gutters and the inlet screen on your rain barrel monthly. Clean or replace them as needed to prevent clogging and maintain water quality.
- First-Flush Diverter Cleaning: If your system includes a first-flush diverter, ensure it is cleaned periodically to prevent buildup of contaminants and maintain its effectiveness.
- Storage Tank Cleaning: Periodically inspect the interior of your rain barrel or tank for sediment buildup or algae growth. For optimal water quality, it's recommended to empty and scrub the barrel every 3-6 months.
- Leak Detection: Regularly check all connections, pipes, and the barrel itself for any signs of leaks. Address any leaks promptly to prevent water loss and potential damage to your property.
Winterization in Colder Climates
In regions experiencing freezing temperatures, winterization is crucial to prevent damage to your system. Before the first frost:
- Drain Barrels: Completely drain all rain barrels and storage tanks.
- Disconnect Hoses: Disconnect any hoses or flexible piping connected to the system.
- Divert Downspout: Ensure your downspout diverter is set to bypass the collection system and direct water back into the regular drainage system to prevent ice from forming inside the barrels or pipes.
- Store Components: If possible, store smaller components like diverters and spigots indoors to protect them from extreme cold.
Mind Map of Rainwater Harvesting System Elements
This mind map illustrates the interconnected elements and considerations involved in setting up and maintaining a rainwater harvesting system, from fundamental components to operational aspects and benefits. It highlights the logical flow and relationship between various parts of the system.
Frequently Asked Questions (FAQ)
What is the best type of roof for rainwater collection?
How much water can I collect from my roof?
Can I drink collected rainwater?
How do I prevent mosquitoes from breeding in my rain barrel?
What should I do with my rainwater system in winter?
Conclusion
Building a rainwater collection system for your home using existing downspouts is a practical, sustainable, and rewarding endeavor. From conserving valuable resources and reducing utility bills to fostering environmental stewardship, the benefits are significant. By carefully planning your system, selecting appropriate components, diligently following installation steps, and committing to routine maintenance, you can establish an efficient and reliable source of water for various needs. This guide provides the comprehensive framework to empower you to embark on this eco-conscious journey, transforming rainfall into a valuable asset for your home and garden.
Recommended Further Exploration
- Explore advanced rainwater filtration systems for potable use.
- Investigate the cost-benefit analysis of large-scale rainwater harvesting.
- Learn about rainwater harvesting systems specifically designed for arid regions.
- Discover how to implement DIY gray water recycling systems for homes.
Referenced Search Results
 amazon.com