
Unlock Your Dream Pantry: A Step-by-Step Guide to Effortless Organization
Transform your kitchen chaos into culinary calm with smart strategies for your unique pantry layout.
Reorganizing your pantry can feel like a monumental task, but with a clear plan, it can transform your kitchen efficiency and make cooking a more enjoyable experience. Your pantry, with its base level and five shelves, offers ample opportunity for a well-structured system. This guide will walk you through the process step-by-step, providing ideas for sub-organizers tailored to your specific layout where middle shelves are most accessible, and the base and top shelf are least.
Quick Wins: Key Highlights for Pantry Perfection
- Strategic Zoning is Crucial: Assign items to shelves based on frequency of use. Everyday essentials belong on easily accessible middle shelves, while bulk and less-used items go on the base or top.
- The Power of Sub-Organizers: Utilize bins, baskets, turntables, and containers to maximize space, improve visibility, and keep similar items grouped together.
- Consistency and Maintenance are Key: Label everything clearly and schedule regular quick touch-ups to ensure your organized pantry stays that way.
Your Comprehensive Pantry Reorganization Blueprint
Follow these steps to systematically transform your pantry into a model of efficiency and order.
Phase 1: Preparation and Assessment
Step 1: Empty, Clean, and Evaluate
Begin by taking everything out of your pantry. This means every can, box, and bag from all shelves and the base level. As you remove items, it's a good idea to group them roughly by type on a large surface like your kitchen counter or dining table. This initial sort gives you a clear picture of what you have.
Once empty, thoroughly clean all surfaces. Wipe down shelves, walls, and the base level. This is also the perfect time to measure your shelves (depth, width, height between shelves) if you're considering new organizers. Standard pantry shelves are often 12-16 inches deep, but knowing your exact dimensions is crucial for choosing well-fitting solutions.
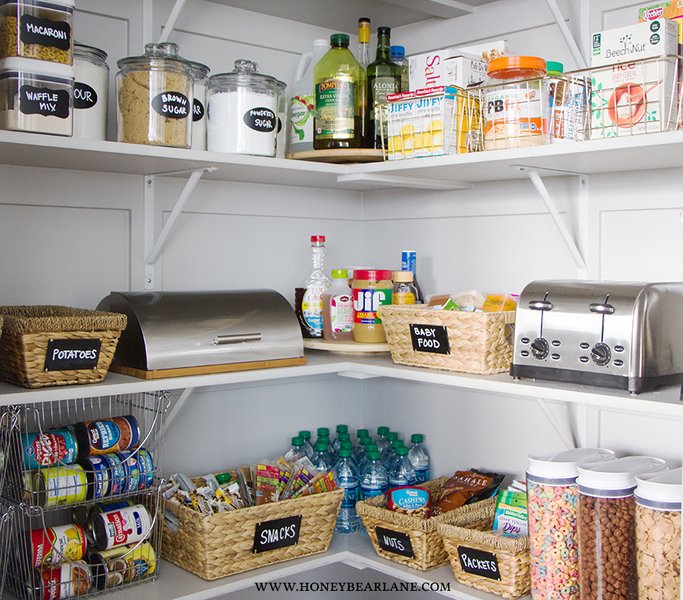
An example of a beautifully organized pantry showcasing clear containers and effective use of space.
Step 2: Sort, Categorize, and Declutter
With all items out, go through everything. Check expiration dates and discard anything that's past its prime or you know you won't use. Be honest with yourself – that specialty spice blend you bought three years ago and used once? It might be time to let it go.
Categorize your remaining items into logical groups. Common categories include:
- Canned goods (vegetables, fruits, soups, beans)
- Grains and Pasta (rice, quinoa, spaghetti, macaroni)
- Baking Supplies (flour, sugar, baking soda, chocolate chips)
- Oils, Vinegars, and Sauces
- Spices and Seasonings
- Snacks (crackers, chips, granola bars)
- Breakfast Items (cereals, oats, pancake mix)
- Back Stock (duplicates or bulk items)
This categorization will form the basis for your pantry "zones."
Phase 2: Strategic Zoning for Your Pantry Layout
Your pantry's layout (base, 5 shelves, middle most accessible, top/base least) is key. "Zoning" means assigning specific types of items to specific areas based on how often you use them and their physical characteristics (e.g., weight, size).
Shelf-by-Shelf Zoning Plan:
- Base Level (Least Accessible): Ideal for very heavy items (large bags of flour, pet food), bulky appliances you rarely use, or bulk back-stock items.
- Shelf 1 (Lower Shelf - Moderately Accessible): Good for other heavy items like large cans or jars, bottled water, or items you use weekly but not daily.
- Shelves 2 & 3 (Middle Shelves - Most Accessible): This is prime real estate! Store your most frequently used items here. Think everyday cooking oils, common spices, your go-to canned goods for quick meals, pasta, rice, and frequently grabbed snacks.
- Shelf 4 (Upper-Middle Shelf - Moderately Accessible): Suitable for lighter bulk items like breakfast cereals, baking supplies that aren't used daily, or less frequently accessed canned goods.
- Shelf 5 (Top Shelf - Least Accessible): Perfect for lightweight, infrequently used items. This could include special occasion baking supplies, seasonal items, paper goods, or items you want to keep out of reach of children.
Phase 3: Implementing Smart Storage Solutions
Once you have your zones planned, it's time to choose and implement storage solutions. The goal is to maximize visibility and accessibility.
Selecting Sub-Organizers for Each Zone:
The right organizers can make a world of difference. Consider these options for your different pantry zones:
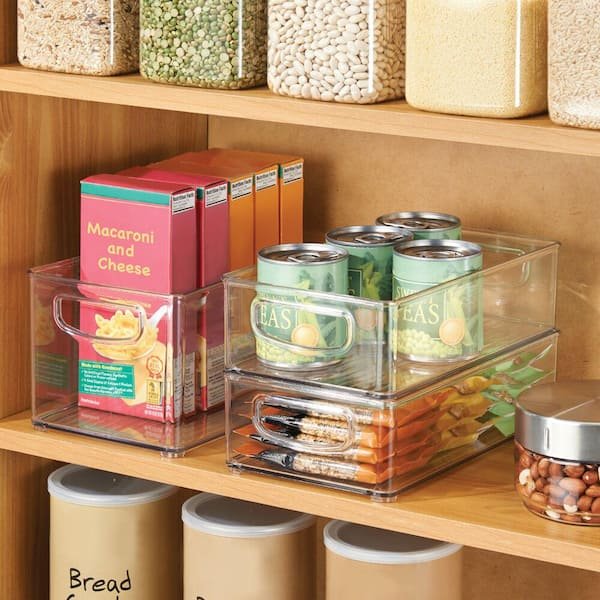
Clear bins enhance visibility and make it easy to grab what you need.
- Clear Airtight Containers: Essential for decanting dry goods like pasta, grains, cereals, flour, and sugar. They keep food fresh longer, allow you to see quantities at a glance, and stack neatly to save space, especially on middle and upper-middle shelves.
- Lazy Susans (Turntables): Perfect for corners or for grouping oils, vinegars, sauces, and spices on middle shelves. A quick spin brings items from the back to the front.
- Open-Front Bins or Baskets (Clear Plastic, Woven, or Wire): Great for grouping similar items like snack packs, baking mixes, or produce like onions and potatoes (ensure ventilation for produce). Handles make them easy to pull out like drawers. Use on middle or lower shelves.
- Tiered Shelf Organizers (Step Racks): Ideal for canned goods or spice jars. They elevate items in rows, so you can see everything without having to move front items. Excellent for middle or lower shelves.
- Deep Storage Bins (with or without lids): Suitable for the base level for back stock or bulky items. Clear ones help see contents, while lidded ones protect items on the top shelf from dust.
- Pull-Out Drawers or Baskets: If your shelves are deep, these can be game-changers, especially for lower shelves or the base, preventing items from getting lost in the back.
- Spice Racks: Whether it's a tiered rack, a drawer insert, or a door-mounted rack, organizing your spices will significantly speed up cooking. Place on a middle shelf or the pantry door.
- Over-the-Door Organizers: If your pantry has a door, utilize this often-overlooked space for spices, wraps, foils, or small, flat items.
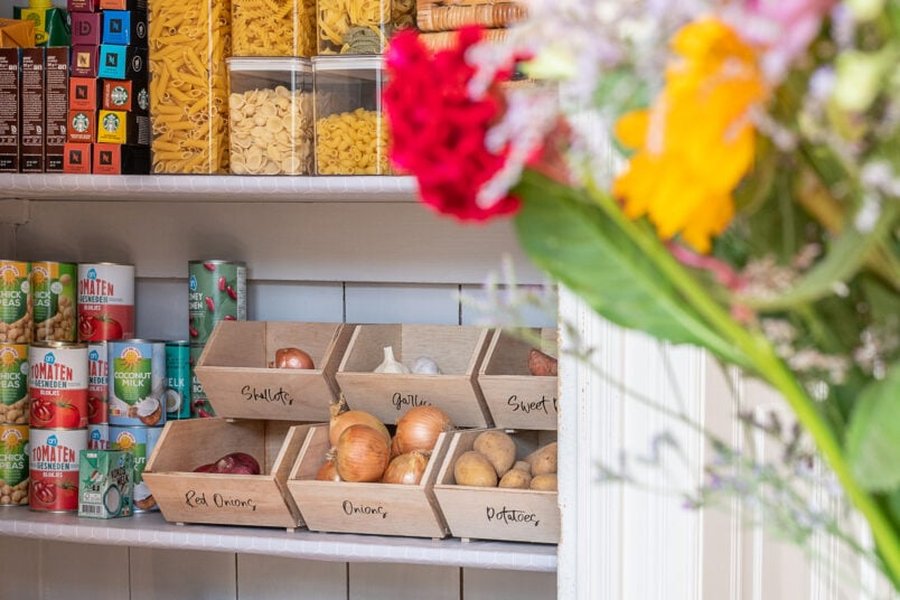
Stackable bins are excellent for maximizing vertical space on shelves.
Step 4: Arrange and Label
Place your chosen organizers in their designated zones and start filling them with your categorized items. As you arrange, think about visibility and ease of access. Group multiples of the same item together, like in a grocery store.
Labeling is non-negotiable for long-term success! Use a label maker, chalkboard labels, or simple adhesive labels on bins, containers, and even shelf edges. This helps everyone in the household find items and, more importantly, put them back in the correct spot.
Phase 4: Ongoing Maintenance
Step 5: Regular Upkeep
An organized pantry isn't a one-time project; it requires a little maintenance. When you put away groceries, take a few extra seconds to place items in their designated zones. Schedule a quick 15-20 minute tidy-up once a month to declutter any new additions, check expiration dates, and wipe down shelves as needed.
Visualizing Your Pantry Organization Strategy
This mindmap illustrates the key phases and considerations in achieving a perfectly organized pantry, helping you to visualize the entire process from start to finish and maintain long-term order.
(e.g., Cans, Grains, Snacks)"] id1_3["Declutter: Check Expiry Dates
& Remove Unused Items"] id1_4["Measure Shelf Dimensions
for Organizer Fit"] id2["Phase 2: Strategic Zoning by Accessibility"] id2_1["Middle Shelves (Most Accessible):
Daily Essentials, Frequent Use Items"] id2_2["Base Level (Least Accessible):
Heavy, Bulk, & Infrequent Use Items"] id2_3["Top Shelf (Least Accessible):
Lightweight, Seasonal, & Rare Use Items"] id2_4["Lower/Upper Shelves (Moderate Access):
Weekly Use Items, Secondary Staples"] id3["Phase 3: Smart Storage Solutions"] id3_1["Select Appropriate Organizers:
Clear Bins, Turntables, Tiered Racks"] id3_2["Implement Organizers & Arrange Items
Logically within Zones"] id3_3["Maximize Vertical Space:
Stackable Containers, Shelf Risers"] id3_4["Label Everything Clearly:
Bins, Containers, Shelves"] id4["Phase 4: Ongoing Maintenance"] id4_1["Regular Tidying & Restocking
During Grocery Put-Away"] id4_2["Monthly Review:
Declutter, Check Dates, Wipe Down"]
Choosing the Right Tools: Pantry Organizer Suitability
Different types of organizers offer varying benefits. This chart evaluates common pantry organizers based on key factors like visibility, accessibility, space efficiency, durability, and aesthetics, helping you choose the best options for your needs and preferences. Each factor is rated on a scale of 1 (Low) to 5 (High).
Pantry Shelf Organization Summary
This table provides a quick overview of how to best utilize each level of your pantry, from the base to the top shelf, including typical contents and recommended organizers for your specific setup.
| Shelf Level | Accessibility | Typical Contents | Recommended Organizers |
|---|---|---|---|
| Base Level | Least Accessible | Very heavy items (e.g., large bags of rice/flour, pet food), bulky/rarely used appliances, large back stock | Heavy-duty stackable bins (clear or solid), rolling bins, pull-out drawers/baskets, sturdy woven baskets |
| Shelf 1 (Lower) | Moderately Accessible | Other heavy items (e.g., large cans, jars, bottled beverages), less frequently used staples, some back stock | Deep bins (acrylic or wire), tiered can racks, sturdy baskets, stackable containers |
| Shelf 2 & 3 (Middle) | Most Accessible | Everyday items: cooking oils, spices, frequently used canned goods, pasta, rice, snacks, breakfast items | Clear airtight containers, lazy Susans, open-front bins, spice racks, drawer dividers, tiered shelf inserts |
| Shelf 4 (Upper-Middle) | Moderately Accessible | Lighter bulk items (e.g., cereals in boxes), baking supplies, less frequently used condiments, extra snacks | Stackable airtight containers, baskets (woven or plastic), shelf risers to create levels, clear bins |
| Shelf 5 (Top) | Least Accessible | Infrequently used items, seasonal goods (e.g., holiday baking supplies), lightweight overstock, paper goods | Lidded bins (to protect from dust), lightweight baskets, clearly labeled containers |
Watch and Learn: Pantry Organization Inspiration
Visual guides can be incredibly helpful. This video provides practical tips and inspiration for maximizing space and efficiency in your pantry, covering many of the techniques discussed. It demonstrates how to effectively declutter, categorize, and utilize various organizers to create a functional and beautiful pantry space.
The video, "Pantry Organization - Maximize Space and Efficiency | How to Organize a Pantry" by Home Organizing by Alejandra.tv, offers a comprehensive look at transforming a pantry. It showcases layout planning, selection of containers, and the importance of systems for long-term organization, which directly aligns with your goal of an efficient and orderly reshuffle.
Frequently Asked Questions (FAQ)
How often should I declutter and reorganize my pantry?
While a major reshuffle like this might happen every year or two, it's beneficial to do a mini-declutter and reorganization seasonally (every 3-4 months). A quick monthly check (15-30 minutes) to wipe shelves, check expiration dates, and ensure items are in their correct zones can prevent clutter from building up and keep your pantry efficient.
What's the best way to label containers and shelves?
The best labeling method is one that is clear, durable, and consistent. Popular options include:
- Label Makers: Produce neat, uniform, and water-resistant labels. Great for a polished look.
- Adhesive Labels (Pre-printed or Write-on): Widely available and come in various styles. Chalkboard labels allow for easy updating if contents change.
- Bin Clips with Label Inserts: Useful for baskets or bins where adhesive labels don't stick well.
- Permanent Markers (on some surfaces): Can be used directly on some plastic or glass containers. Ensure it's food-safe or use on the exterior only.
Always include the item name and, if decanting, the expiration date (you can write this on a small piece of masking tape on the bottom or back of the container).
How can I make the most of deep pantry shelves?
Deep shelves can be challenging as items at the back often get forgotten. Here are some solutions:
- Pull-Out Organizers: Bins, baskets, or drawers that slide out make it easy to access everything.
- Lazy Susans (Turntables): Allow you to rotate items from back to front.
- Long, Narrow Bins: Use several bins front-to-back. You can pull out one bin at a time to access its contents. Label the front of each bin.
- Store "Back Stock" Behind Front Stock: For items you have multiples of, place the newer ones at the back and older ones at the front (First-In, First-Out principle).
Should I decant all my dry goods into clear containers?
Decanting dry goods (like flour, sugar, pasta, cereal, rice) into clear, airtight containers has several benefits: it keeps food fresher for longer, makes it easy to see quantities, protects against pests, and creates a uniform, tidy look. However, it can be an investment in time and money for the containers.
Consider decanting items you use frequently or buy in bulk. For items you use less often or that come in convenient resealable packaging, decanting might not be necessary. It's a personal preference based on your goals for aesthetics, freshness, and convenience.
Recommended Next Steps & Deeper Dives
Continue your organization journey with these related topics:
- What are some creative storage solutions for pantries with limited space?
- How can I maintain an organized pantry consistently over time with minimal effort?
- What are the best eco-friendly and sustainable pantry organizer options available?
- What are the most effective tips and tools for organizing a large collection of spices?
References
This response was synthesized using information from various expert sources. For further reading, consider these resources:
 amazon.com
Last updated May 19, 2025