
Unlock the Secret to Bakery-Worthy Open Crumb Sourdough at Home
Your comprehensive guide to achieving that light, airy texture and those beautiful, irregular holes in your homemade sourdough bread.
Achieving a magnificent open crumb in your sourdough bread is often seen as the pinnacle of home baking. It refers to a loaf with a light, airy interior, characterized by large, irregular holes (alveoli) and a wonderfully soft, chewy texture. This isn't just about aesthetics; an open crumb signifies well-fermented bread with an optimal structure. This guide will walk you through the best methods and critical factors to help you bake sourdough bread with an enviable open crumb, right in your own kitchen.
Essential Insights for Sourdough Success
- A Thriving Starter is Non-Negotiable: Your sourdough journey begins with a vibrant, active starter, as its health directly fuels fermentation and gas production, crucial for an open crumb.
- Hydration and Fermentation are King: Higher dough hydration (water content) and meticulously managed bulk fermentation are the power couple behind those coveted airy pockets.
- Gentle Handling Preserves Perfection: From mixing to shaping, treating your dough with a light touch ensures the delicate gas bubbles, which form the open crumb, are retained.
The Core Pillars for an Exceptional Open Crumb
Creating sourdough bread with a fantastic open crumb is a symphony of well-orchestrated steps. Each element plays a vital role, and understanding their interplay is key.
The Indispensable Starter: Quality and Activity
The heart of your sourdough bread is its starter. A robust, active, and mature starter is paramount. It should be bubbly, have a pleasant aroma, and ideally, be used at its peak activity – typically a few hours after feeding when it has at least doubled in volume and passes the "float test" (a small dollop floats in water). A sluggish starter will result in poor fermentation and a dense crumb.
Feeding for Vigor
Regular feedings with quality flour and water maintain your starter's strength. If your starter seems weak, give it a few days of consistent, twice-daily feedings to boost its activity before you plan to bake.
Flour Power: Choosing the Right Base
The type of flour you use significantly impacts gluten development, which is essential for trapping gases. Bread flour, with a protein content of around 11-13%, is highly recommended. This higher protein content allows for a stronger gluten network capable of holding the large gas bubbles that create an open crumb. While all-purpose flour can be used, it may require adjustments in hydration and handling. Incorporating a small percentage (10-20%) of whole wheat or rye flour can add flavor and boost fermentation, but be mindful that higher proportions of whole grains can lead to a denser crumb unless techniques are adjusted for increased enzymatic activity and extensibility.
The Hydration Equation: Water's Role in Crumb Structure
Hydration refers to the ratio of water to flour in your dough. Higher hydration levels (typically 70-80%, or even higher for more experienced bakers) lead to a more extensible (stretchy) dough. This extensibility allows gas bubbles to expand more easily, resulting in larger, more open alveoli. While high-hydration doughs can be stickier and more challenging to handle, the payoff in crumb structure is often worth the effort.
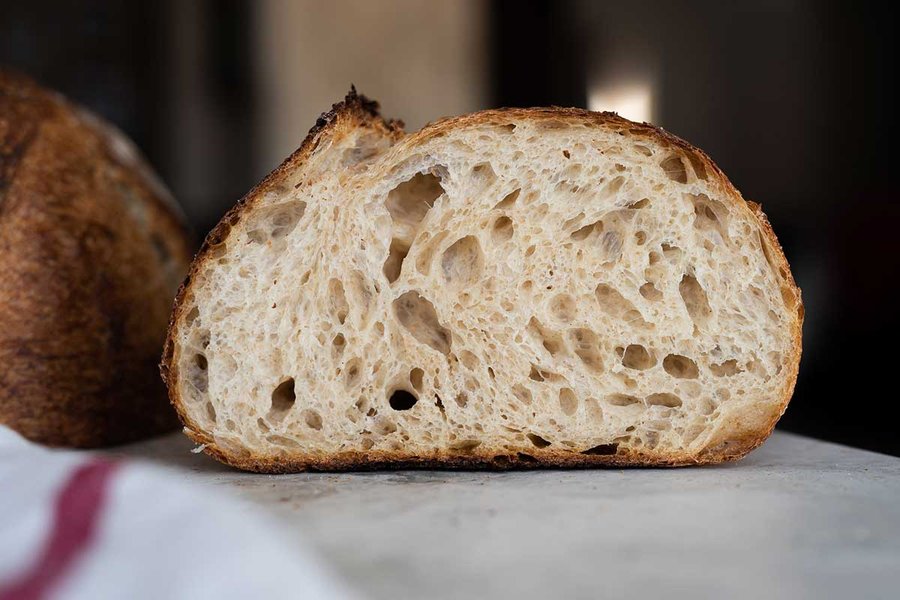
A visual example of the desirable open crumb structure in sourdough bread.
Building the Foundation: Mixing and Gluten Development
Proper gluten development is crucial for trapping the gases produced during fermentation.
Autolyse: The Gentle Start
Begin by mixing just your flour and water, letting this mixture rest for 30 minutes to an hour. This step, known as autolyse, allows the flour to fully hydrate and initiates enzyme activity, which starts gluten development without the interference of salt (which can tighten gluten) or starter. This results in a more extensible dough.
Incorporating Starter and Salt
After the autolyse, add your active starter and salt. Mix gently but thoroughly until they are fully incorporated. Salt not only adds flavor but also strengthens the gluten network and controls fermentation.
Stretch and Folds: Building Strength Gently
Instead of vigorous kneading, sourdough benefits from a series of "stretch and folds" during bulk fermentation. Every 30-60 minutes, gently stretch a portion of the dough up and fold it over itself. Repeat this from all four "sides" of the dough. This technique builds strength and structure while being gentle enough to preserve the developing gas bubbles. Some bakers also use lamination (stretching the dough very thin and folding it) early in bulk fermentation to build exceptional strength.
The Magic of Fermentation: Bulk Fermentation Insights
Bulk fermentation is arguably the most critical stage for crumb development. This is when the yeast and bacteria in your starter get to work, producing carbon dioxide gas that creates the airy pockets. The goal is to allow the dough to ferment until it has increased significantly in volume (often by 50-75%, though some aim for nearly double) and shows signs of good gas production (e.g., visible bubbles on the surface and a light, airy feel). "Reading your dough" is key – it should feel puffy, slightly domed, and pull away from the sides of the bowl slightly. It will be smooth and slightly tacky, but not overly sticky.
Time and Temperature
The duration of bulk fermentation depends heavily on ambient temperature and starter activity, typically ranging from 3 to 6 hours at room temperature (around 70-75°F or 21-24°C). Avoid under-fermentation (leading to a dense, tight crumb) and over-fermentation (which can cause the gluten structure to break down, resulting in a collapsed, gummy loaf).
The Art of Shaping: Preserving Air and Structure
Shaping is where you give your loaf its final form while creating surface tension that helps it hold its shape and rise well in the oven. Handle the dough gently throughout this process to avoid degassing it. A common approach involves a pre-shape (gently forming the dough into a loose round or oblong) followed by a 20-30 minute bench rest, then the final shape. When final shaping, aim to create good surface tension without being overly aggressive. Avoid overtightening, especially with well-developed and highly fermented dough, as this can compress the internal structure. A batard (oval) shape is often thought to promote a more open crumb compared to a boule (round).
The Final Ascent: Proofing to Perfection
After shaping, the dough undergoes its final proof. This can be done at room temperature or, highly recommended for enhanced flavor and often a better crumb, retarded in the refrigerator (cold proof).
Cold Proof (Retardation)
Proofing the shaped dough in a banneton or cloth-lined bowl, covered, in the refrigerator for 12-24 hours (or even longer) slows down fermentation. This extended period allows complex flavors to develop and can improve the gluten structure, contributing to a more open and well-defined crumb. It also makes the cold dough easier to score before baking.
Baking Brilliance: Achieving Oven Spring and Crust
The final transformation happens in the oven. Preheat your oven to a high temperature (450-500°F or 232-260°C) with your baking vessel (preferably a Dutch oven or a baking stone with a steam setup) inside for at least 30-45 minutes. Score the top of your dough with a lame or sharp blade just before baking. This allows the bread to expand controllably during the initial rapid rise known as "oven spring." Baking in a Dutch oven traps steam released from the dough, keeping the crust soft initially and allowing for maximum oven spring. Bake covered for the first 20-25 minutes, then remove the lid to allow the crust to develop a deep golden-brown color and crisp texture for another 15-25 minutes, or until the internal temperature reaches 205-210°F (96-99°C).
The Crucial Cool-Down
Resist the temptation to slice into your beautiful loaf immediately! The bread is still cooking internally as it cools. Cooling completely on a wire rack (for at least 1-2 hours, longer for larger loaves) allows the crumb structure to set. Slicing too early can result in a gummy, compressed texture.
Visualizing Sourdough Success: Key Factor Dynamics
The radar chart below illustrates the perceived impact and difficulty associated with key factors in achieving an open crumb. "Impact on Crumb Structure" rates how much each factor contributes to an airy loaf, while "Baker's Control Difficulty" reflects the challenge in mastering that specific element. Both are rated on a scale of 1 to 10, with 10 being the highest.
This chart highlights that while factors like precise bulk fermentation have a massive impact, they also present a greater challenge to perfect. Mastering these elements requires practice and observation.
The Sourdough Open Crumb Journey: A Mindmap
This mindmap provides a visual overview of the interconnected elements crucial for baking sourdough bread with an excellent open crumb. It traces the path from initial preparation to the final baked loaf, emphasizing key decision points and techniques along the way.
Understanding this journey helps in appreciating how each step contributes to the final texture and appearance of your sourdough bread.
Watch and Learn: Visualizing the Technique
Sometimes, seeing is believing (and learning!). The video below offers a comprehensive visual guide to making open crumb sourdough bread, which can be incredibly helpful for understanding the dough consistency and handling techniques discussed.
This video, "How To Make A Basic Open Crumb Sourdough Bread," provides an excellent overview that complements the details in this guide, especially regarding the hands-on aspects of the process.
Comparative Overview of Key Techniques
The table below summarizes how adjusting certain variables can influence the crumb structure and handling of your sourdough. Understanding these relationships can help you troubleshoot and refine your technique.
| Factor | Lower/Shorter Setting | Optimal Setting | Higher/Longer Setting (or Overdone) | Impact on Open Crumb |
|---|---|---|---|---|
| Dough Hydration | <65% | 70-80% | >85% (can be very challenging) | Denser crumb ➔ Airy, open crumb ➔ Potentially unmanageable dough, can lead to a flatter loaf if not handled expertly. |
| Starter Activity | Sluggish, recently fed or past peak | Peaked, very active, bubbly | Over-ripe, collapsing, very acidic | Poor rise, dense crumb ➔ Excellent rise, good gas production ➔ Weakened gluten, potentially poor structure. |
| Bulk Fermentation Duration (at moderate temp) | Under-fermented (e.g., <30-40% volume increase) | Optimally fermented (e.g., 50-75% volume increase, airy) | Over-fermented (e.g., >100% volume increase, soupy, collapsing) | Dense, tight, possibly gummy crumb ➔ Well-developed, open, and airy crumb ➔ Collapsed structure, gummy, overly sour. |
| Shaping Tension | Too loose, insufficient surface tension | Gentle but firm, creating good surface tension | Too tight, degassing the dough | Loaf may spread excessively, poor oven spring ➔ Good structure, supports oven spring ➔ Degassed, potentially tighter crumb. |
Frequently Asked Questions (FAQ)
Why is my sourdough crumb dense instead of open?
How important is the "float test" for the starter?
Can I get an open crumb with whole wheat flour?
Is a Dutch oven necessary for an open crumb?
How do I know when bulk fermentation is complete?
Conclusion
Achieving a sourdough bread with a very good open crumb at home is a deeply rewarding endeavor that combines science, art, and patience. It's an accumulation of many small, deliberate steps, from cultivating a potent starter to the final moments of cooling. By understanding and carefully managing factors like starter health, flour choice, hydration levels, fermentation dynamics, gentle handling, and baking conditions, you can consistently produce loaves with the light, airy texture and beautiful irregular holes that define exceptional sourdough. Embrace the learning process, pay attention to your dough, and don't be afraid to experiment. Each bake brings you closer to mastering this craft.
Recommended Further Exploration
- How does starter feeding schedule affect sourdough open crumb?
- Techniques for handling high hydration sourdough dough for beginners.
- The role of autolyse duration in sourdough gluten development and crumb structure.
- Advanced scoring patterns for maximizing oven spring in sourdough bread.
References
Last updated May 22, 2025