
The Ultimate Restaurant-Quality Chicken Biryani Recipe
Achieve authentic flavors and aromas with this comprehensive home-cooked biryani guide.
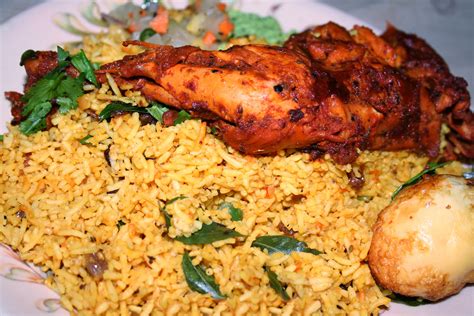
Key Takeaways
- Use high-quality, aged basmati rice for the perfect aroma and texture.
- Marinate the chicken thoroughly to ensure tenderness and rich flavor infusion.
- Employ the dum cooking technique to blend and enhance the layered flavors.
Introduction
Making restaurant-quality chicken biryani at home is a rewarding culinary endeavor that combines the richness of spices, the tenderness of marinated chicken, and the delicate fragrance of perfectly cooked basmati rice. This comprehensive guide will walk you through each step, ensuring you achieve an authentic and flavorful biryani that rivals your favorite restaurant's version.
Ingredients
For the Chicken Marinade
- 1 kg bone-in chicken pieces (thighs or drumsticks)
- 1 cup plain Greek yogurt
- 2 tablespoons ginger-garlic paste
- 1 teaspoon turmeric powder
- 1 tablespoon red chili powder (adjust to taste)
- 1 tablespoon garam masala powder
- 1 teaspoon cumin powder
- 1 teaspoon coriander powder
- 2 tablespoons lemon juice
- 2-3 green chilies, slit
- Salt to taste
For the Rice
- 3 cups high-quality aged basmati rice (aged for 1-2 years)
- 6 cups water
- 2 bay leaves
- 4 green cardamom pods
- 4 cloves
- 1-inch cinnamon stick
- 1 teaspoon caraway seeds (shahi jeera)
- 1 teaspoon salt
For the Onion Base (Birista)
- 3 large onions, thinly sliced
- ½ cup ghee or clarified butter
- ½ cup neutral cooking oil
Additional Ingredients
-
2 tomatoes, finely chopped
-
½ cup fresh mint leaves, chopped
-
½ cup fresh coriander leaves, chopped
-
1 teaspoon biryani masala (optional)
-
½ cup warm milk infused with saffron strands
-
2 tablespoons rose water or kewra water
-
4 tablespoons ghee, for layering
Step-by-Step Instructions
1. Marinate the Chicken
Start by preparing the marinade to infuse the chicken with rich flavors.
- In a large mixing bowl, combine the plain Greek yogurt, ginger-garlic paste, turmeric powder, red chili powder, garam masala powder, cumin powder, coriander powder, lemon juice, slit green chilies, and salt.
- Add the bone-in chicken pieces to the marinade and ensure each piece is thoroughly coated.
- Cover the bowl with plastic wrap and refrigerate for at least 4 hours, preferably overnight, to allow the flavors to permeate the meat.
2. Prepare the Rice
Properly cooked rice is essential for the perfect biryani.
- Rinse the aged basmati rice under cold running water until the water runs clear to remove excess starch.
- Soak the rinsed rice in water for 30 minutes, then drain.
- In a large pot, bring 6 cups of water to a boil. Add the bay leaves, green cardamom pods, cloves, cinnamon stick, caraway seeds, and salt.
- Add the soaked rice to the boiling water and cook until the rice is about 70-80% done, maintaining a firm texture. The grains should have a slight bite to prevent mushiness.
- Drain the partially cooked rice immediately and set aside.
3. Fry the Onions (Birista)
Caramelized onions add a sweet and crunchy texture to the biryani.
- Heat the ghee and neutral cooking oil in a heavy-bottomed pan over medium heat.
- Add the thinly sliced onions to the pan and fry until they turn golden brown and crispy. This process may take about 15-20 minutes.
- Once fried, transfer the onions to a plate lined with paper towels to absorb excess oil. Reserve half of the fried onions for garnishing.
4. Cook the Chicken
Cooking the marinated chicken properly ensures tenderness and flavor.
- In the same pan used for frying onions, add a tablespoon of ghee or oil if necessary.
- Add the marinated chicken pieces to the pan and cook on medium heat, stirring occasionally, until the chicken releases its juices and the masala begins to thicken, approximately 15-20 minutes.
- Add the finely chopped tomatoes to the chicken and continue to cook until the tomatoes soften and the gravy thickens further.
- Incorporate half of the reserved fried onions, chopped mint leaves, and chopped coriander leaves into the chicken masala. If using biryani masala, add it at this stage for enhanced flavor.
- Remove the chicken from heat and set aside.
5. Layering the Biryani
Layering is crucial for the dum cooking process, allowing flavors to meld together.
- Use a heavy-bottomed pot or a Dutch oven for layering to ensure even heat distribution.
- Start by adding a thin layer of ghee at the bottom of the pot.
- Spread a layer of the cooked chicken masala evenly across the bottom.
- Add a layer of the partially cooked basmati rice over the chicken.
- Drizzle a portion of the saffron-infused warm milk and a tablespoon of rose water or kewra water over the rice.
- Sprinkle half of the reserved fried onions, some chopped mint, and coriander leaves over the rice.
- Repeat the layering process with the remaining chicken masala, rice, saffron milk, rose water, and fried onions.
- Finish the top layer with a generous drizzle of ghee, the remaining fried onions, and a final sprinkle of chopped mint and coriander leaves.
6. Dum Cooking (Sealing and Steaming)
The dum cooking technique allows the biryani to steam and the flavors to blend perfectly.
- Seal the pot tightly with aluminum foil or a dough seal to trap the steam inside. Traditionally, dough is used to ensure a completely airtight seal.
- Place the sealed pot on a very low flame or preheat your oven to 180°C (350°F) and place the pot inside.
- Cook the biryani on low heat for 25-30 minutes. This slow-cooking process allows the rice to fully cook and absorb the flavors from the chicken and spices.
- After the cooking time, remove the pot from the heat and let it rest for an additional 10 minutes before opening.
7. Serve
Proper serving ensures that the biryani maintains its integrity and flavor.
- Gently fluff the biryani using a fork to mix the layers slightly without breaking the rice grains.
- Transfer the biryani to a serving platter, ensuring an even distribution of rice, chicken, and garnishes.
- Garnish with the reserved fried onions, fresh mint, and coriander leaves for an added burst of flavor and visual appeal.
- Serve hot with accompaniments such as raita (yogurt sauce), fresh salad, boiled eggs, or lemon wedges.
Essential Tips for Restaurant-Quality Biryani
1. Quality Ingredients
Using high-quality ingredients is paramount. Opt for aged basmati rice, which offers superior aroma and texture. Fresh, high-quality chicken, preferably bone-in pieces, ensures juiciness and robust flavor.
2. Proper Marination
Marinating the chicken for an extended period, preferably overnight, allows the spices to deeply penetrate the meat, resulting in tender and flavorful chicken.
3. Perfect Rice Cooking
Cooking the rice to 70-80% done ensures that it remains firm and separate after the dum cooking process. Overcooked rice can become mushy and lose its texture.
4. Caramelized Onions (Birista)
Frying onions until they are golden brown and crispy adds a sweet and crunchy element to the biryani. These onions also contribute to the overall depth of flavor.
5. Dum Cooking Technique
The slow-cooking dum process is essential for blending the flavors of the spices, chicken, and rice. Ensuring an airtight seal traps the steam, facilitating even cooking and flavor infusion.
6. Layering with Care
Layering the chicken and rice meticulously ensures that each bite delivers a balanced taste of spices, meat, and rice. Proper layering also contributes to the visual appeal of the dish.
7. Use of Saffron and Aromatics
Infusing warm milk with saffron strands adds a distinctive aroma and a subtle golden hue to the biryani. Additionally, incorporating rose water or kewra water elevates the fragrance, making the dish irresistibly aromatic.
8. Serving Suggestions
Serve the biryani with complementary sides like raita, fresh salad, boiled eggs, or lemon wedges to balance the rich flavors and enhance the dining experience.
Nutritional Information
| Component | Amount per Serving |
|---|---|
| Calories | 600 kcal |
| Protein | 30g |
| Carbohydrates | 80g |
| Fat | 20g |
| Fiber | 3g |
Frequently Asked Questions
1. Can I use boneless chicken for biryani?
While boneless chicken can be used, bone-in pieces are preferred as they add more flavor and retain moisture better during the cooking process.
2. How do I prevent the rice from becoming mushy?
Ensure the rice is only 70-80% cooked before layering. Additionally, refrain from stirring the biryani vigorously after layering to maintain the integrity of the rice grains.
3. Can I make biryani without using saffron?
Saffron imparts a unique aroma and color to the biryani. If unavailable, you can substitute with turmeric for color and a few drops of rose water or kewra water for fragrance.
4. How long should I marinate the chicken?
Marinate the chicken for at least 4 hours. For the best results, marinating overnight in the refrigerator allows the flavors to deeply infuse the meat.
5. What is the best way to store leftover biryani?
Store leftover biryani in an airtight container in the refrigerator for up to 3 days. Reheat gently on the stovetop or in the microwave, adding a splash of water if necessary to restore moisture.
Conclusion
Crafting the ultimate restaurant-quality chicken biryani at home is a blend of selecting the right ingredients, mastering the marination and layering techniques, and employing the dum cooking method. By following this comprehensive guide, you can create a biryani that boasts rich flavors, aromatic spices, and a perfect balance of textures, bringing the authentic taste of a renowned restaurant directly to your dining table.
References
Last updated January 19, 2025