
Empowering Your Energy: A Comprehensive Guide to Setting Up Six 200-Watt Solar Panels with Essential Protection
Unlocking Sustainable Power with Intelligent Fusing and Circuit Breaking for Optimal Safety and Performance
- Strategic Protection: Fuses and circuit breakers are critical safety components, safeguarding your solar system from overcurrents and short circuits, particularly at key points like between panels, panels and charge controller, and charge controller and batteries.
- Smart Wiring for Efficiency: For a 1200-watt (6 x 200W) array, combining series and parallel wiring can optimize voltage and current for your charge controller, enhancing system efficiency and stability.
- DIY Feasibility with Caution: While setting up a solar array can be a DIY project, it demands meticulous planning, adherence to safety protocols, and proper sizing of all components, including fuses, wires, and controllers, to ensure longevity and prevent hazards.
Setting up a solar panel system, especially one involving multiple panels like six 200-watt units, requires a thorough understanding of electrical principles, safety measures, and proper component integration. This comprehensive guide will walk you through the essential steps, with a particular focus on the critical role of fuses and circuit breakers in protecting your investment and ensuring a safe, efficient power supply. A 1200-watt solar array (six 200-watt panels) is a significant setup, capable of powering a substantial load, making safety precautions paramount.
Understanding Your 1200-Watt Solar Array
The Power of Six 200-Watt Panels
A 200-watt solar panel is a versatile component, often used in RVs, boats, and off-grid cabins due to its balance of power output and portability. When you combine six of these panels, you create a 1200-watt (1.2 kW) system. This capacity is capable of generating a considerable amount of electricity, typically ranging from 470 to 972 Watt-hours per day per 200-watt panel, meaning your 1200-watt array could produce 2820 to 5832 Watt-hours daily under ideal conditions. This makes it suitable for running various small home appliances and devices simultaneously, offering significant energy independence.
Key Considerations for Panel Selection
While this guide focuses on a 200-watt panel setup, it's worth noting that the actual performance can be influenced by factors like the time of day, seasonality, weather patterns, shading, and the orientation of your panels. High-efficiency solar cells are crucial for maximizing electricity conversion. When acquiring your panels, ensure they come with detailed specifications, including short-circuit current (Isc) and maximum series fuse rating, as these are vital for proper fusing.
The Indispensable Role of Fuses and Circuit Breakers
Safeguarding Your Solar System
Fuses and circuit breakers are non-negotiable safety devices in any solar PV system. Their primary function is to provide overcurrent protection, preventing wires from overheating and potentially causing fires or damaging expensive components like the charge controller, batteries, and inverter. In the event of a short circuit, overloading, or other fault, a fuse "blows" or a breaker "trips," interrupting the flow of electricity and isolating the fault. While some argue that fuses are not always strictly necessary between panels and the charge controller if specific conditions are met (e.g., array short circuit current is less than the panel's maximum series fuse rating), they are widely recommended for an additional layer of safety, especially in parallel configurations.
Fuses vs. Circuit Breakers: A Quick Look
Both fuses and circuit breakers serve the same protective purpose, but they operate differently. Fuses are single-use devices that melt and break the circuit when an overcurrent occurs, requiring replacement. Circuit breakers, on the other hand, are resettable switches that trip under fault conditions and can be reset manually or automatically once the fault is cleared. For DIY solar setups, circuit breakers are often preferred for their convenience in resetting, though both are effective when properly sized.
Strategic Placement of Protection Devices
For a robust and safe 1200-watt solar system, fuses or circuit breakers should be installed at several key points:
- Between Solar Panels (Parallel Connections): If you wire your panels in parallel, a fuse is required for each panel. This is critical because a short circuit in one panel can draw excessive current from the other parallel panels, potentially causing wires to overheat and ignite. For a 200-watt panel, the maximum series fuse rating is often around 15 amps. For panels in parallel, a 30-amp fuse might be needed for each panel if they are larger. A combiner box is typically used in parallel systems to house these individual fuses and a combined fuse leading to the charge controller.
- Between Solar Panels and Charge Controller: This fuse or breaker protects the wiring and the charge controller from overcurrent events. The size should be based on the maximum current generated by the solar array. According to the National Electrical Code (NEC), the maximum current for solar panels should be 1.25 times the short-circuit current (Isc) of the panels. An additional 1.25 safety margin is mandated by the NEC for protection devices, resulting in an effective oversizing of 156% (1.25 x 1.25) of the Isc.
- Between Charge Controller and Battery Bank: This fuse or breaker protects the wiring and the battery from short circuits and overloads. Its size should be rated to handle the maximum current output of the charge controller. For example, a 20-amp charge controller is adequate for a 200-watt solar panel setup, but if you plan to scale up, consider a higher-rated MPPT charge controller.
- Between Battery Bank and Inverter: This is typically the largest fuse or breaker in the system, protecting the inverter and the main battery cables from high current faults. Its size depends on the inverter's continuous amp draw and the nominal battery voltage.
- AC Breakers (for Grid-Tied or AC Loads): If you have an inverter converting DC power to AC for household appliances or grid connection, AC circuit breakers are necessary on the AC output side.
Fuses and breakers are typically only necessary on the positive side of the DC circuits. It is also highly recommended to include a manual disconnect switch for the solar panels to completely isolate them from the charge controller when needed for maintenance or safety.
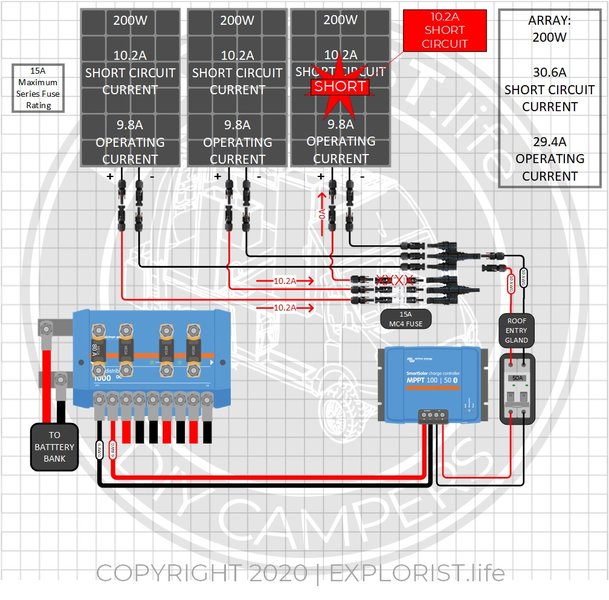
A comprehensive diagram illustrating fuse placement in a solar array.
Wiring Your Six 200-Watt Solar Panels
Series and Parallel Configurations
For a 1200-watt system comprised of six 200-watt panels, you'll likely use a combination of series and parallel wiring to achieve optimal voltage and current for your charge controller and battery bank. Understanding these configurations is crucial:
- Series Wiring: Connecting panels in series increases the total voltage while keeping the current the same. This is often beneficial for longer wire runs as it reduces voltage drop and allows for the use of thinner wires. For example, two 12V 200W panels in series would yield a 24V array.
- Parallel Wiring: Connecting panels in parallel increases the total current while keeping the voltage the same. This is ideal for maximizing power output at a specific voltage, especially if you have a 12V battery bank. However, parallel connections necessitate individual panel fusing due to the potential for reverse current in case of a fault.
Example Wiring for Six 200-Watt Panels
A common and efficient way to wire six 200-watt panels (assuming they are 12V nominal panels) for a 12V or 24V system would be to create strings of panels in series and then connect these strings in parallel. For instance:
- Option 1 (For 24V System): Wire three pairs of 200W panels in series (each pair totaling 400W at 24V). Then connect these three 24V strings in parallel to your charge controller. This would give you 1200W at 24V. Each of the three parallel strings would require a fuse.
- Option 2 (For 12V System with higher current): Wire two sets of three 200W panels in parallel (each set totaling 600W at 12V). Then connect these two 12V sets in parallel to your charge controller. This would give you 1200W at 12V. Each individual panel in the parallel configuration would require a fuse.
Always consult your panel's specifications for its maximum series fuse rating and short-circuit current (Isc) to accurately size your fuses and wires. For a 200-watt panel, a 15-amp maximum series fuse rating is common. Wire gauge is also critical; for a 200-watt solar panel up to 30 feet, 12 AWG (American Wire Gauge) is recommended to minimize power loss. For larger systems and longer runs, thicker wires (e.g., 8 AWG for 55 amps) will be necessary. Always use copper wiring with conduit for protection against weather and proper connectors.
Component Selection and System Integration
Beyond Panels: Charge Controllers, Batteries, and Inverters
A complete solar power system goes beyond just the panels. For your six 200-watt array, you'll need:
- Charge Controller: This device regulates the voltage and current from your solar panels, preventing overcharging of your batteries. For a 1200-watt array, an MPPT (Maximum Power Point Tracking) charge controller is highly recommended over a PWM (Pulse Width Modulation) controller, as MPPT controllers are more efficient, especially in varying light conditions, and can handle higher voltages from series-wired panels. A 20A controller might be adequate for a single 200W panel, but for a 1200W array, a much higher amperage controller will be needed (e.g., a 60A charge controller for a system with a 50A current output).
- Battery Bank: To store the generated electricity for use when the sun isn't shining, you'll need a battery bank. The size and type of batteries (e.g., deep-cycle lead-acid, lithium-ion) will depend on your energy consumption needs. For a 200-watt system, a 100 Ah battery could provide around 50 Amp-hours of usable power, so for a 1200-watt system, you would need significantly more capacity.
- Inverter (Optional for AC Loads): If you plan to power standard household AC appliances, an inverter is necessary to convert the DC electricity from your batteries into AC.
Essential System Components and Their Ratings
The following table summarizes key components and their typical considerations for a 1200-watt solar setup:
| Component | Purpose | Sizing Consideration (for 1200W array) |
|---|---|---|
| Solar Panels (6 x 200W) | Convert sunlight into electricity | Total 1200 Watts. Individual panel Isc (e.g., ~10-12A for 200W 12V panel) and Max Series Fuse Rating (e.g., 15-20A). |
| Fuses/Circuit Breakers | Overcurrent protection | Between Panels (Parallel): Based on panel Isc, often 30A per panel if 50W+. |
| Charge Controller | Regulates power flow to batteries | MPPT recommended. Amperage capacity should exceed max current from solar array (e.g., 60-100A for 1200W array depending on voltage). |
| Battery Bank | Stores electrical energy | Capacity (Ah) determined by daily energy consumption and days of autonomy. Multiple batteries in series/parallel. |
| Inverter | Converts DC to AC power | Wattage rating to match or exceed peak AC load (e.g., 1500W-3000W for household appliances). |
| Wiring | Transfers electrical current | Gauge (AWG) selected based on current, distance, and permissible voltage drop. (e.g., 12 AWG for 200W up to 30ft, thicker for higher current/longer runs). |
| Combiner Box | Houses fuses/breakers for parallel connections | Required for parallel arrays to manage multiple strings and house protection. |
The Installation Process: A Step-by-Step Overview
From Planning to Power Generation
Installing a solar system, especially one of this size, requires careful planning and execution. While a DIY approach is possible, it involves working with electricity and potentially at heights, so safety precautions are paramount. Always consider consulting with or hiring a licensed professional for parts of the installation, especially for grid-tied connections or if you're unsure about any electrical work.
Step-by-Step Installation Guide:
- Site Assessment and Planning:
- Determine the ideal location for your panels, ensuring maximum sunlight exposure (minimum 5-6 hours daily) and minimal shading from trees, buildings, or chimneys.
- Calculate your energy needs to ensure the 1200-watt system is sufficient.
- Check local regulations and obtain any necessary permits.
- Mounting the Panels:
- Install industrial-strength racking brackets securely. For ground-mounted panels, installing them at least 6 feet above ground level can offer protection.
- Ensure panels are securely mounted to withstand wind and other environmental factors.
- Wiring the Solar Panels:
- Decide on your series/parallel configuration based on your charge controller and battery bank voltage.
- Connect the panels using appropriate MC4 connectors. For two 200W panels, a common approach is two 100W panels with MC4-comparable T-branch connectors.
- Install inline fuses as determined by your wiring configuration, especially for parallel connections.
- Connecting to the Charge Controller:
- Crucial Safety Step: Always connect the battery to the charge controller first, and then the solar panels to the charge controller. This ensures the controller can sense the battery voltage and properly regulate charging.
- Install the appropriately sized fuse or circuit breaker between the solar array and the charge controller.
- Connecting to the Battery Bank:
- Connect your battery bank to the charge controller.
- Install the necessary fuse or circuit breaker between the charge controller and the battery bank.
- Connecting the Inverter (if applicable):
- Connect your inverter to the battery bank.
- Install the required fuse or circuit breaker between the battery bank and the inverter.
- Grounding and Safety Checks:
- Properly ground all components of your solar system according to electrical codes.
- Install surge protection devices, especially before the main breaker and service disconnect on the line side, to protect against lightning strikes.
- Double-check all connections for tightness and correct polarity.
- Use safety gear, including work gloves, eye protection, and fall protection if working on a roof.
- System Activation and Monitoring:
- Once all connections are verified, safely activate your system.
- Monitor performance to ensure optimal operation. Consider a professional monitoring system to track panel performance and identify issues.
Here's a video that demonstrates wiring a solar electrical system, which can provide valuable visual guidance:
A helpful guide on wiring solar panels to a breaker box.
Optimizing Solar System Performance and Safety
Beyond the Initial Setup
Once your six 200-watt solar panel system is operational, ongoing maintenance and awareness of potential issues are key to ensuring its longevity and efficiency. Regular cleaning of panels is important as dirt, dust, and debris can significantly reduce energy generation. Inspections every two years, or whenever a performance drop is noticed, are recommended.
Common Challenges and Solutions
- Overheating: Flexible solar panels glued directly to roofs can overheat. Portable or properly mounted rigid panels are recommended.
- Fuse Failures/Breaker Trips: Repeated failures indicate a deeper issue, such as improper sizing, a short circuit, or an overloaded component. Professional consultation is advised.
- Theft and Damage: Solar panels are valuable. Consider security measures like locking fasteners, installing at a minimum height for ground mounts, and advanced CCTV systems. Protective covers and lightning rods can mitigate damage from adverse weather.
Performance Considerations for a 1200-Watt System
Achieving Peak Energy Output
The actual energy generated by your 1200-watt solar array will depend on several factors, including peak sun hours in your location. For example, a 200-watt panel can produce 10 to 12 amps of energy per hour in direct sunlight. Over a day, this can translate to 60 to 100 Amp-hours. In winter months with fewer peak sun hours, this output will decrease significantly. Maximizing your panel's power involves ensuring they are exposed to full sunlight, avoiding local shadowing, and keeping them clean. Connecting multiple 200W panels in rows, as you are doing with a 6-panel setup, allows for significant power generation, potentially up to 840 watts from multiple panels when properly configured and exposed.
System Robustness and Efficiency Radar Chart
To visualize the various aspects of system robustness and efficiency, consider the following radar chart. This chart helps illustrate how different components and design choices contribute to the overall performance and safety of your 1200-watt solar panel setup.
Frequently Asked Questions (FAQ)
Does a solar panel setup absolutely need fuses or breakers?
Where exactly should fuses or circuit breakers be placed in a solar system?
How do I size fuses for my six 200-watt solar panels?
Can I mix different types of solar panels in my 1200-watt system?
What type of wiring should I use for a 1200-watt solar panel system?
Conclusion
Setting up six 200-watt solar panels to create a 1200-watt solar power system is a rewarding endeavor that can provide significant energy independence. The backbone of a safe and reliable system lies in the diligent implementation of fuses and circuit breakers at every critical juncture. By carefully planning your wiring configurations (series and parallel), selecting appropriately sized components—from charge controllers and batteries to inverters—and adhering to established safety protocols, you can ensure your solar investment delivers clean, sustainable energy for years to come. Remember, while DIY installation is feasible, understanding the electrical principles and knowing when to seek professional assistance are key to a successful and secure solar setup.
Recommended Further Reading
- How to select the right charge controller for a 1200W solar array
- Calculating battery bank size for off-grid solar systems
- Best practices for solar panel maintenance and cleaning
- Understanding voltage drop in solar panel wiring
